One of the primary purposes of information technology teams in organizations is to ensure the availability of resources on file servers at the highest possible speed and efficiency in a High Availability (HA) and secure architecture. In systems where the Distributed File System (DFS) infrastructure is not established, the maintenance, management, monitoring and backup operations of files and folders, in short, resources in distributed organizations, become difficult. For this reason, since many large organizations can have dozens of file servers distributed geographically in different locations, it is important to use these files in the most efficient way, not to cause many problems and difficulties for users trying to access the files, and even to provide backup of shared files.
I want to state that it will be a long essay. Because in the light of this information, you will be able to create DFS High Availability (DFS-HA) structure in your environment without any problems.
My topology has been designed as it is seen in the following;
The topology will be built on the "Home Folders" structure, which is used in corporate companies to keep the user profile folders on the Server instead of the users' local computers. In this way, I will also have performed a Distributed File System (DFS) High Availability Test.
NOTE: The structure of my topology in my essay is configured on the Windows Server 2016 operating system.
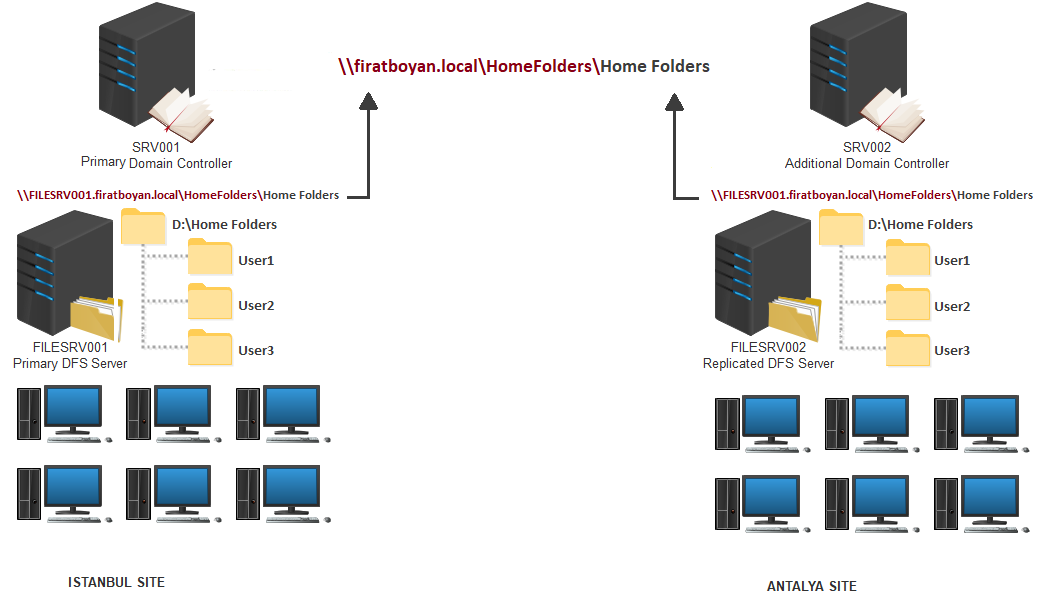
According to this structure, there is an Active Directory Site structure divided into Istanbul Site and Antalya Site in my domain environment, each Site has a Domain Controller and a File Server. My purpose is creating a Namespace on these DFS Servers and configuring them to work in replication with each other and providing an uninterrupted access to the resources with High Availability (HA) after the installation of DFS on File Servers.
Installing DFS- Distributed File System Role on Primary DFS
I will first perform installation action of DFS- Distributed File System Role on the server with the host name of FILESRV001, which is the primary DFS Server.
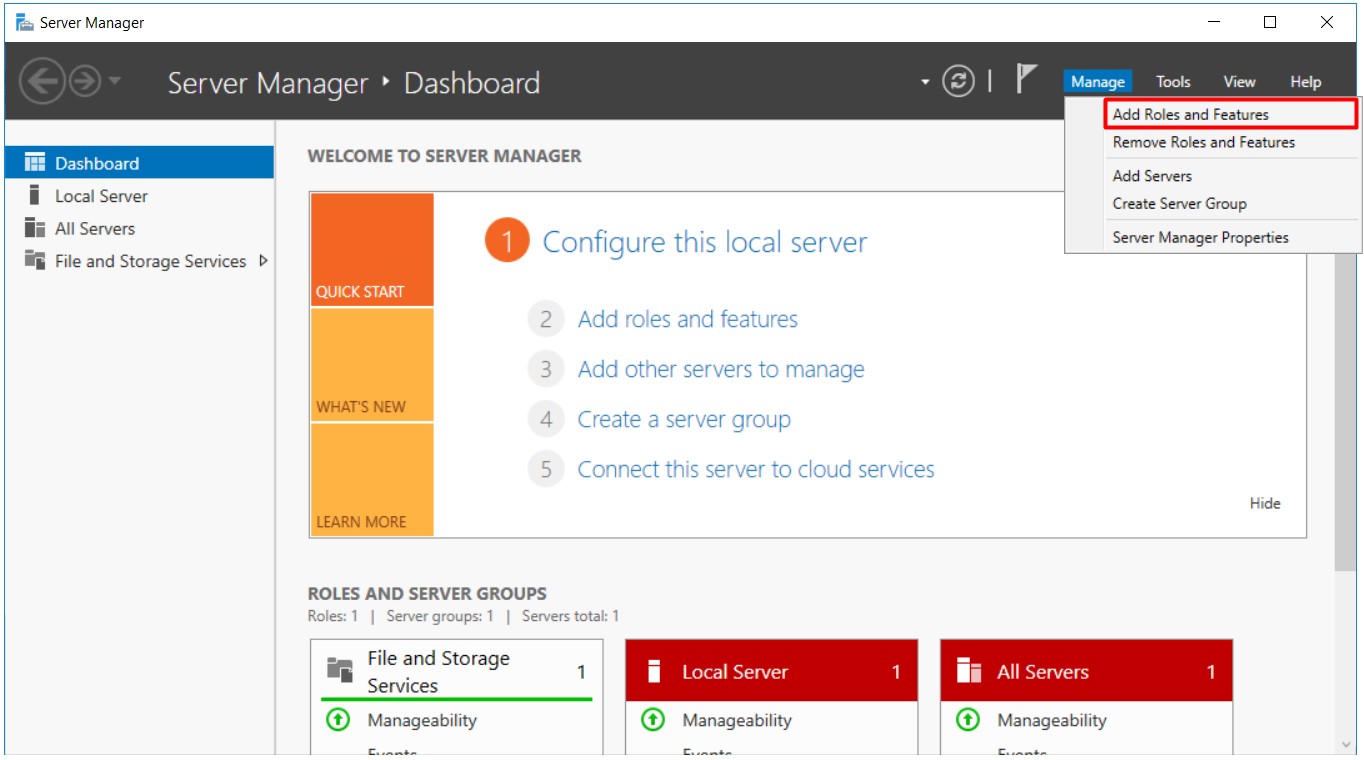
1- I am clicking on Manage> Add roles and Features through the Server Manager console, on the Dashboard screen. It is also possible for us to open the add roles wizard through Add Roles and Features in the Quick Start tab in the middle of the Dashboard screen.
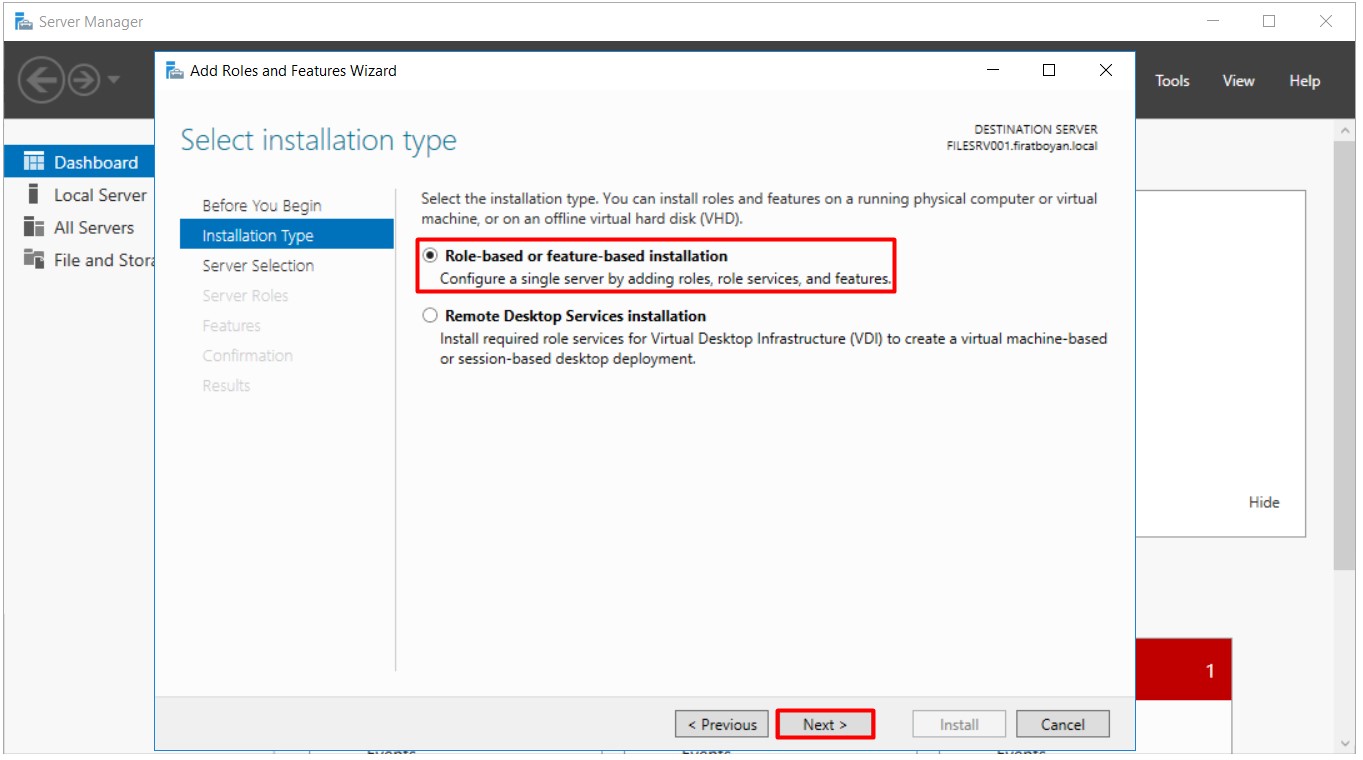
2- I am proceeding by pressing on the Next button while Role-based or Features-based Installation option is selected in the Select Installation Type step.
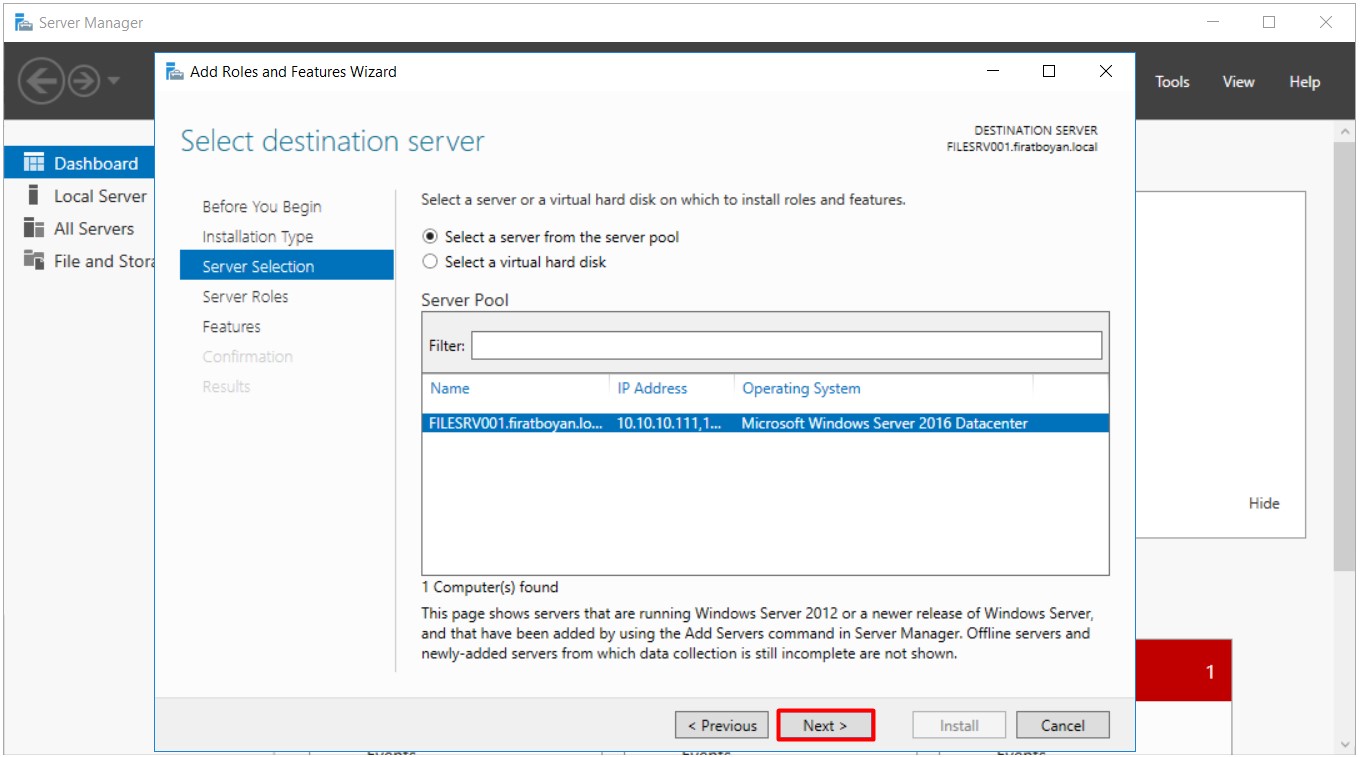
3- I need to select the Server on which the installation will be made in the Select destination Server step. Since I will configure it by installing the Distributed File System (DFS) Role under File and Storage Services on FILESRV001, I am selecting this Server and proceeding the configuration by clicking on the Next button.
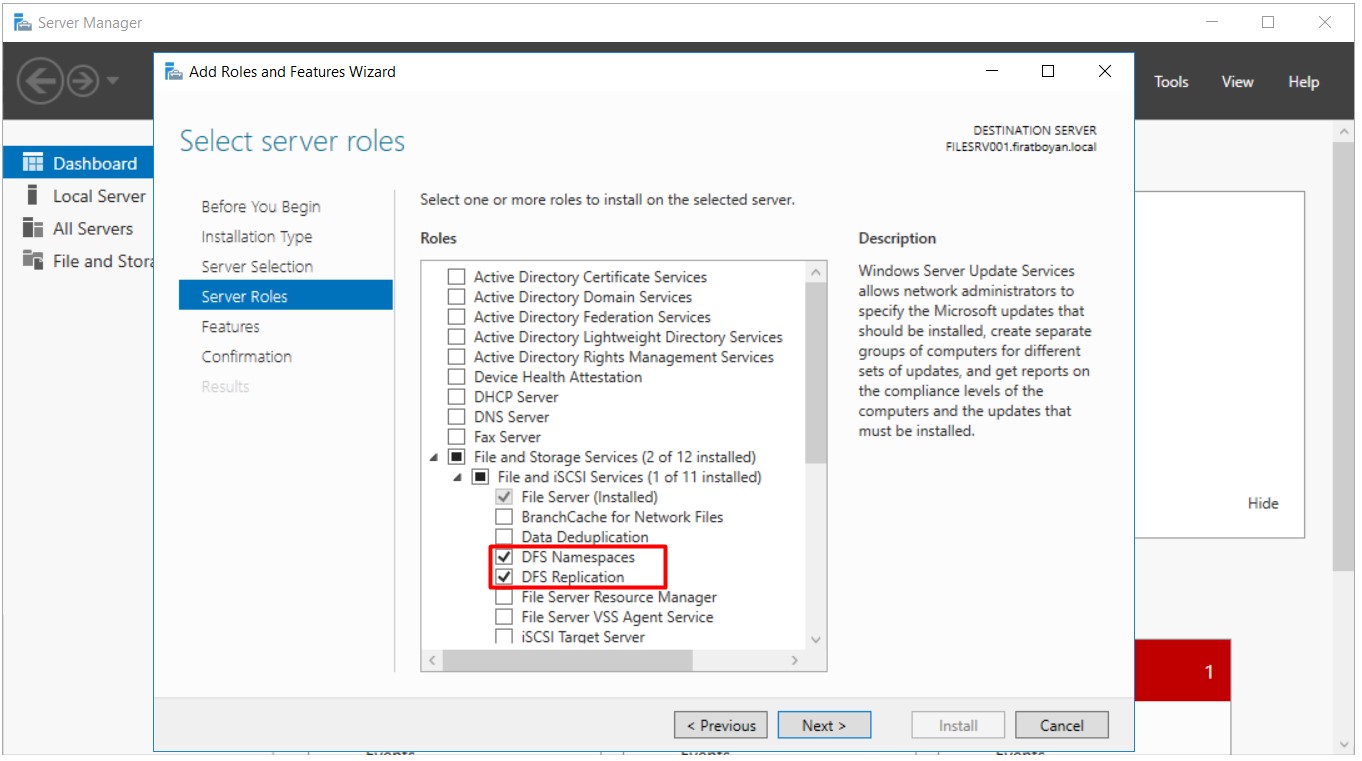
4- I am selecting the DFS Namespaces (DFS-N) and DFS Replication (DFS-R) features under the File and Storage Services role in the Select Server roles step.
DFS Namescpace (DFS-N): Allows grouping of shared folders located on different Servers into one or more logically structured namespaces. While DFS Namespace offers a structure with a root share folder in the root directory and a number of sub-shares under it, it appears as a single shared folder. Sub-sharing folders, that is, sub-shares, can be found in different servers and locations.
DFS Replication (DFS-R): It is a feature that synchronizes files between LAN and WAN network connections. It supports DFS Replication scheduling and bandwidth reduction, updating only the parts of files that have changed after the last replication. You can use DFS Replication feature with DFS Namespace or alone.
5- Since I do not need any additional feauture installation for DFS Namespaces (DFS-N) and DFS Replication (DFS-R) features in the Select features step. I am proceeding the configuration by clicking on the Next button.

6- I am starting the installation of DFS Namespaces (DFS-N) and DFS Replication (DFS-R) features by clicking on the Install button in the Confirm installation selections step.
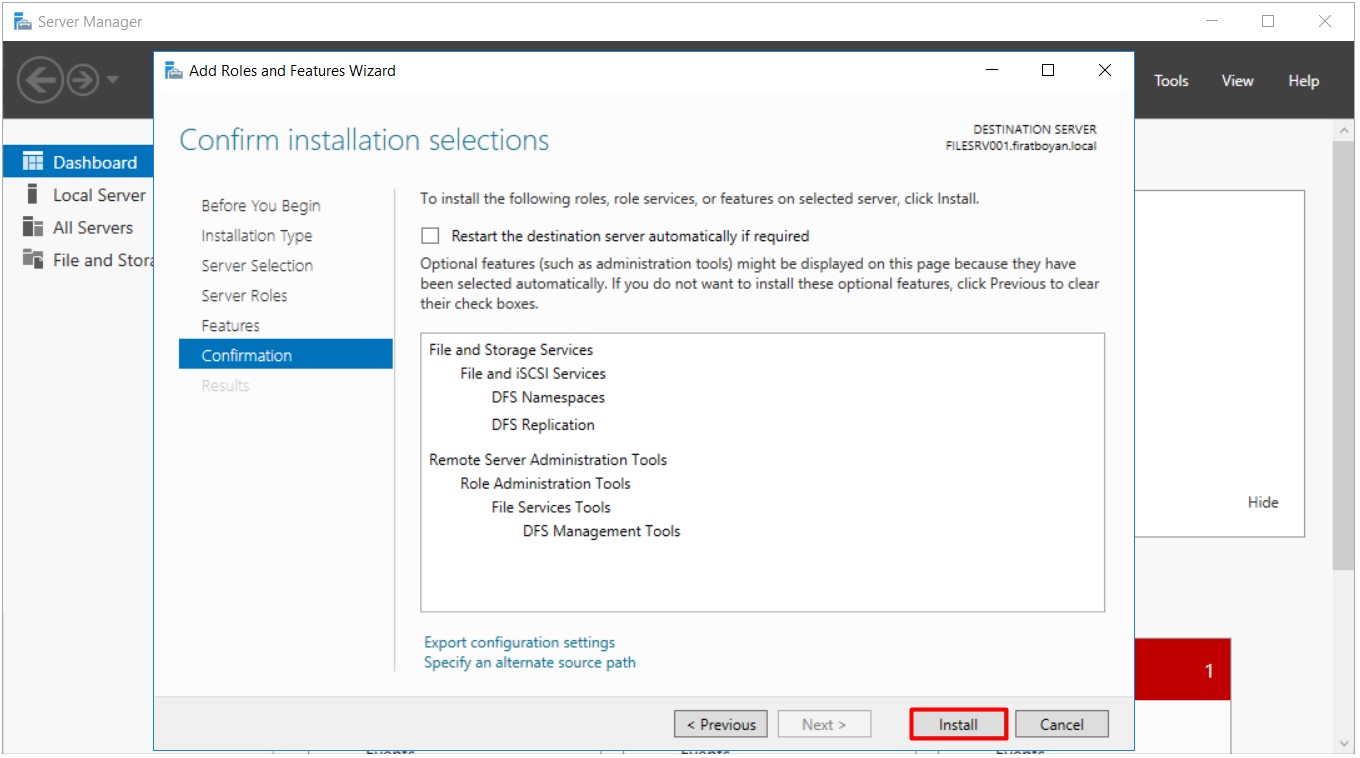
7- I am starting the installation of DFS Namespaces (DFS-N) and DFS Replication (DFS-R) features under File and Storage Services by clicking on the Install button.
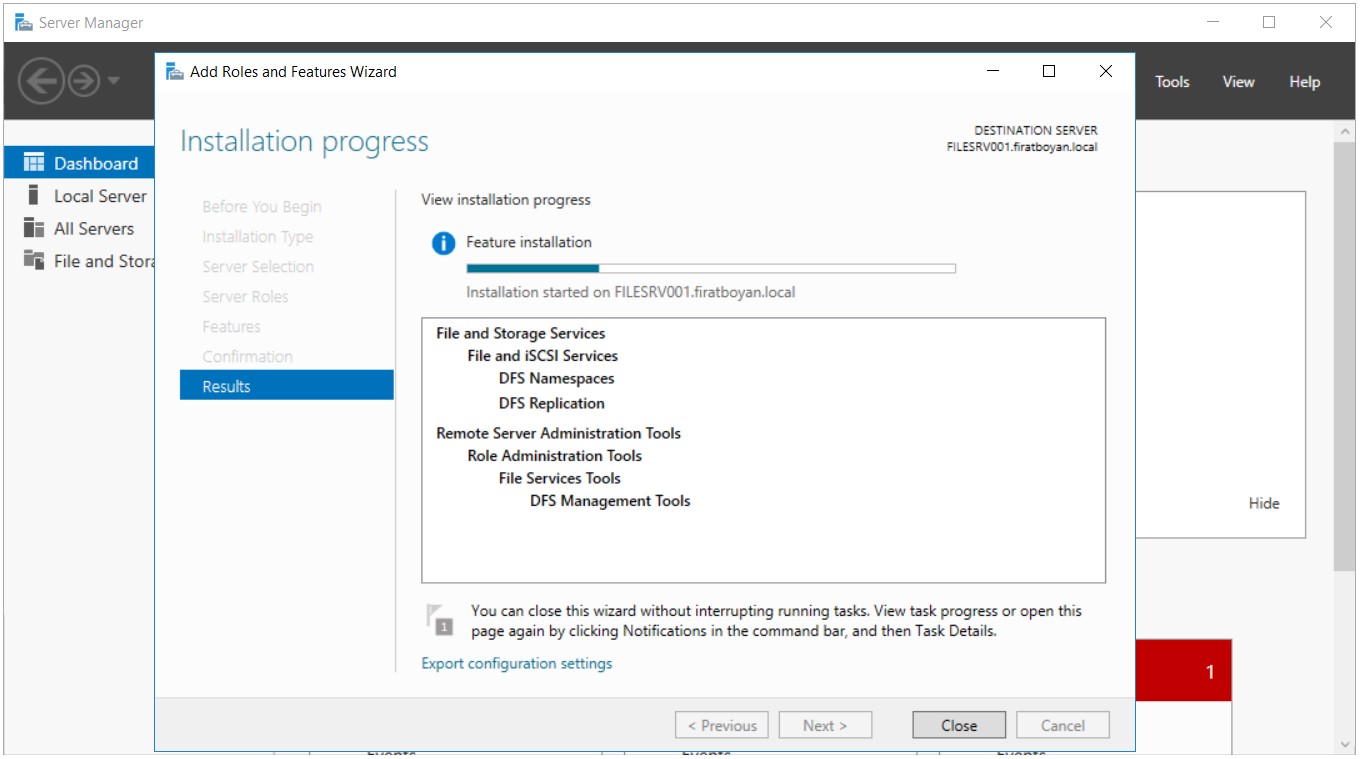
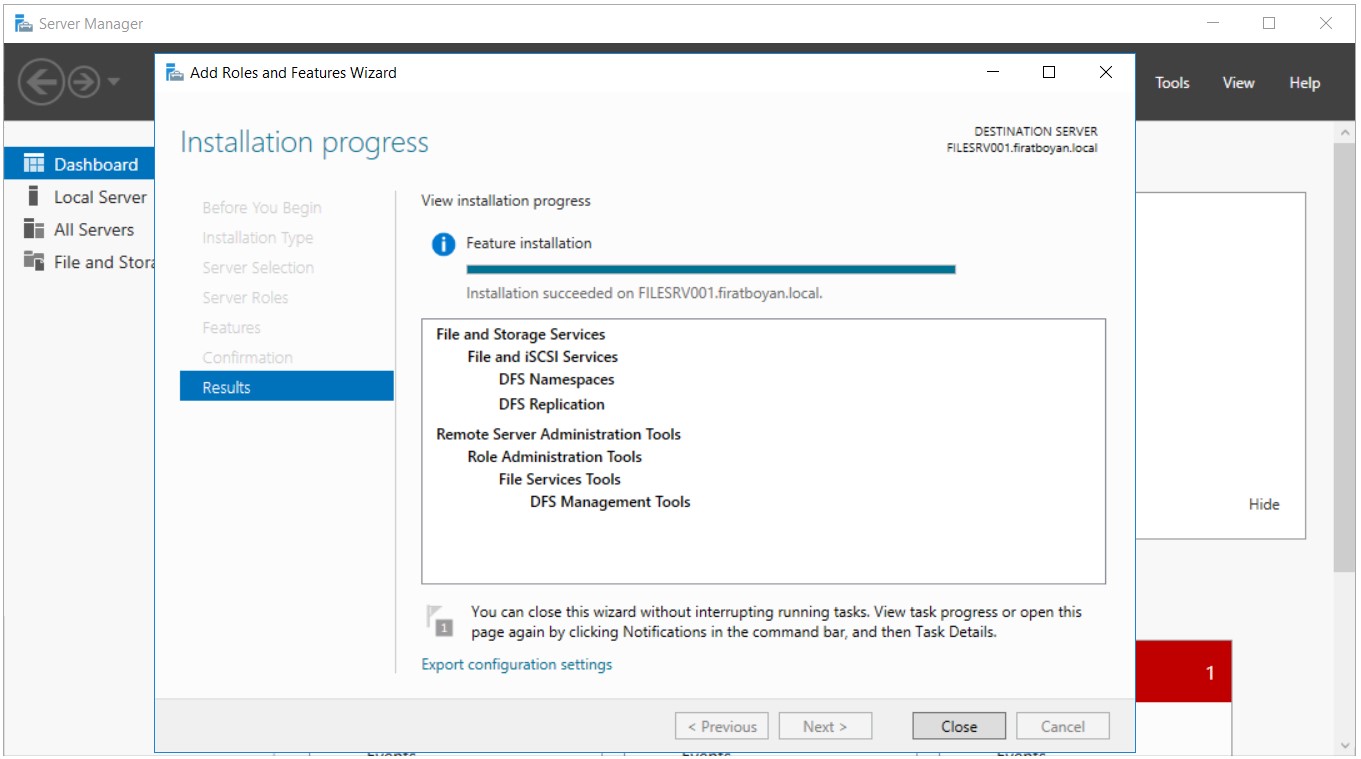
8- Distributed File System (DFS) Role installation process is completed successfully.
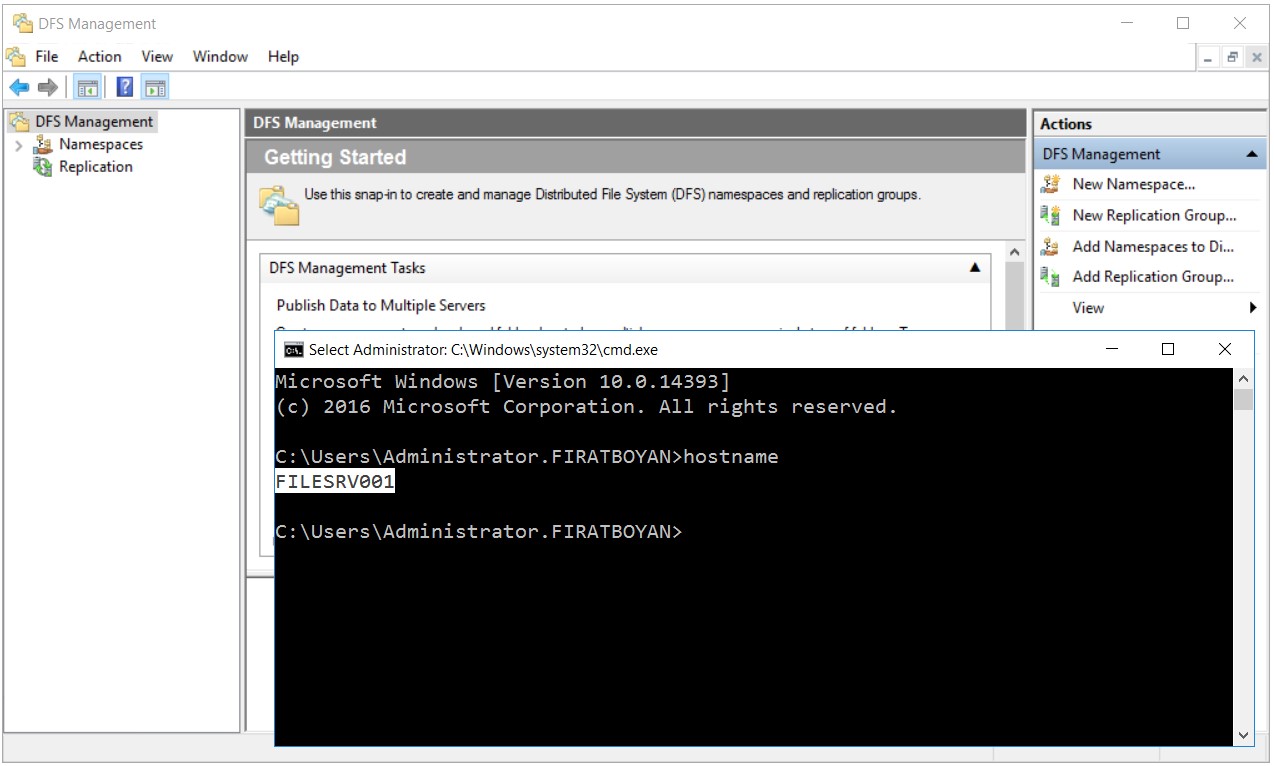
DFS- Distributed File System Role Installation on Replicated DFS
9- I am performing the installation action of DFS-Distributed File System Role on the Replicated DFS server with host name of FILESRV002 in the same way as I did the server with host name of FILESRV001, which is my Primary DFS Server.
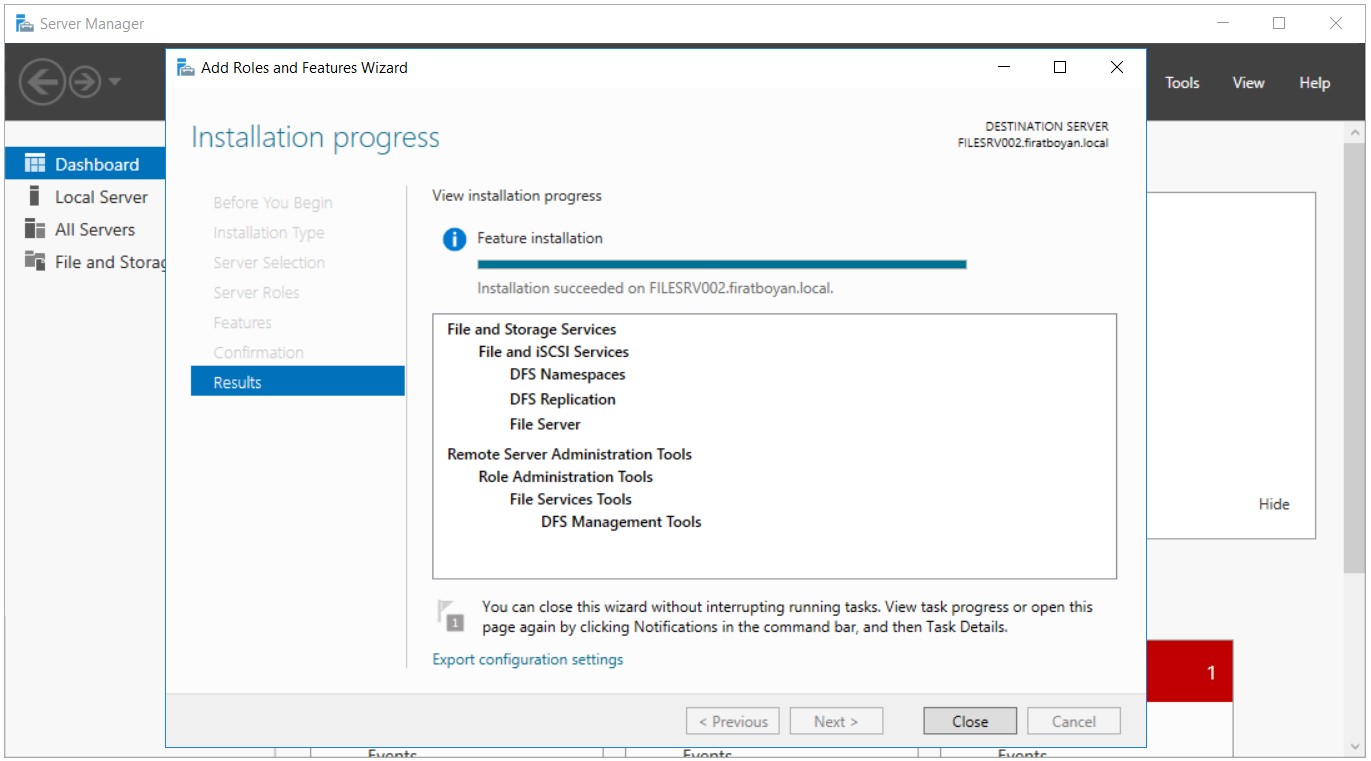
10- The Distributed File System (DFS) Role installation on server with the host name of FILESRV002 has been successfully completed.
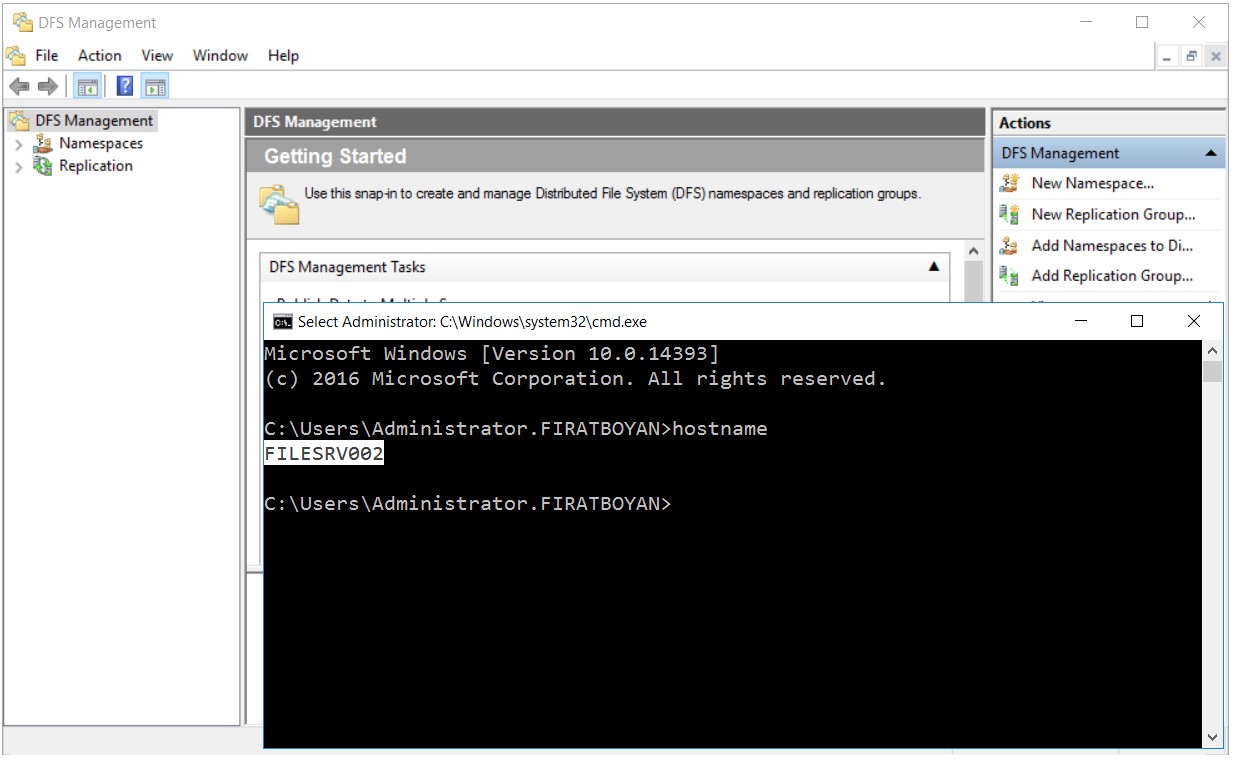
Creating Replication Folders on File Servers
After the DFS Server High Availability (HA) is created, the test structure will be installed on the "Home Folder" structure, which is based on keeping the user profile folders on the Server and not keeping any data in the profile folders of the users' Local computers, so I am creating folders on the secondary disks of the File Servers with the host names of FILESRV001 and FILESRV002.
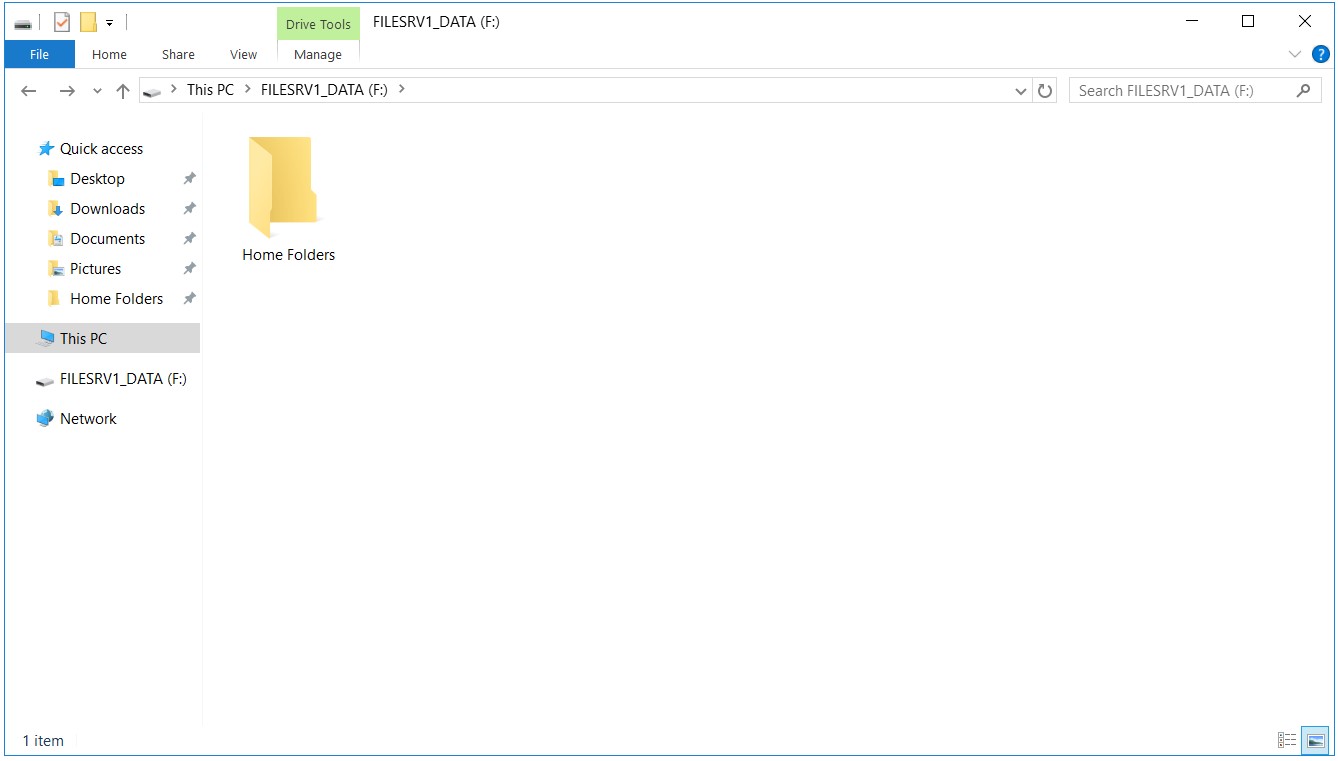
10- I am creating a folder named "Home Folders" on the secondary disk of my File Server with the host name of FILESRV001 and share it.
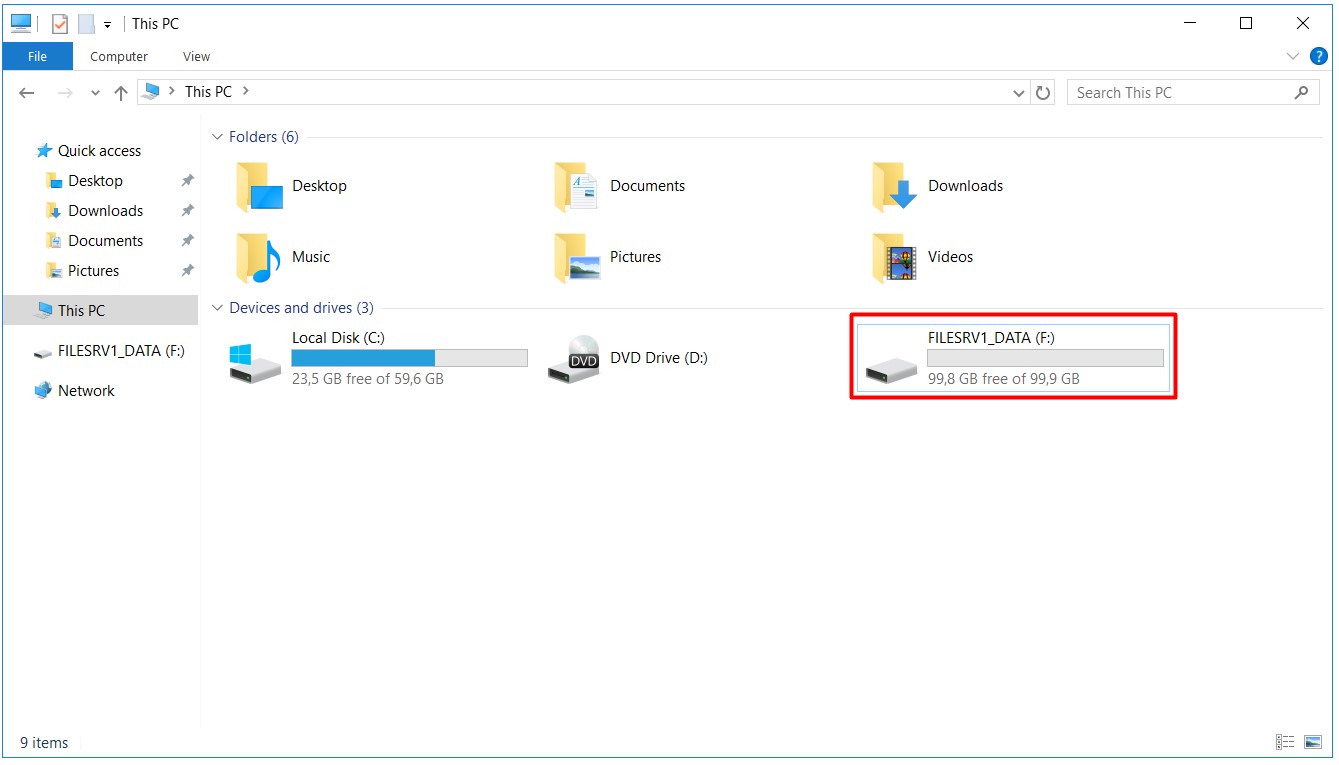
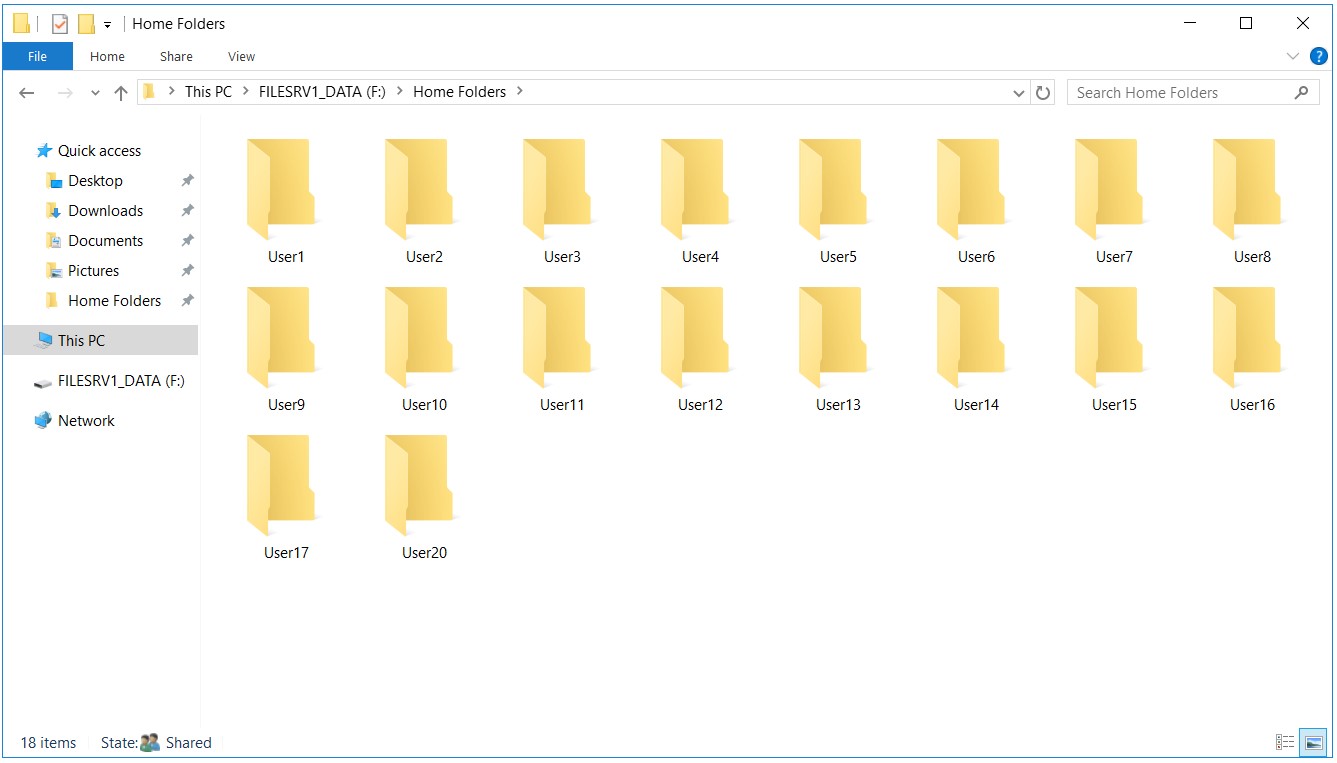
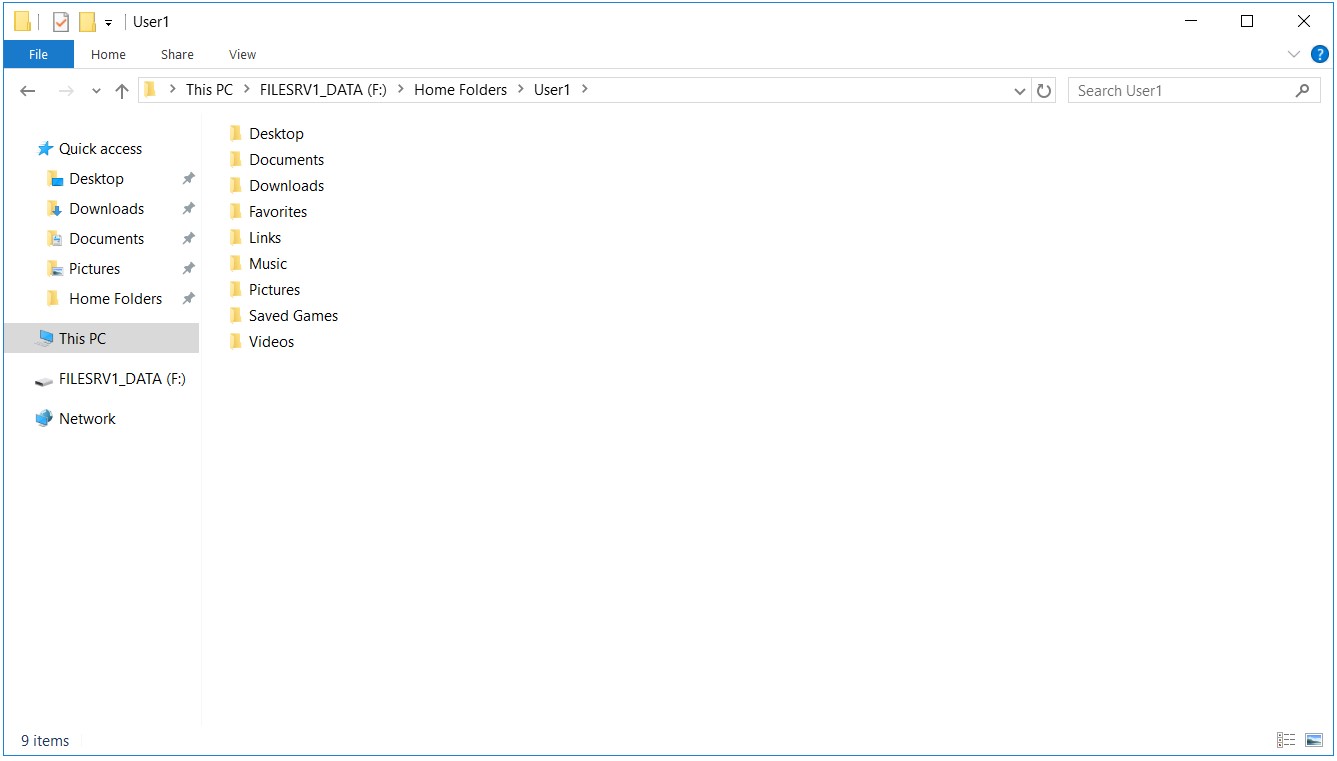
10.1- I am creating the profile folders bearing the username of each user into this folder named Home Folders that I have created and performing the related assignment action of NTFS permissions one by one.
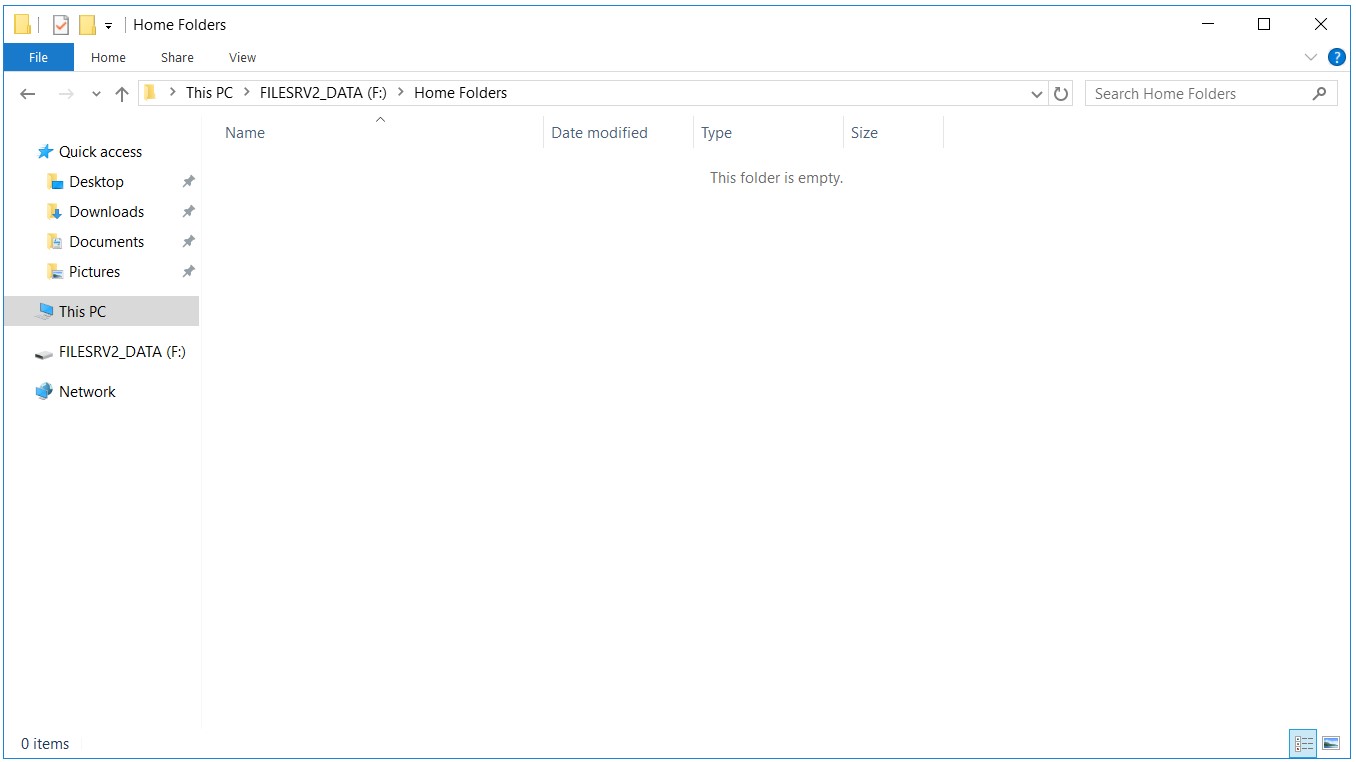
11- I am creating a folder named Home Folders on the secondary disk of my File Server with the host of name of FILESRV002 this time and sharing it.
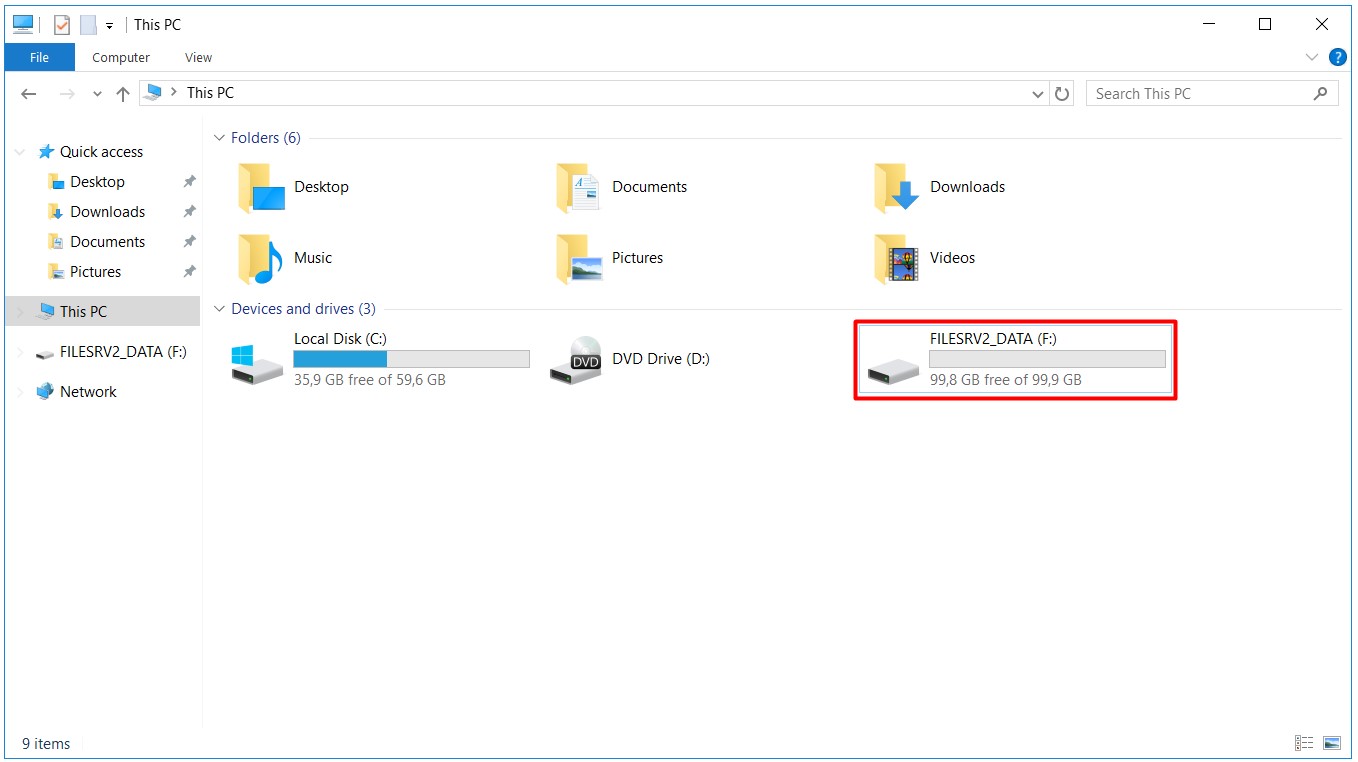
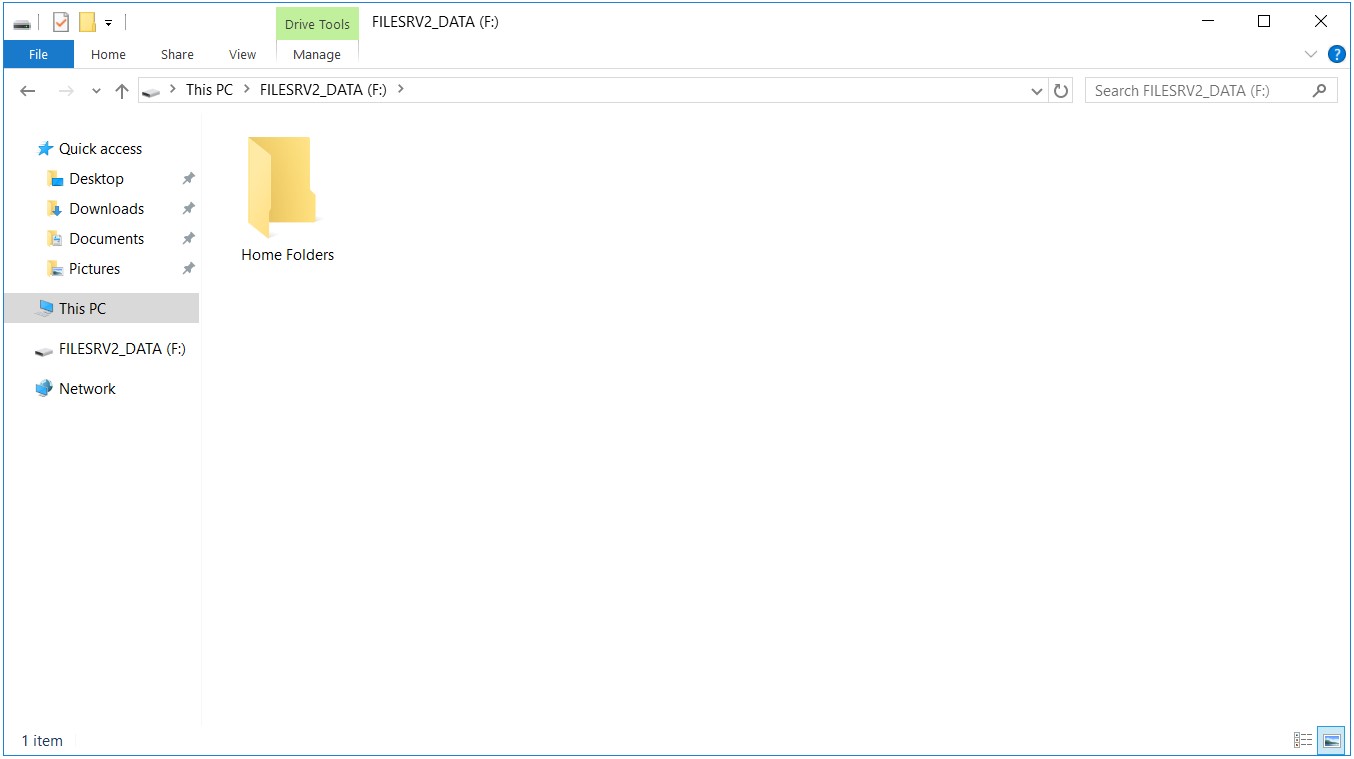
11.1- I am not creating the profile folders with the username of each user into this folder named Home Folders that I created, as I did on my File Server with the host of name of FILESRV001. These folders will be replicated through replication traffic.
Creating Namespace on DFS Management
I will create a Namespace on DFS Management in this section, but I think it will be useful to mention a little about the concept of Namespace. DFS (Distributed File System) provides the synchronization of file exchange between servers running on a Network with limited network connections and it is used under different Server Host Names under a DOMAIN name. It appears as a replication infrastructure under a UNC (Universal Naming Convention) Path. The "Home Folders" shared folder that I created on both File Servers above sets an example for that.
Instead of using different UNC (Universal Naming Convention) Paths both as;
\\FILESRV001\SharedFolderName
and
\\FILESRV002\SharedFolderName |
and alternatively as in the following;
\\FILESRV001.firatboyan.local\NameSpaceName\SharedFolderName
and
\\FILESRV002.firatboyan.local\NameSpaceName\SharedFolderName |
Gathering them under a single DOMAIN as DFS Namespaces will be more useful and logical in terms of both accessibility and High Availability (HA) as in the following.
|
\\firatboyan.local\NameSpaceName\SharedFolderName |
Let's initiate the Namespace creation process in the light of this information;
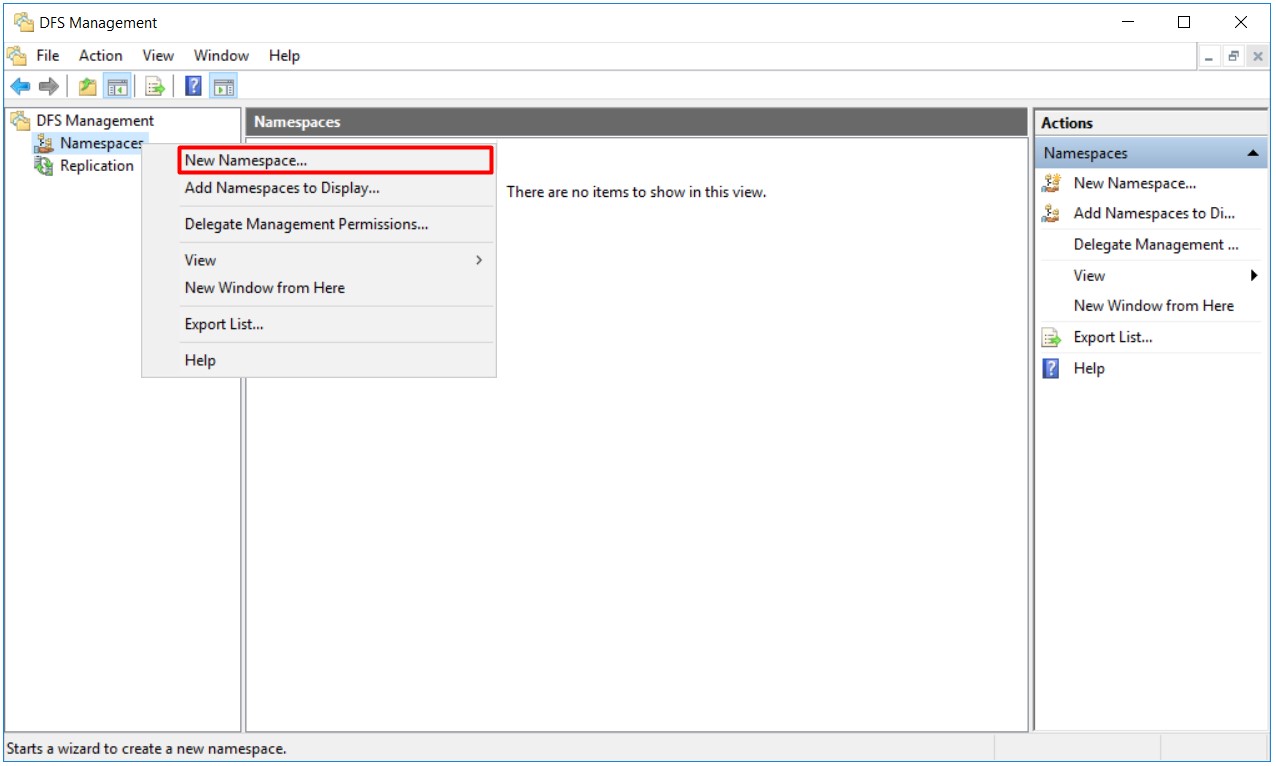
11- Open DFS Management, right click on Namespace and select New Namespace... option.
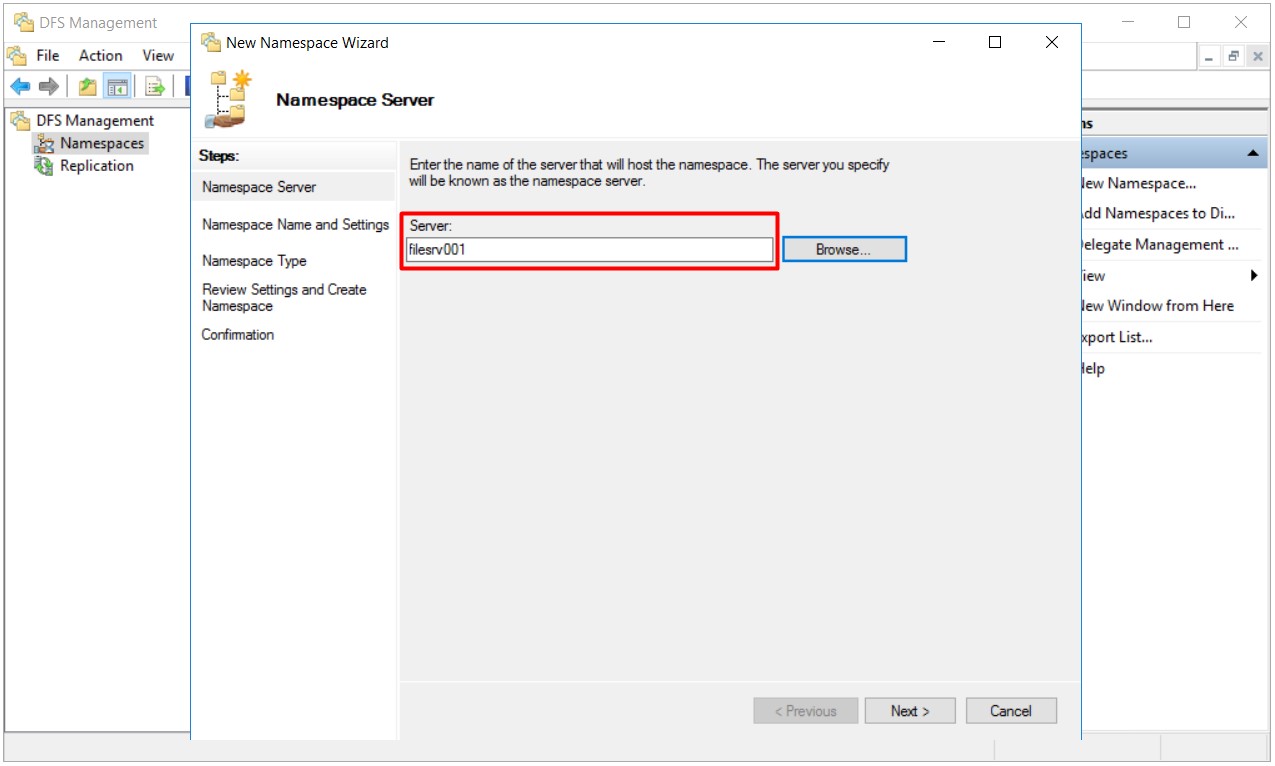
12- I am selecting the Server where I will create the Namespace in the Namespace Server section on the New Namespace Wizard that opens.
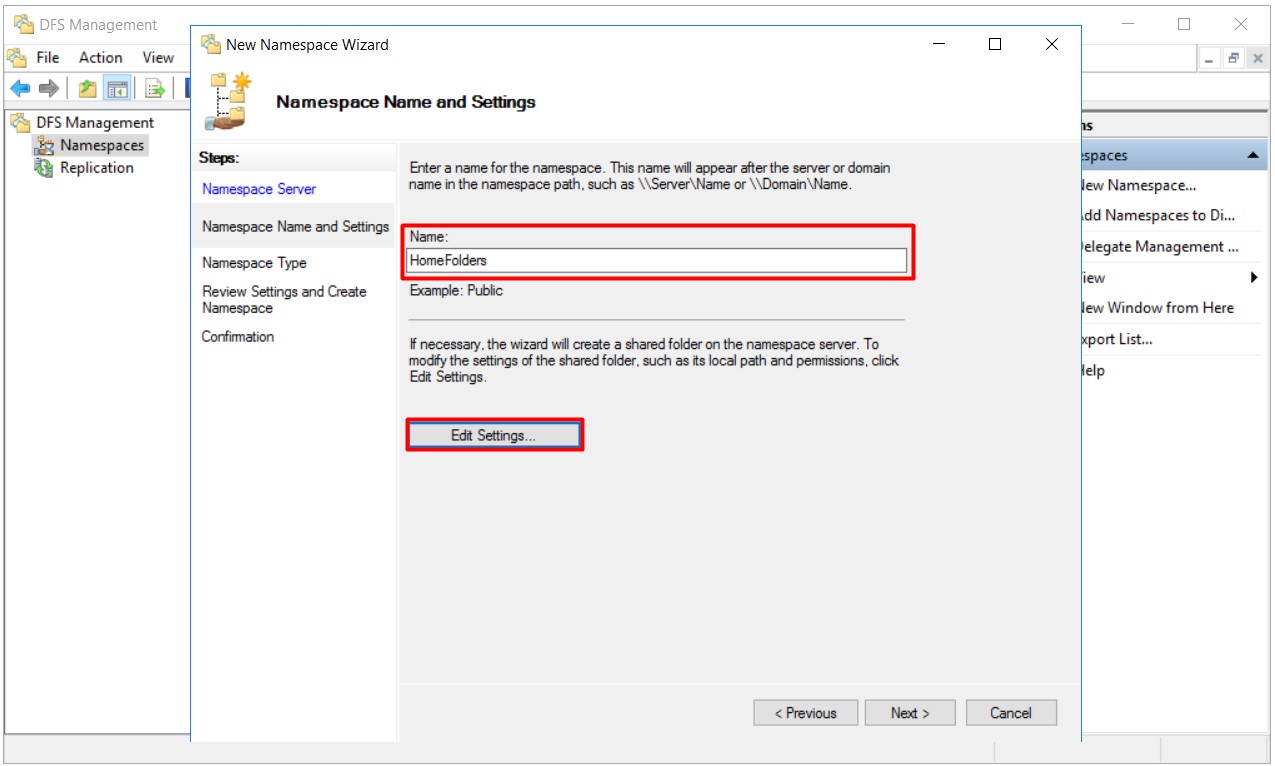
13- I am typing a name for my Namespace in the Name field and clicking on the Edit Settings... button at the bottom in the Namespace Name and Settings step.
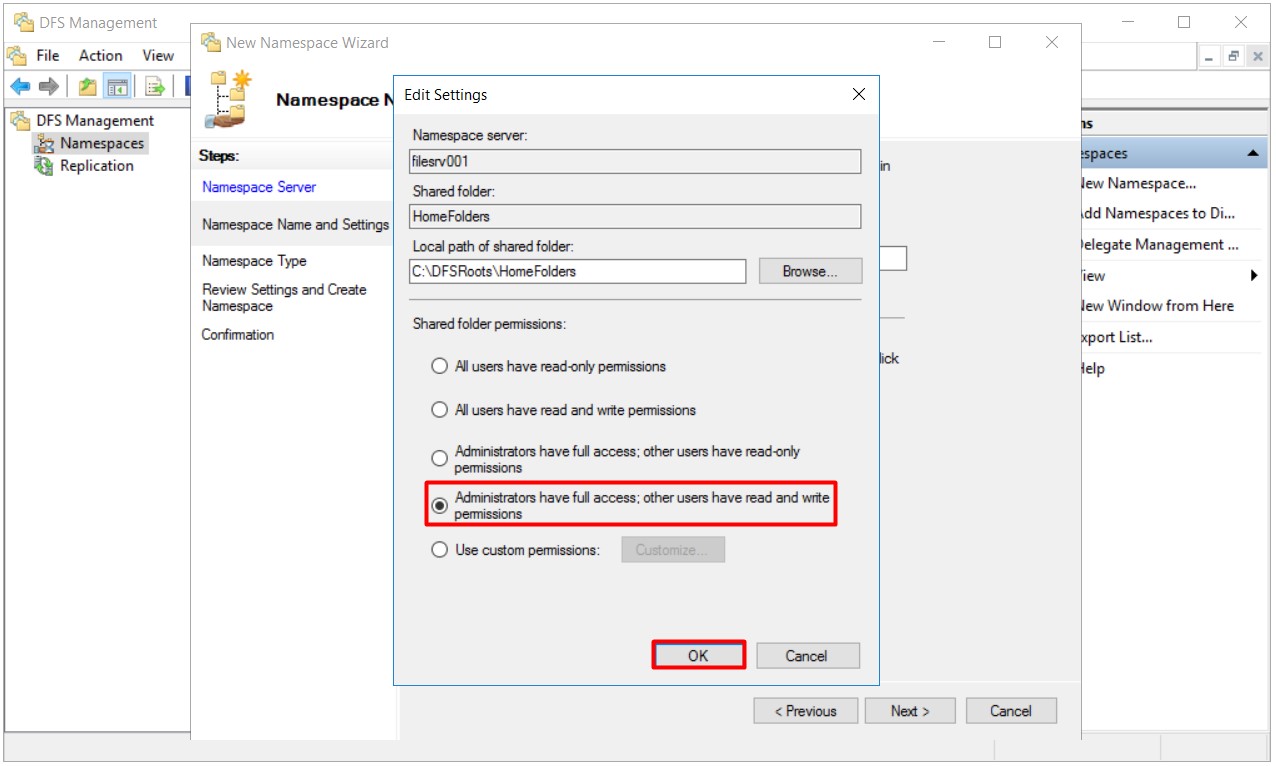
13.1- I am selecting the option of Administrators have full access; other users have read and write permissions In the Edit Settings... and closing the relevant window by clicking on the OK button.
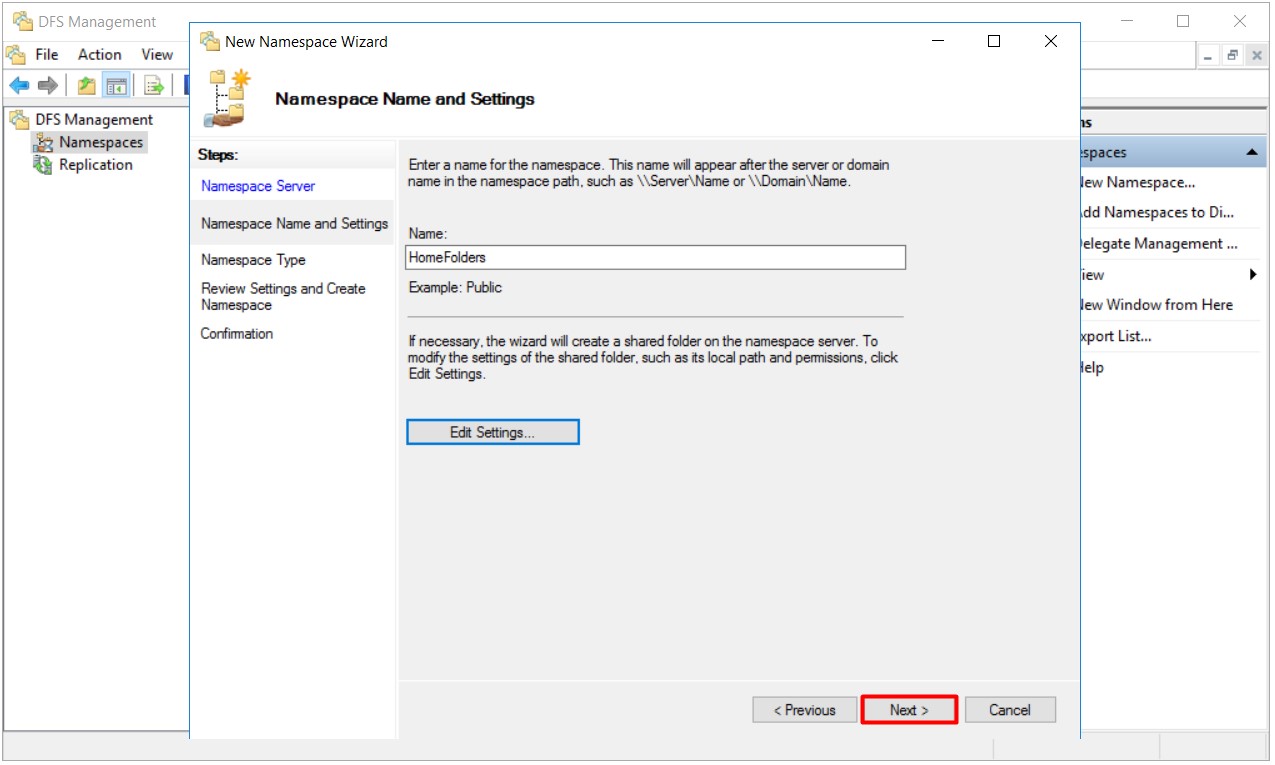
13.2- I am proceeding with the next step by clicking on the Next button upon completing the necessary procedures.
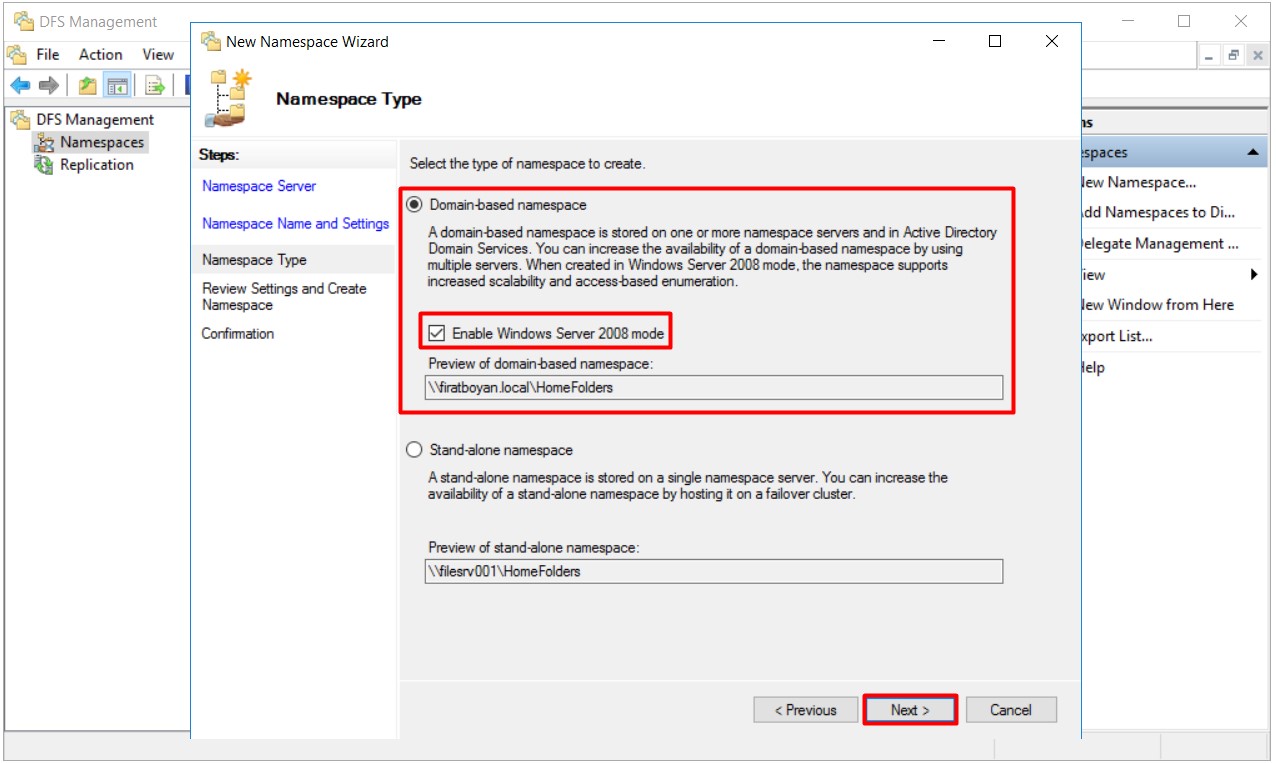
14- It is clearly seen that by default Domain-based namespace and Enable Windows Server 2008 Mode options are selected in the Namespaces Type step.
• Domain-based namespace: It is an option to be used to provide both accessibility and High Availability by gathering your share folders to be accessed through more than one server under a single DOMAIN framework.
|
Ex. \\firatboyan.local\NameSpaceName\SharedFolderName |
NOTE: If you have pre-Windows Server 2008 operating systems in your current build, you can enable it to work with Windows Server 2008 operating systems by selecting the option of Enable Windows Server 2008 Mode.
• Stand-alone namespace: It is an option to be used when you want to access your share folders on a single server in a structure that does not require High Availability.
|
Ex. \\FILESRV001\NameSpaceName\SharedFolderName |
I am proceeding by selecting the Domain-based namespace option and clicking on the Next button.
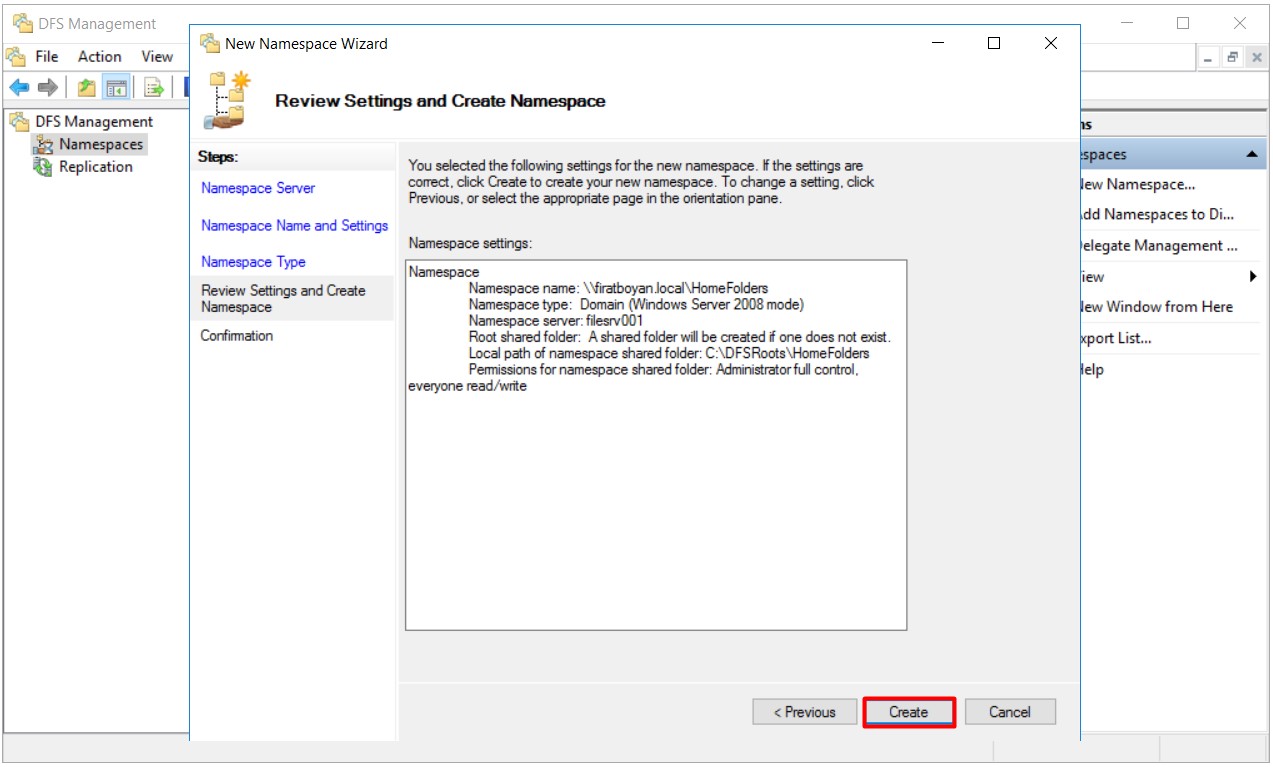
15- A summary of the settings I have made in the Review Settings and Create Namespace step is seen. If our configuration settings are correct, Namespace creation process may be completed by clicking on the Create button.
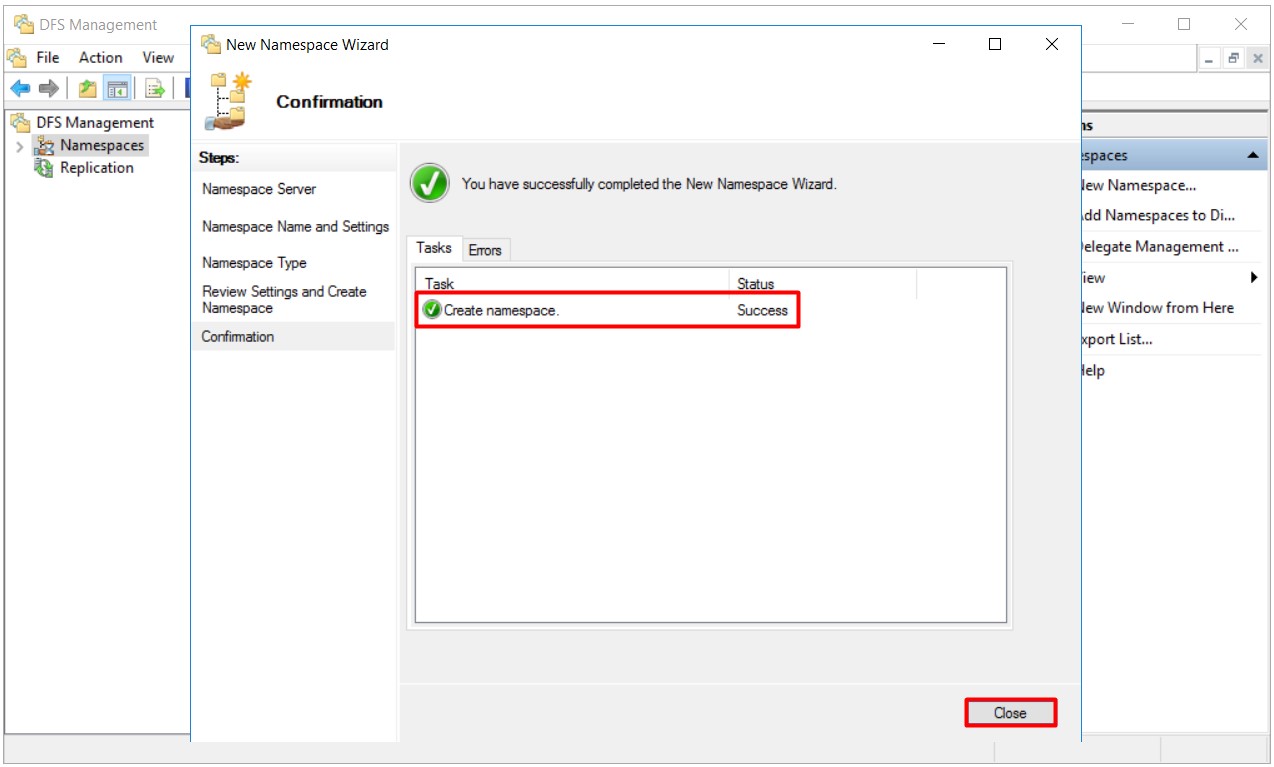
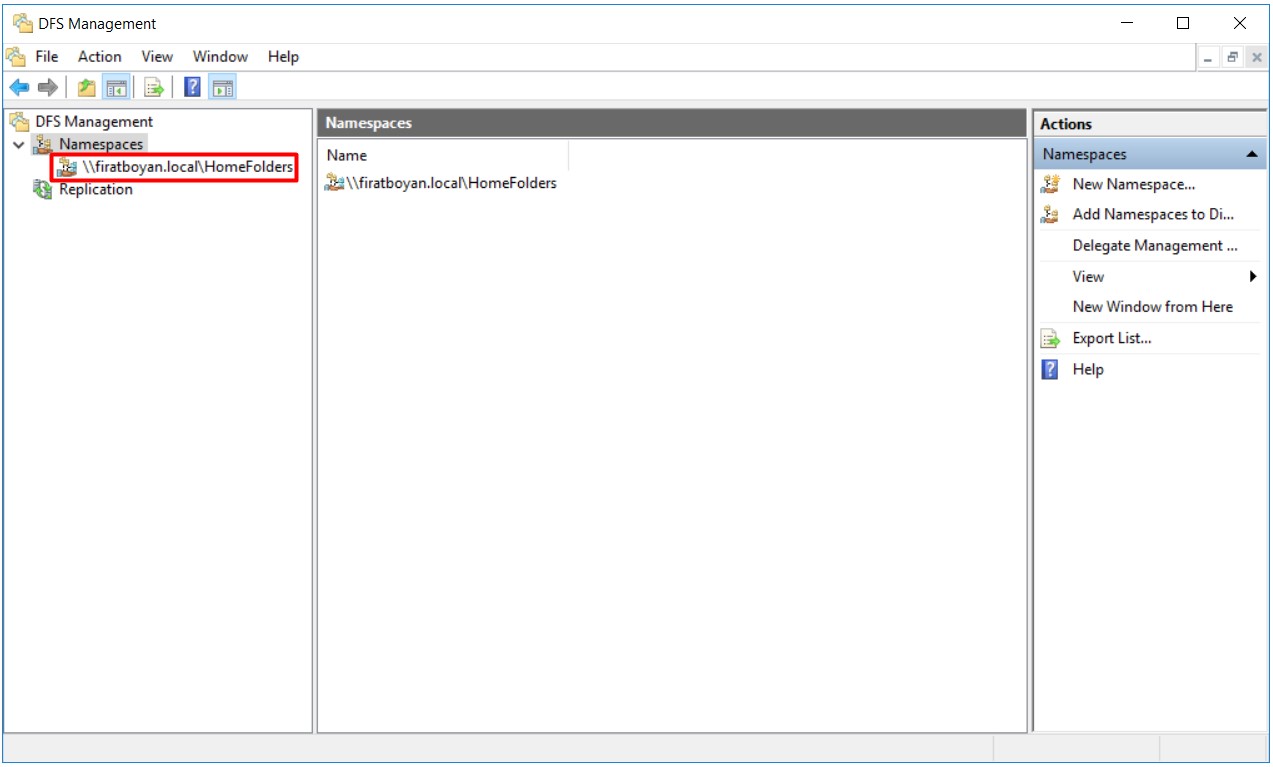
16- I can see the Namespace that I created under DFS Management.
Creating Replication on DFS Management
I have completed the Namespace creation process. I will make the necessary configurations for my share folders that I created on my File Servers to work with replicas on both File Servers by performing the Replication process on DFS Management in this section.
DFS Replication Requirements are as follows:
• Active Directory Domain structure must exist. Use of DFS replication is not supported in Workgroup configurations.
• Active Directory Schema structure, including DFS Classes and Attributes, must be up-to-date.
• All members of a Replication group must be in the same FOREST. DFS Replication cannot be enabled between servers in different Forest structures. However, it is an exception if it is in the same Forest (eg Child Domain) and has a different Domain.
• Folders to be replicated with DFS Replication must reside on an NTFS Volume.
• Files encrypted with EFS cannot be reproduced.
• Monitoring of DFS Replication can be provided by SCOM Management Pack or similar Monitoring tools.
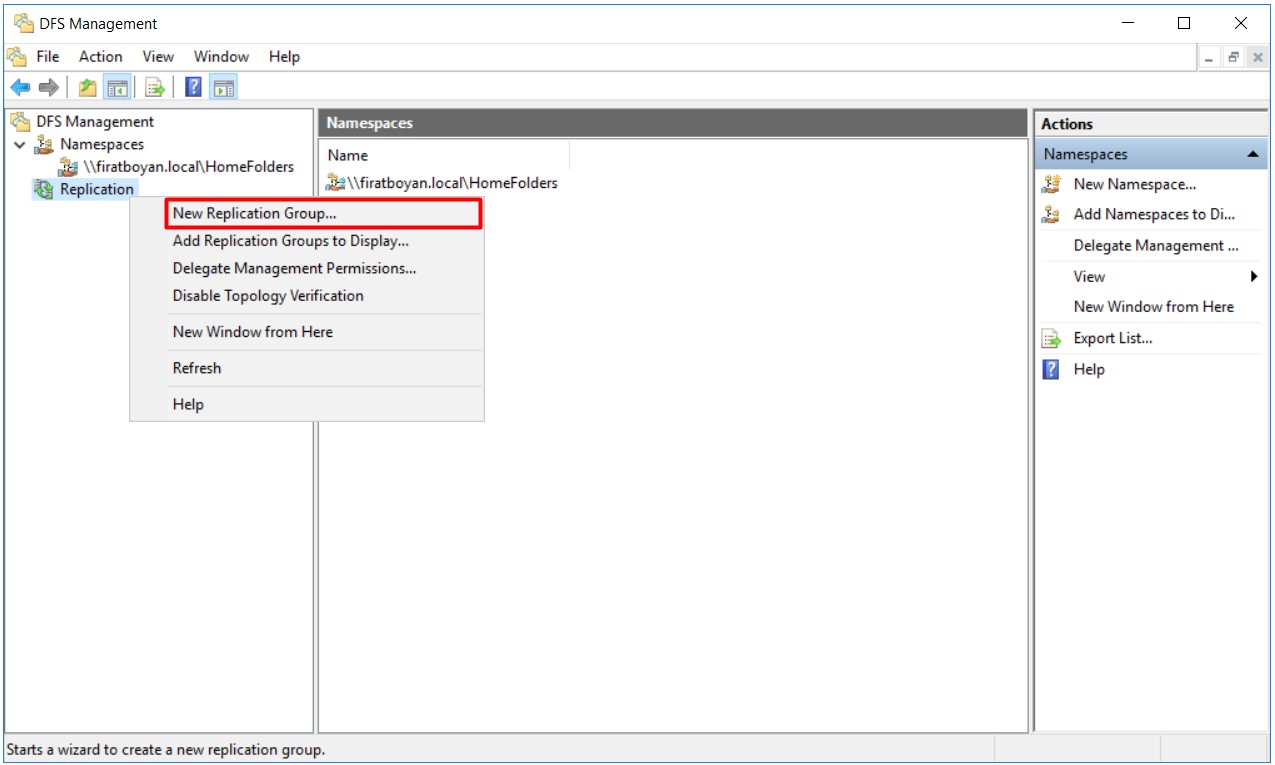
17- I am right clicking on Replication and selecting the option of New Replication Group.... on DFS Management.
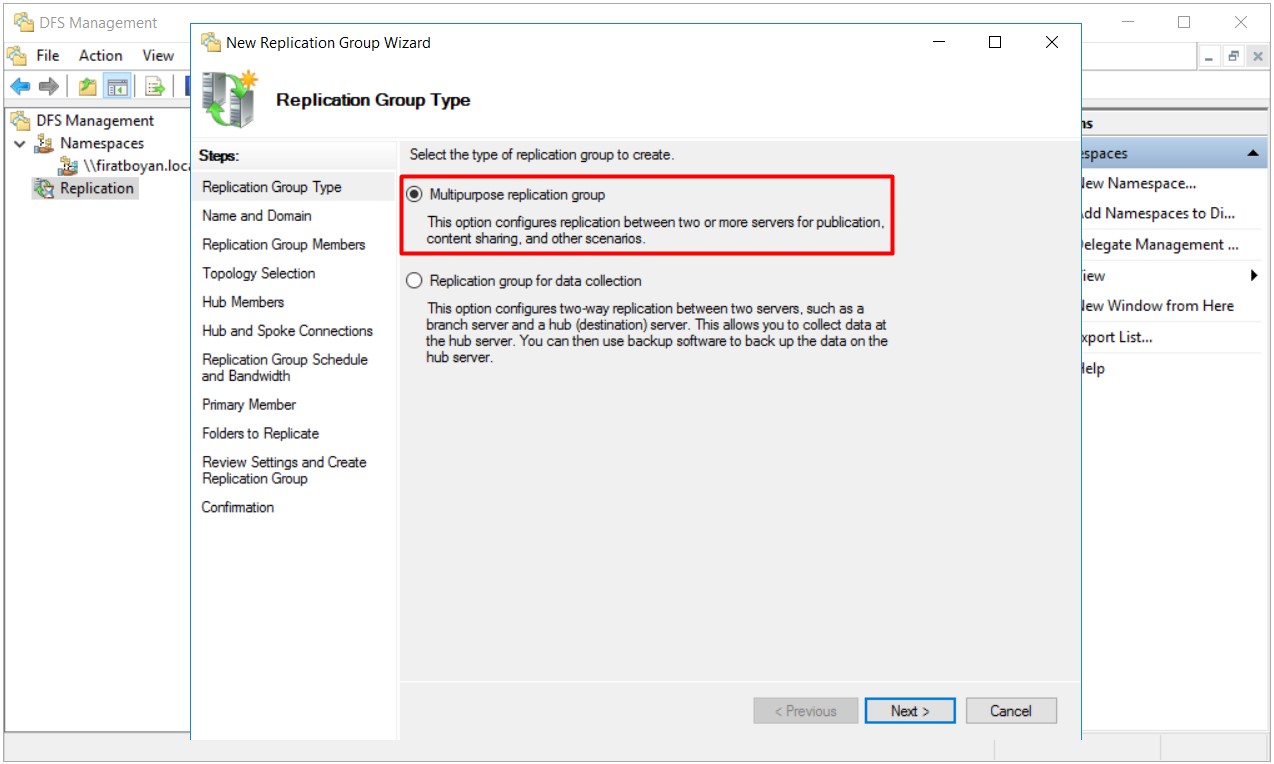
18- Two options appear in the Replication Group Type step on the New Replication Group Wizard that opens;
• Multipurpose replication group: This Replication Group type is used for replication on two or more DFS Servers.
• Replication group for data collection: This Replication Group type is used between the branch and the target two servers in two-way replication operations.
Although I have two DFS servers in the current production, I am choosing the Multipurpose replication group option, in case I can install a third or more DFS servers later and add them to the replication, I am proceeding by clicking on the Next button.
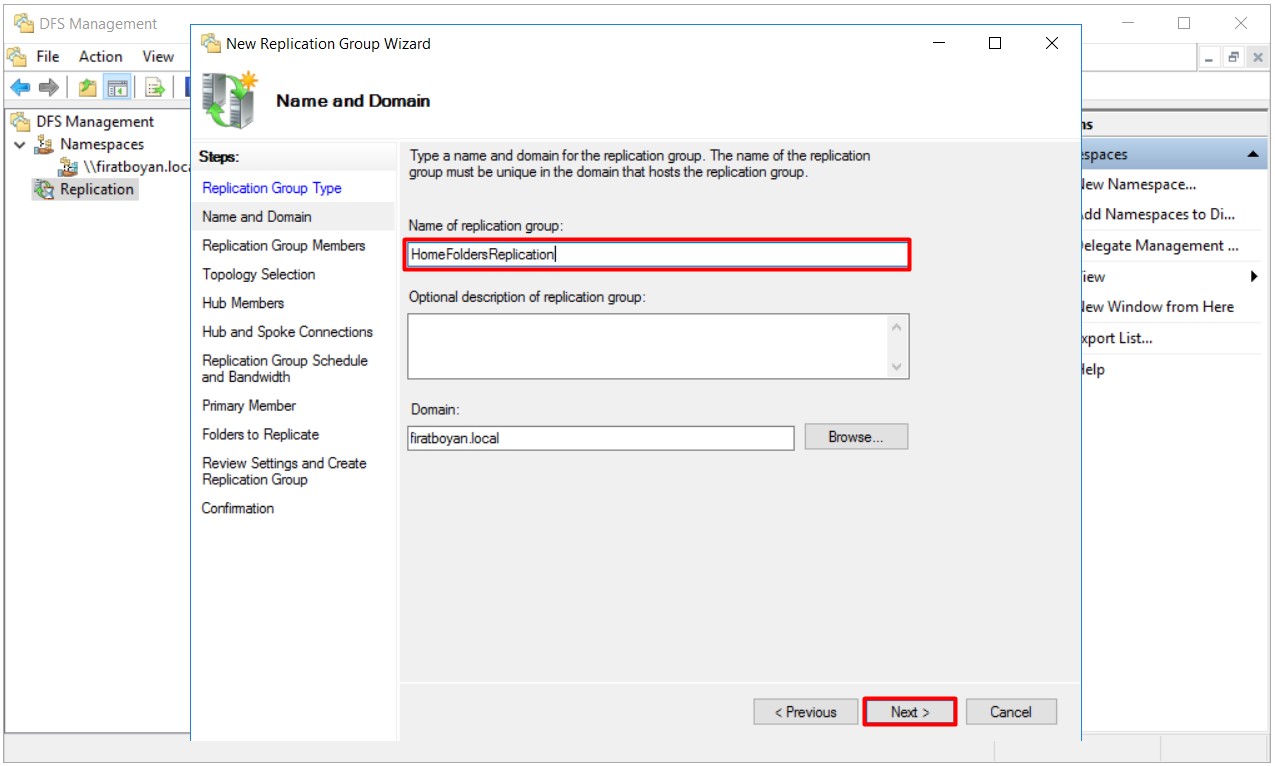
19- I am providing a name for the Replication Group that I will create in the Name and Domain step and I am proceeding by clicking on the Next button.
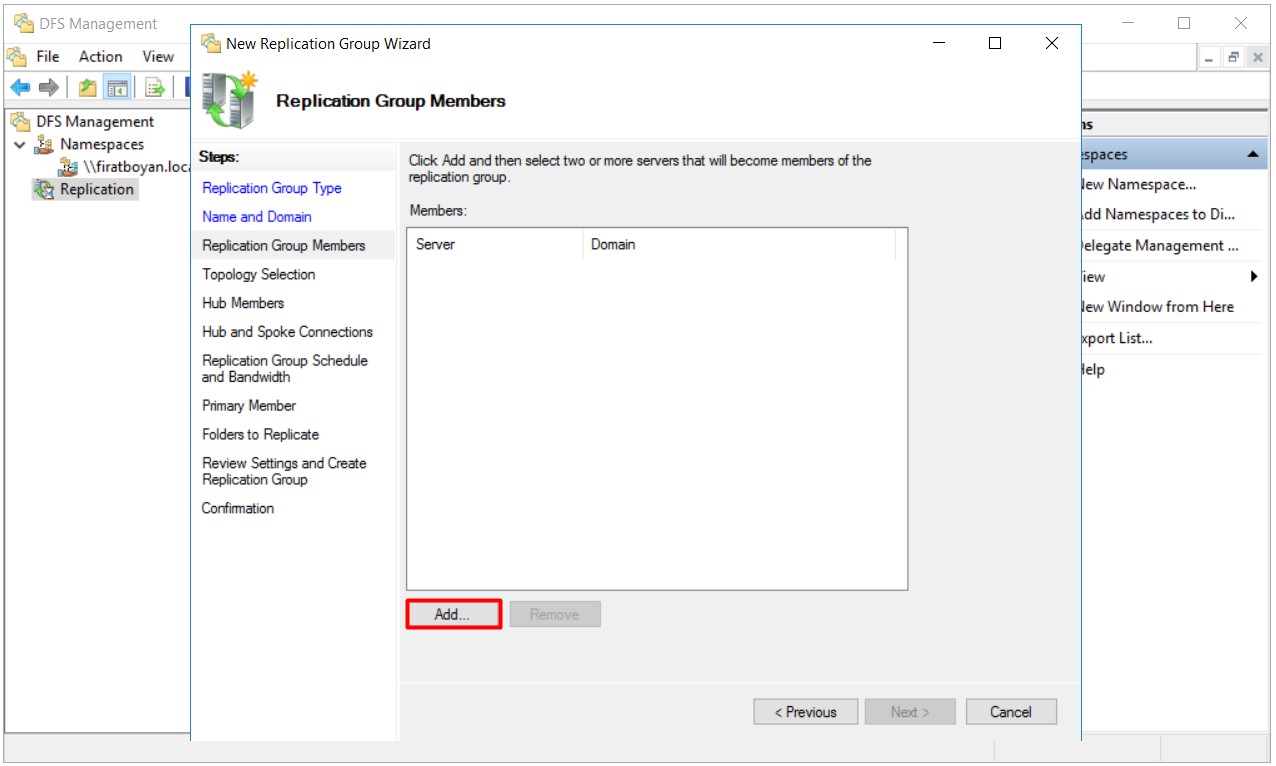
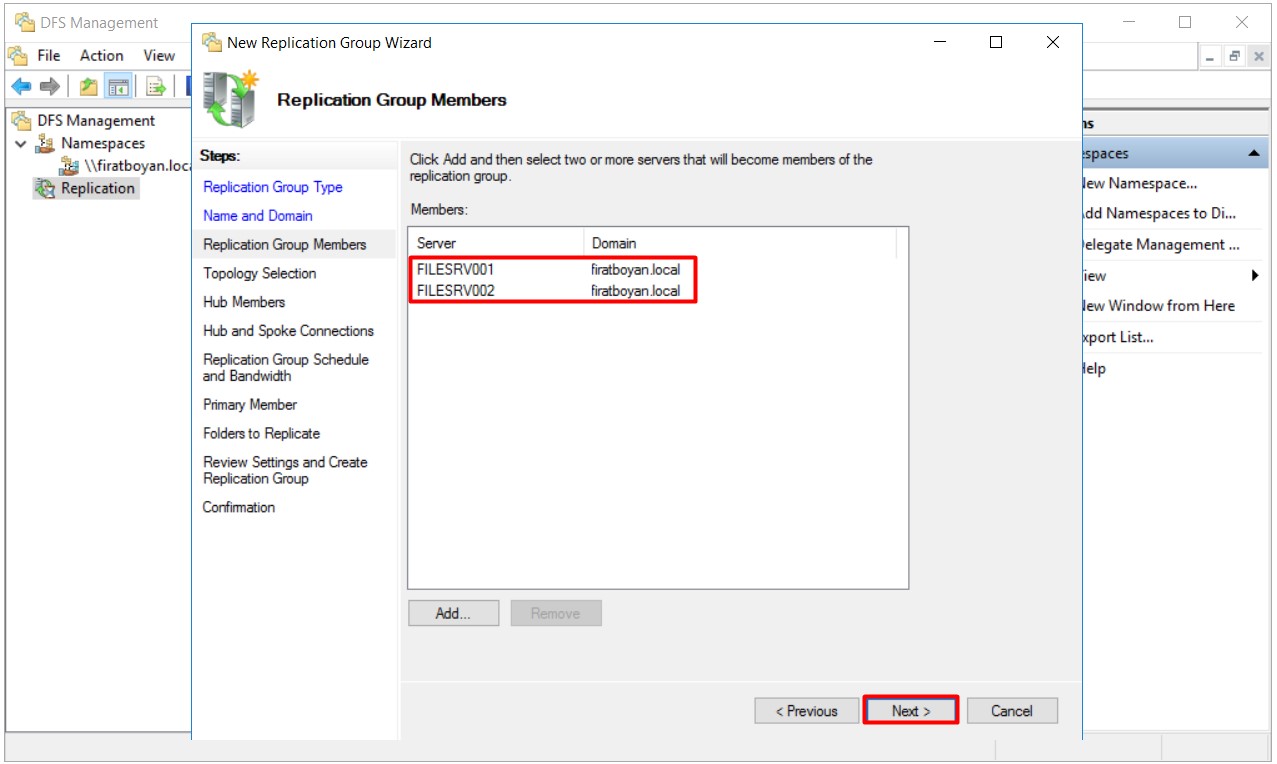
20- I am selecting my servers that will be included in the replication group in the Replication Group Members step. I am pressing on the Add... button to perform this action.
20.1- I am selecting my servers with the host of names of FILESRV001 and FILESRV002 and add them.
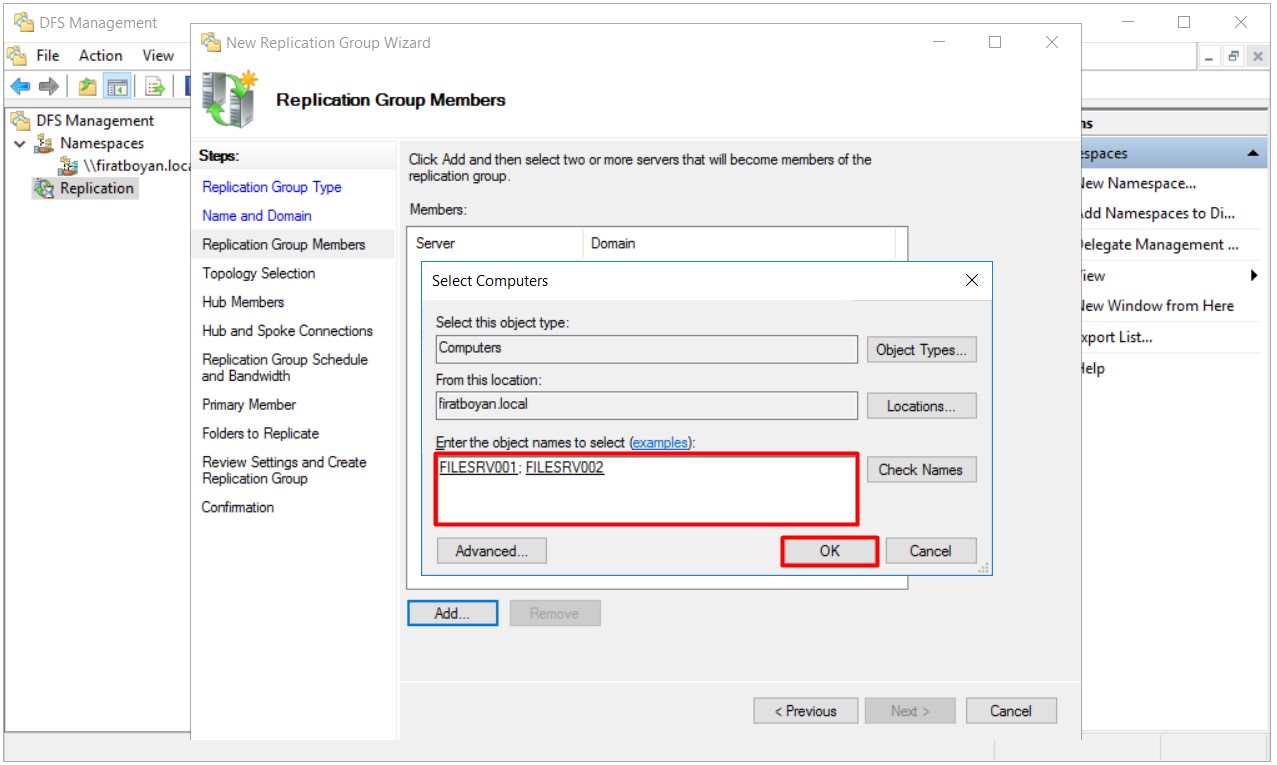
20.2- I have added my servers with the host of names of FILESRV001 and FILESRV002 to include them in the replication group. I am proceeding by clicking on the Next button.
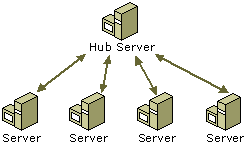
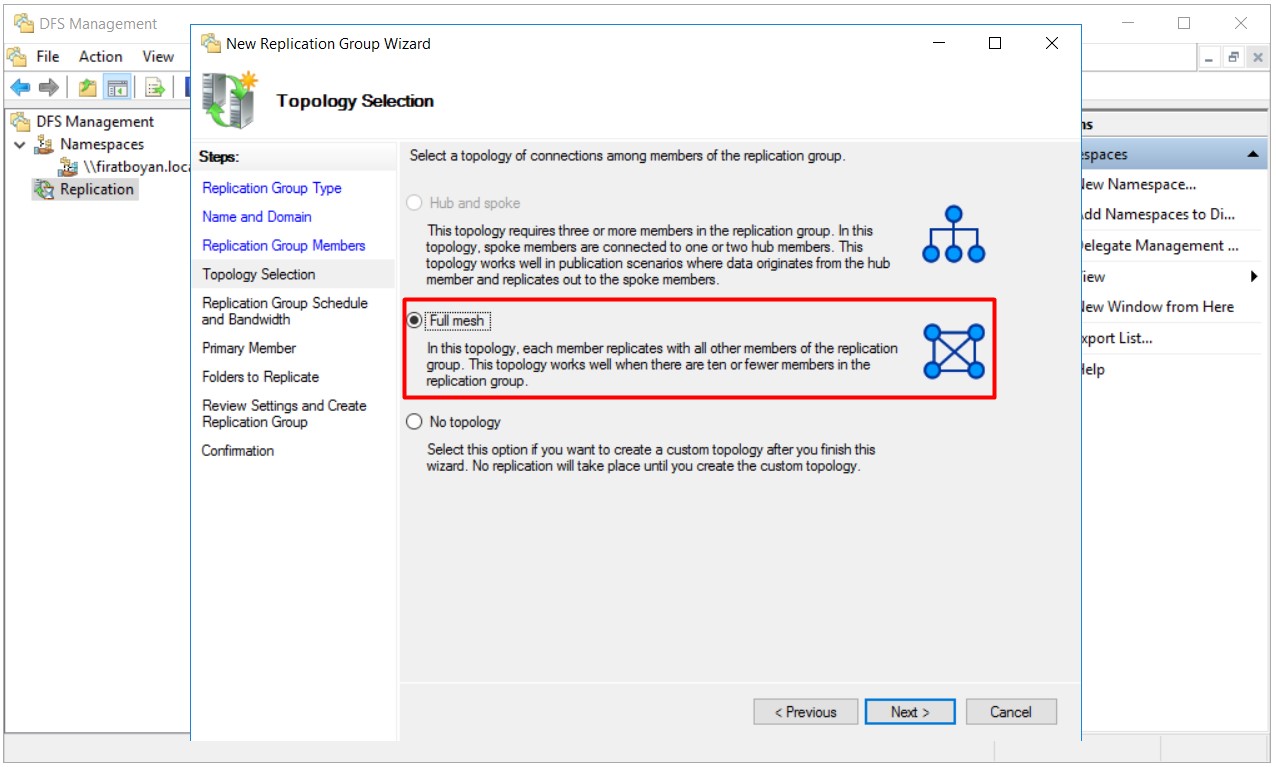
21- It is needed to select one of the topologies to be used for replacements according to our own structure in the Topology Selection step. Let's take a brief look at these topologies;
• Hub and Spoke Topology: One of the most popular topologies is the Hub and spoke Topology type. The main Server whose DFS replication starts is at the center of the topology. Servers that are members of the DFS replication group perform bidirectional replication with this main server, while other Servers that are members of the replication group do not replicate with each other. Replication takes place only from the replication group member Servers to the main Server or vice versa. Replication will stop when the main Server is inaccessible although such a topology is a fast architecture in terms of efficiency.
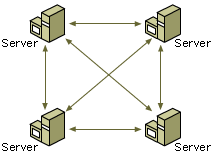
• Full Mesh Topology: Another widely used replication topology. Servers member of DFS replication group can replicate with other Servers in this topology. The advantage of this topology is that replications will continue even if any server is inaccessible. The disadvantage of this topology method is that it causes excessive replication traffic.
• No Topology: It is the choice made for replication groups that do not need to define a replication topology.
I am proceeding my topology selection by choosing the Full Mesh Topology option.
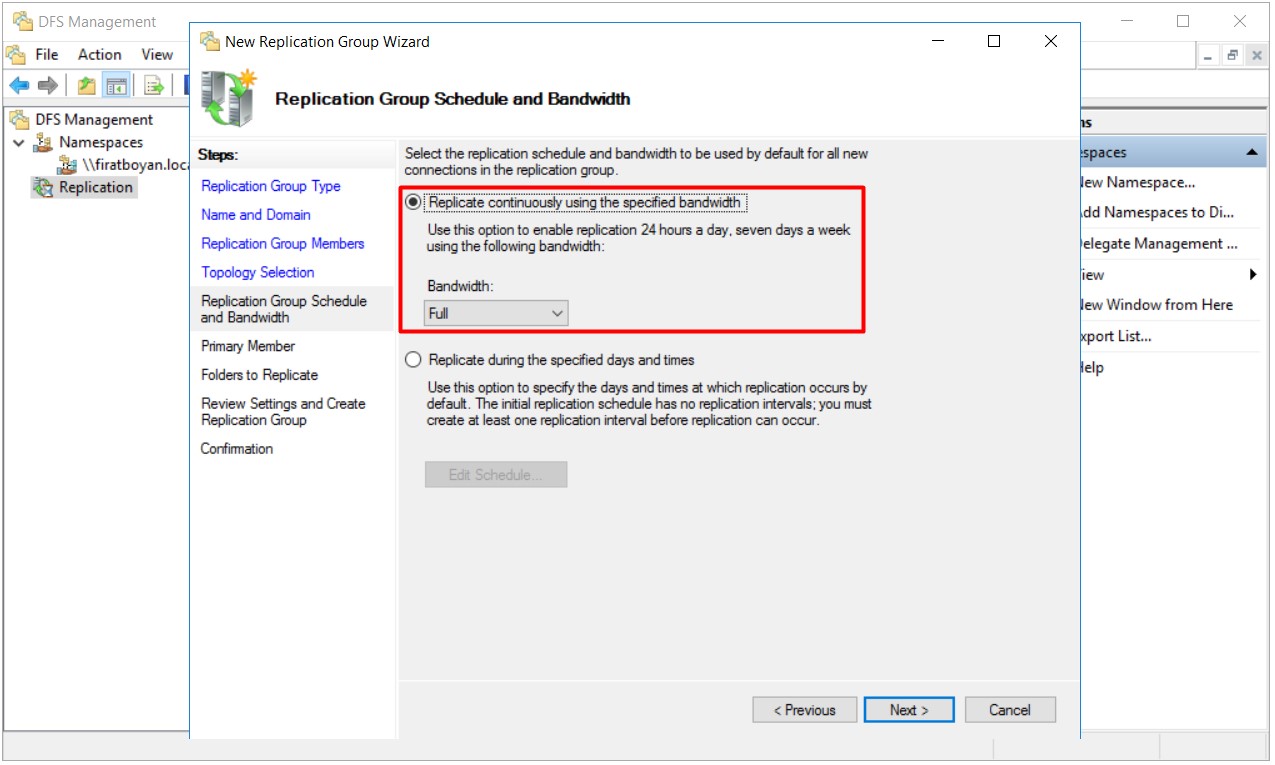
22- The schedule for replication and bandwidth usage are set for the replication group in the Replication Group Schedule and Bandwith step.
22.1- The option of Replicate continuously using the specified bandwith is selected to perform 7/24 continuous replication. You are required to determine how much of the bandwidth you will allocate to this replication group from the Bandwith list at the bottom.
22.2- If replication will be made only between certain days and hours, the necessary planning is made on the screen displayed with the Edit Schedule... button at the bottom while the Replicate during the specified days and times option is selected.
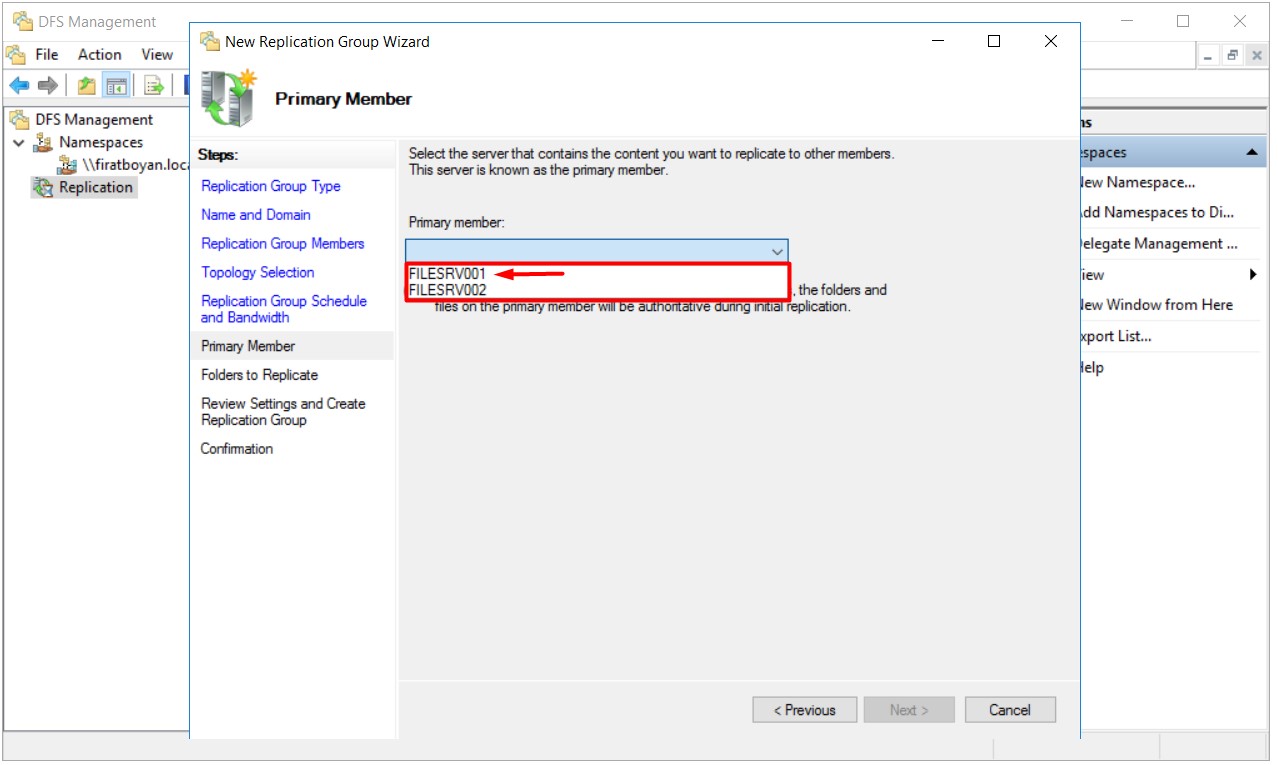
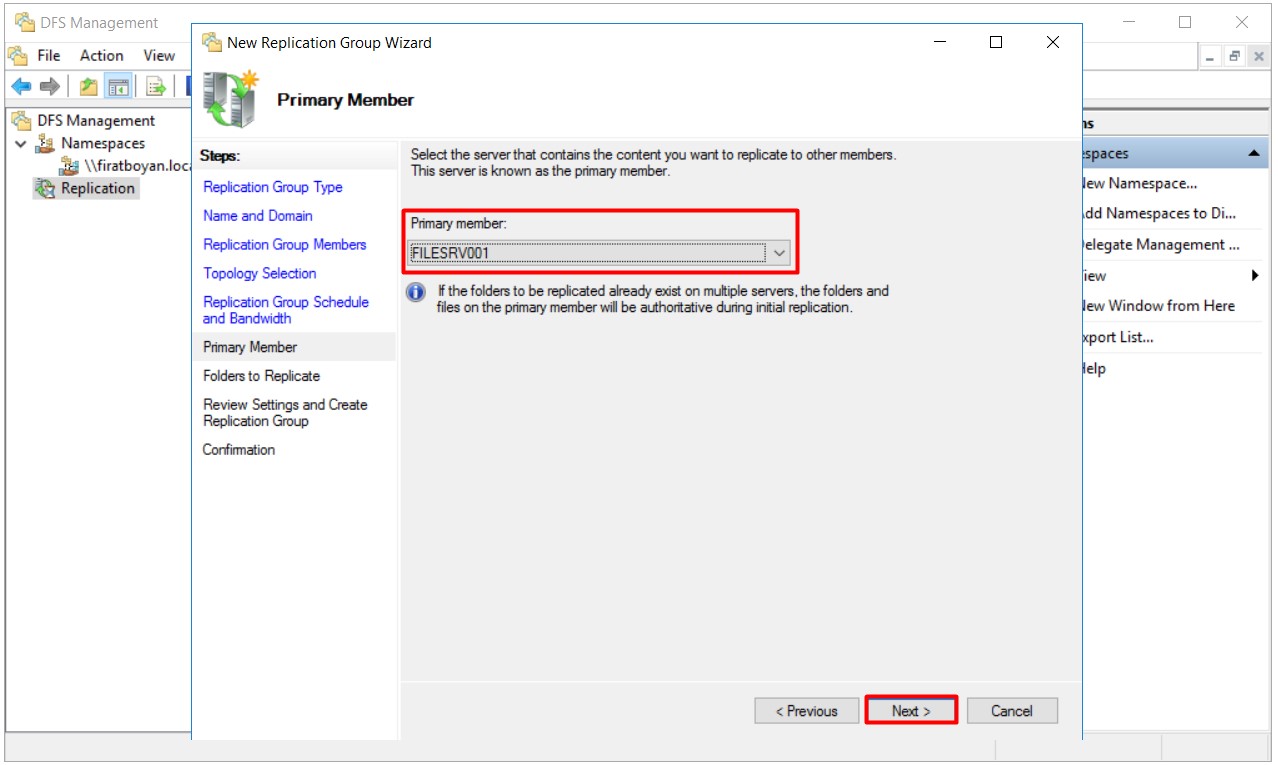
23- I am selecting the Primary Server that will replicate the contents kept in the share folder to other replication group members, and continue by clicking on the Next button in the Primary Member step.
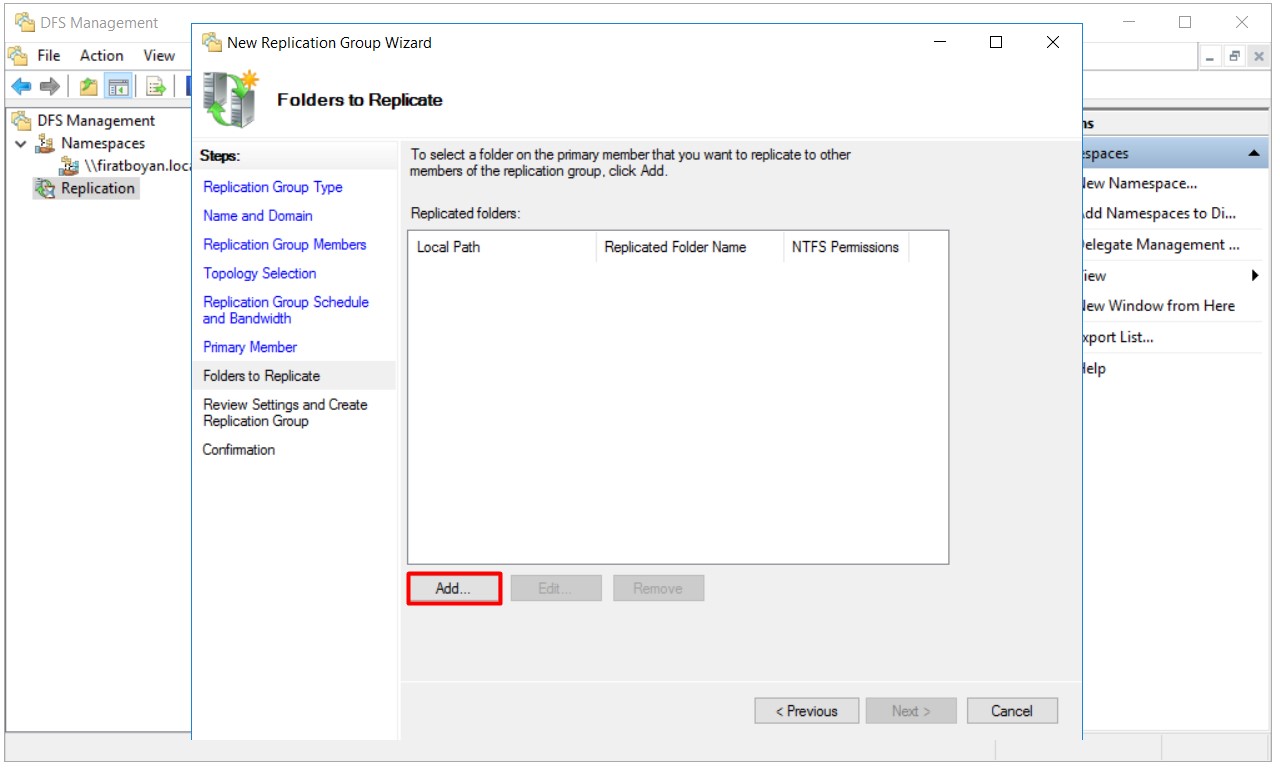
24- I am selecting my share folder to which replication group members will be replicated in the Folders to Replicate step. I am pressing on the Add... button to make a selection.
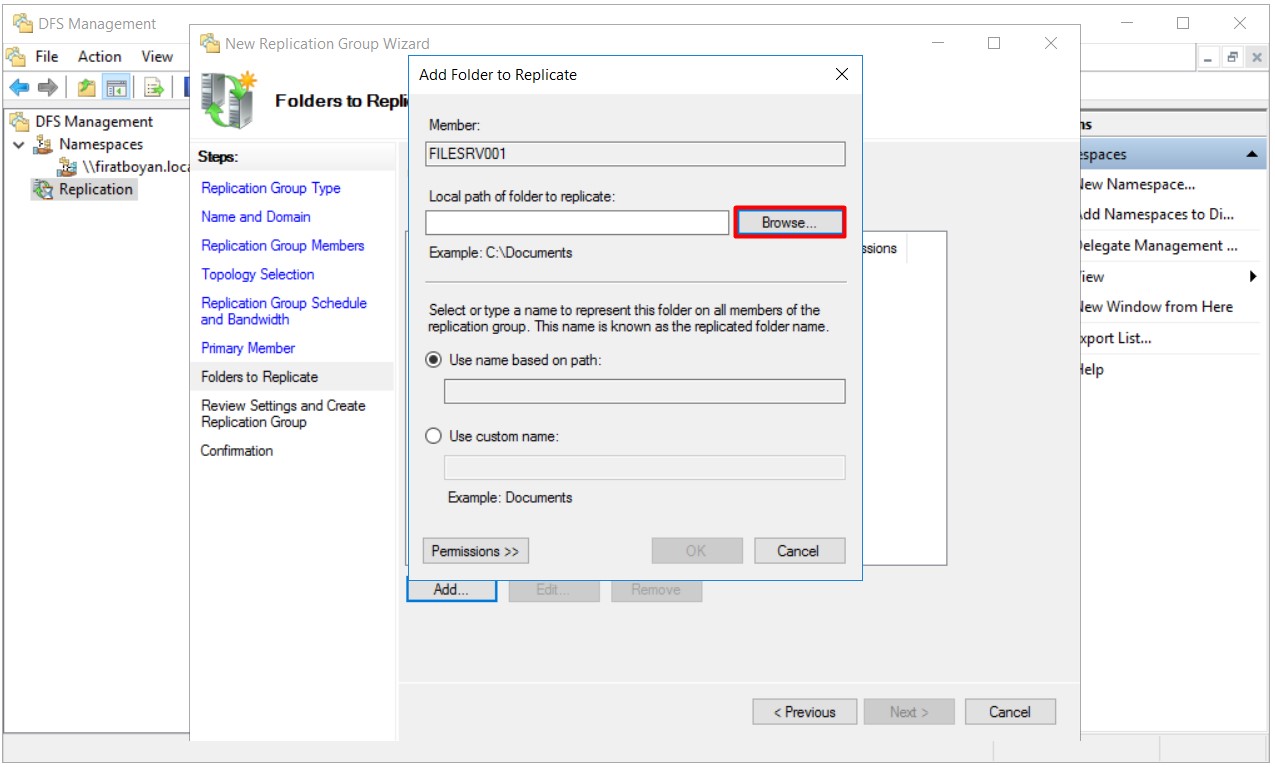
24.1- I am clicking on the Browse... button in the Local path of folder to replicate section on the opened Add Folder to Replicate window.
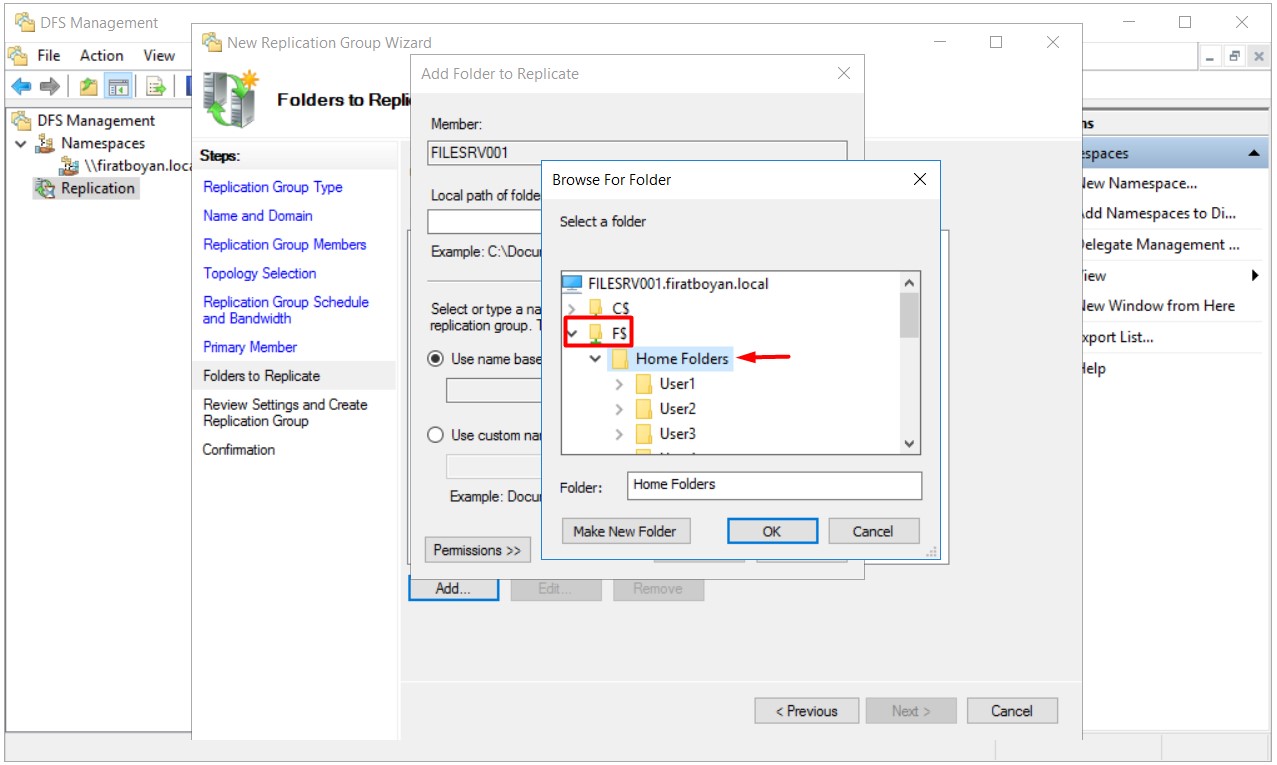
24.2- I am selecting my shared folder to be replicated on the corresponding NTFS Volume.
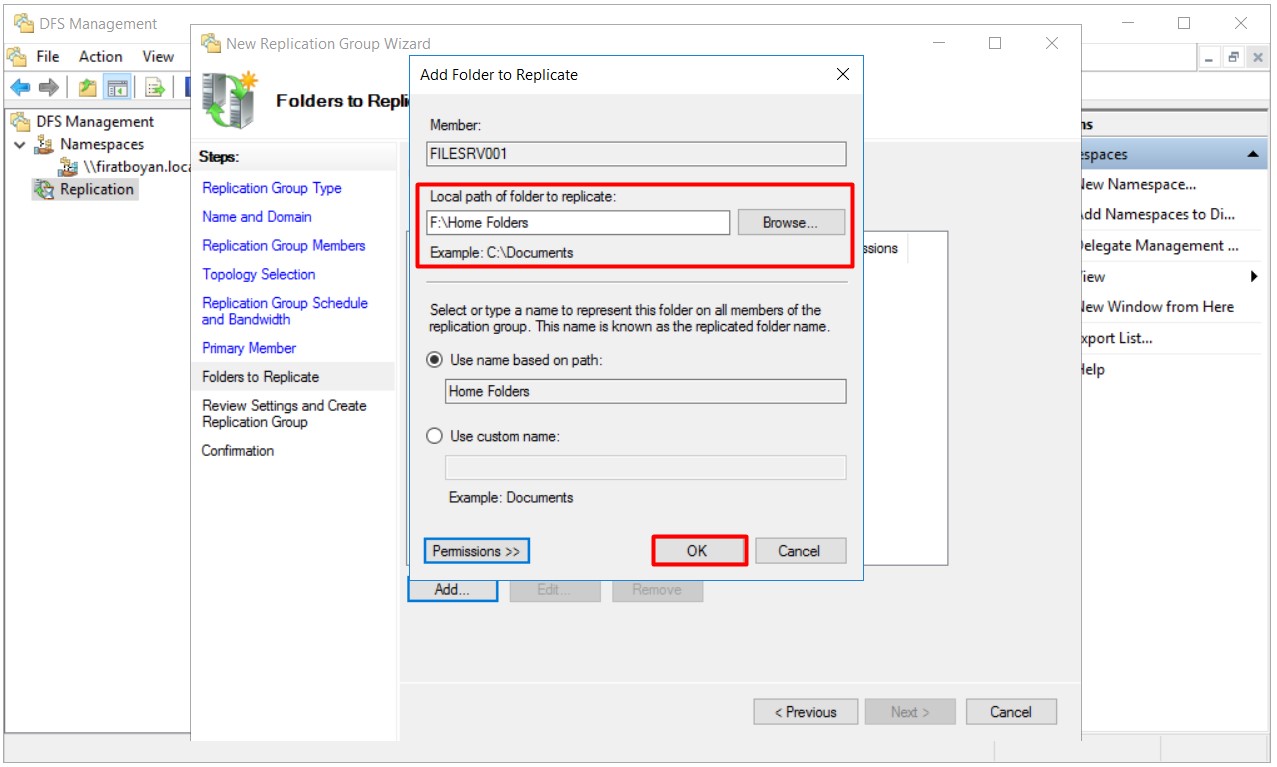
24.3- NTFS Volume Path information is displayed where my share folder will be replicated in the Local path of folder to replicate section. If you wish, you can type the path manually if you know the relevant NTFS Volume Path information. I am closing the window by clicking on the OK button after finishing my process.
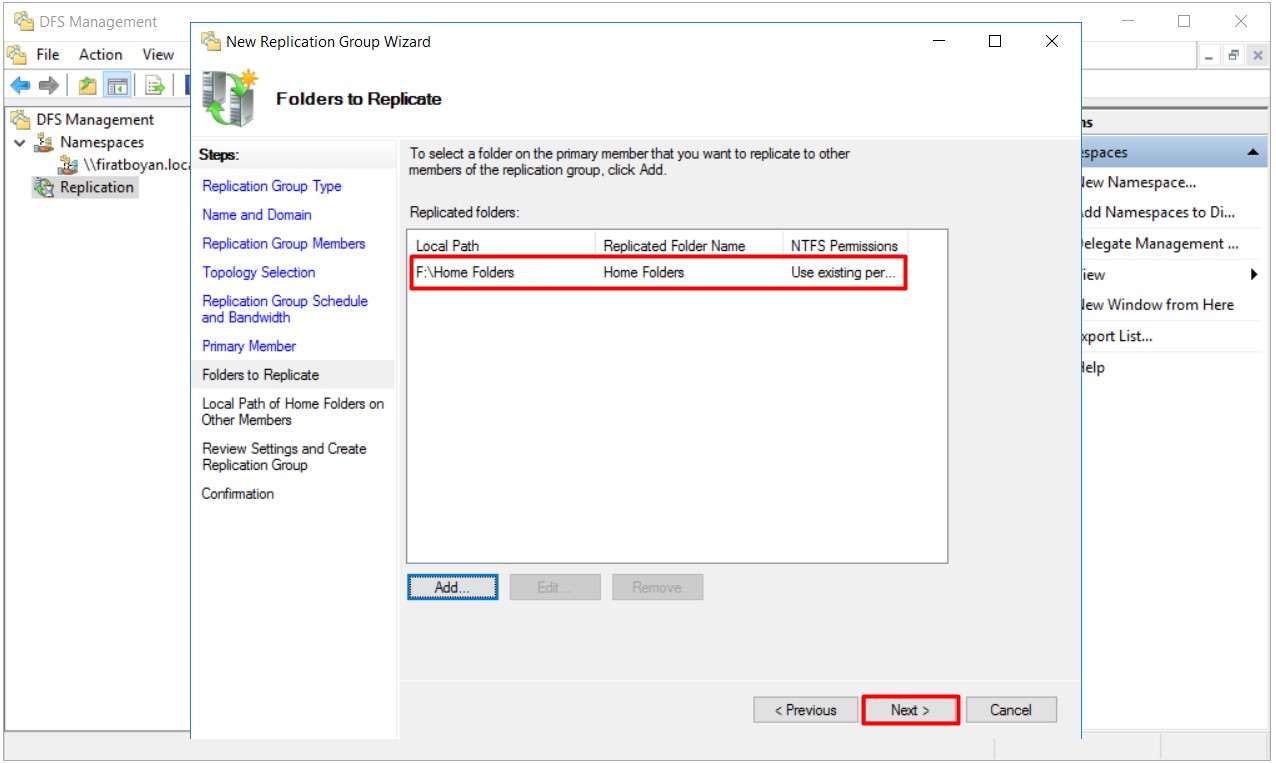
24.4- The information of the relevant NTFS Volume Path and the share folder to be replicated is seen. I am proceeding by clicking on the Next button.
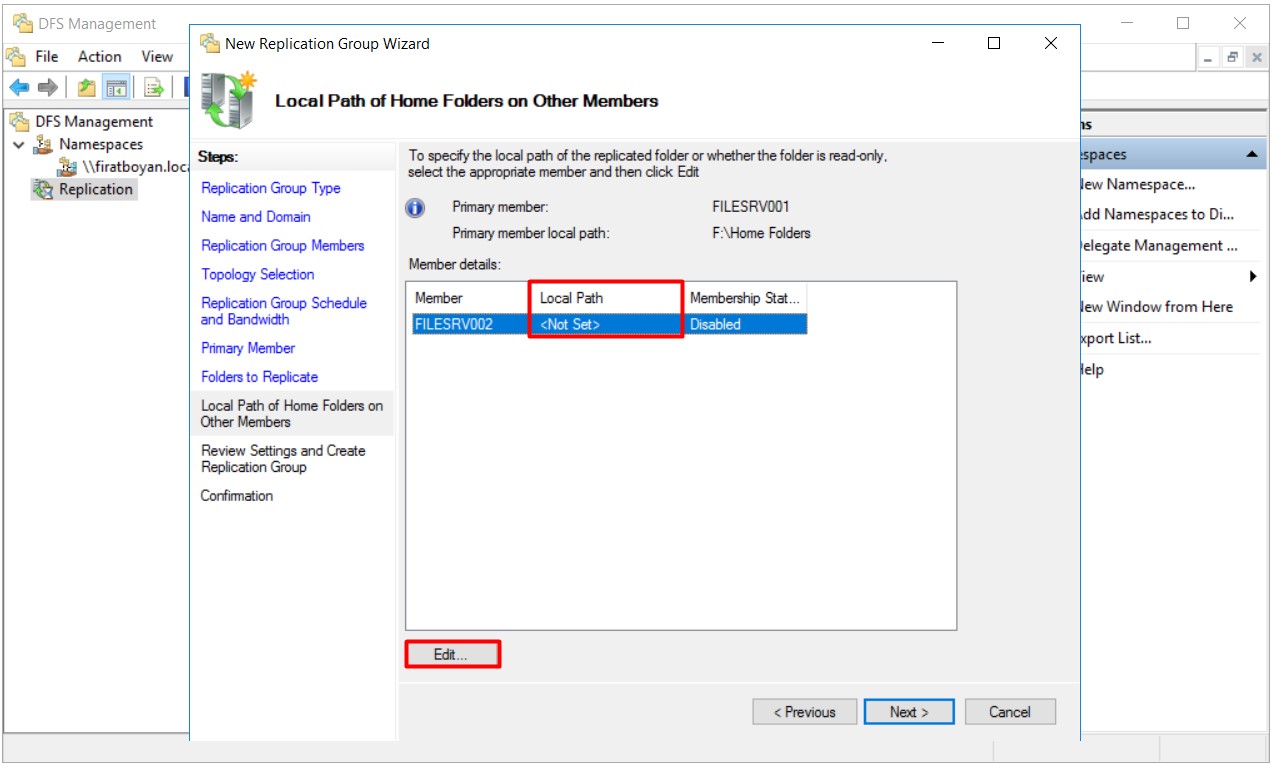
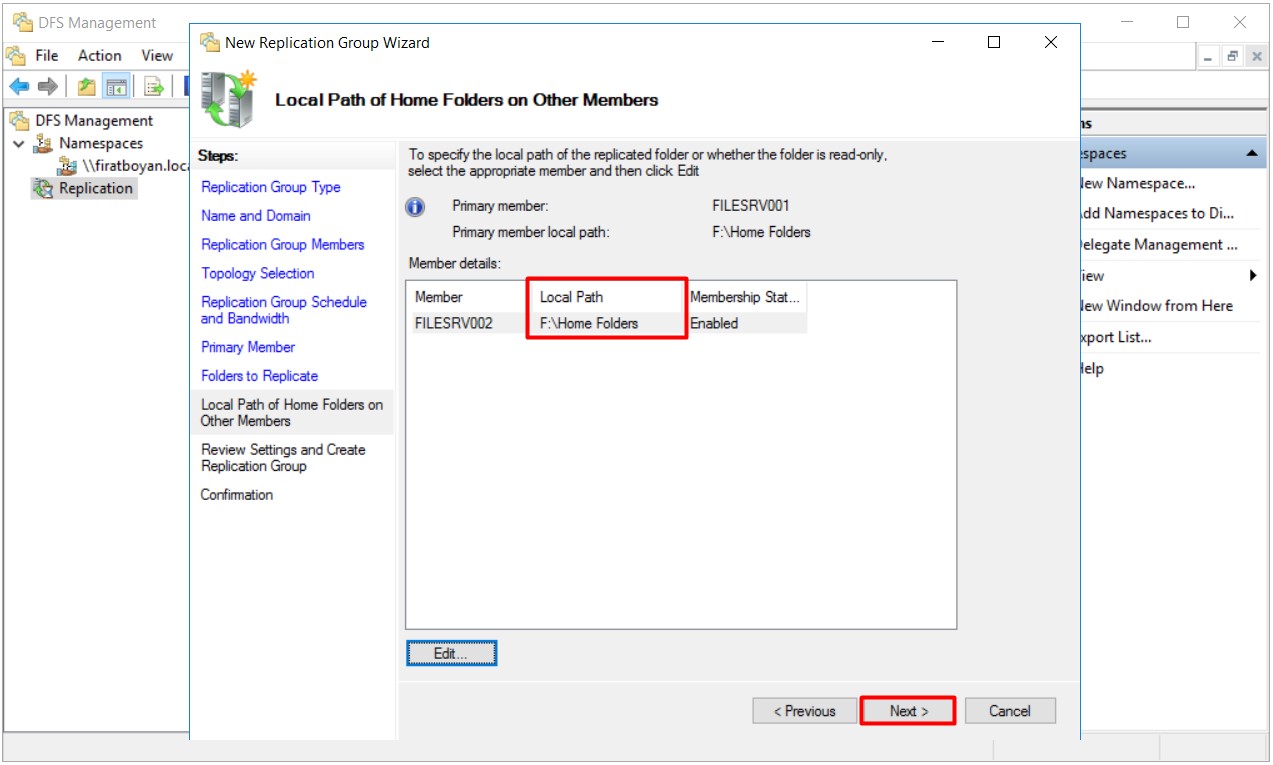
25- As in the Folders to Replicate step, I will select my share folder on the corresponding NTFS Volume on my other DFS Server in the replication group in the Local Path of Home Folders on Other Members step. I am starting the selection process by clicking on the Edit... button.
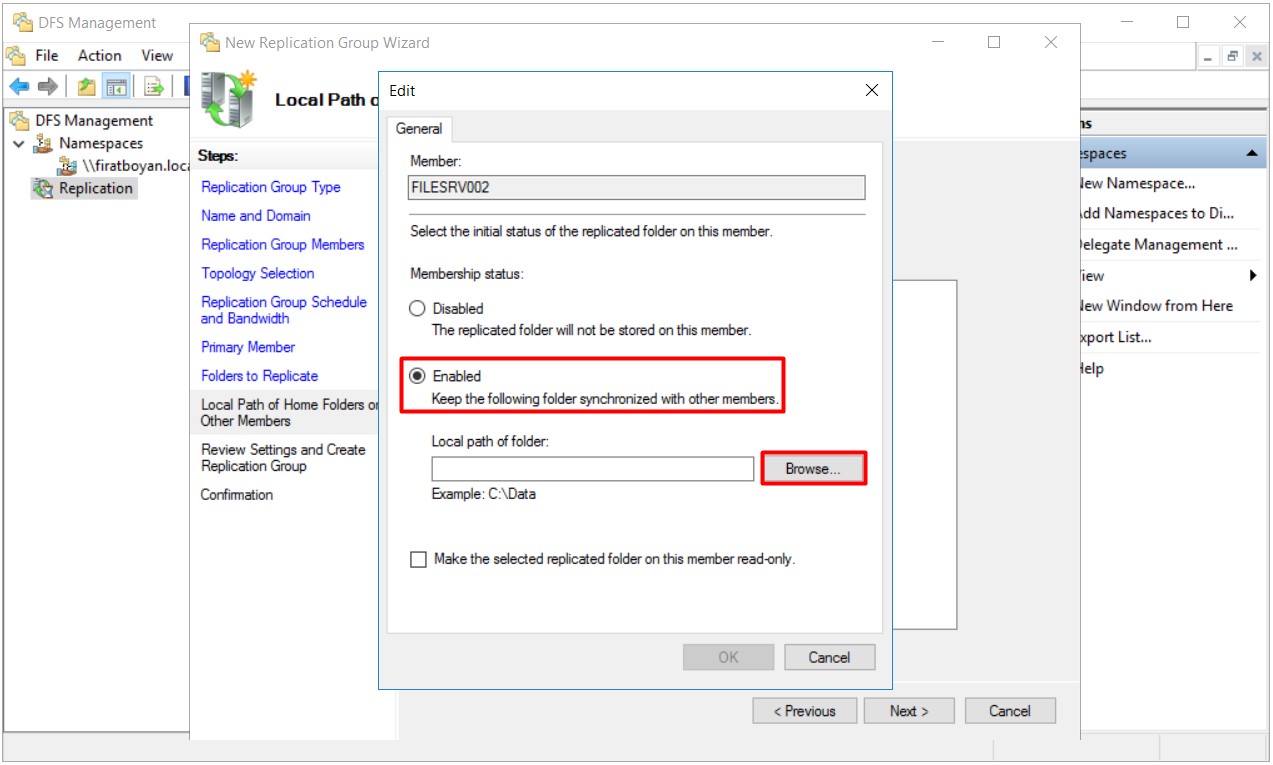
25.1- I am first selecting the Enabled option under the Membership status, and click on the Browse... button in the Local path of folder section and select my share folder on the relevant NTFS Volume on the window that opens.
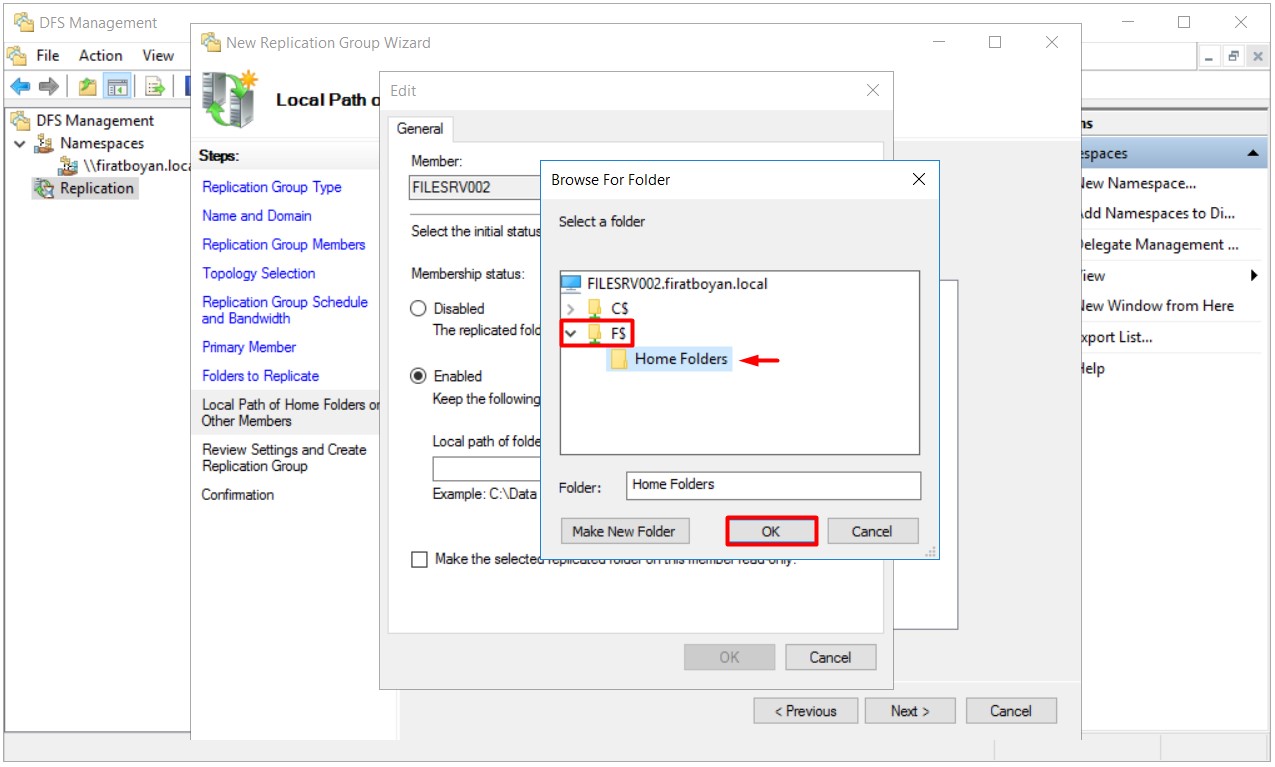
25.2- NTFS Volume Path information, which contains my share folder to be replicated, appeared in the Local path of folder to replicate section. If you wish, you can type manually if you know the relevant NTFS Volume Path information. I am closing the window by pressing the OK button upon finishing my process.
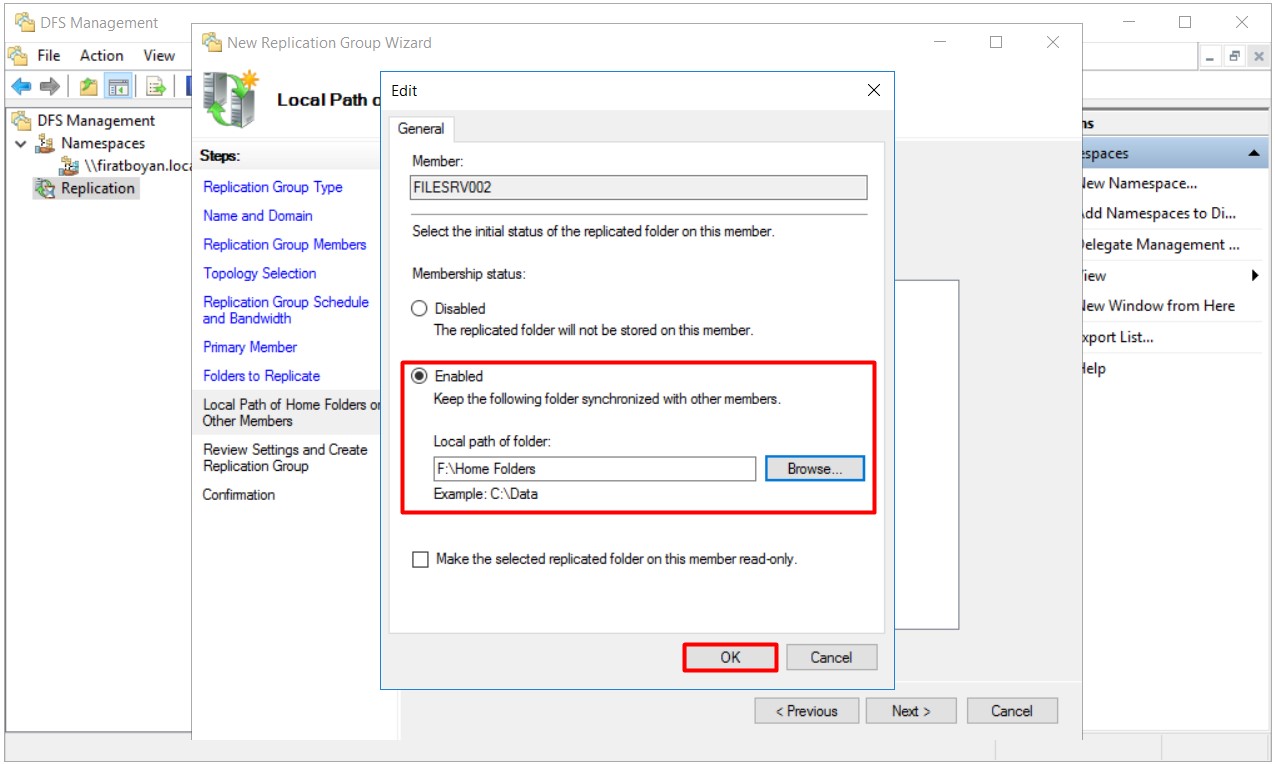
25.3- The relevant NTFS Volume Path information and the share folder information to be replicated is seem. I am proceeding by clicking on the Next button.
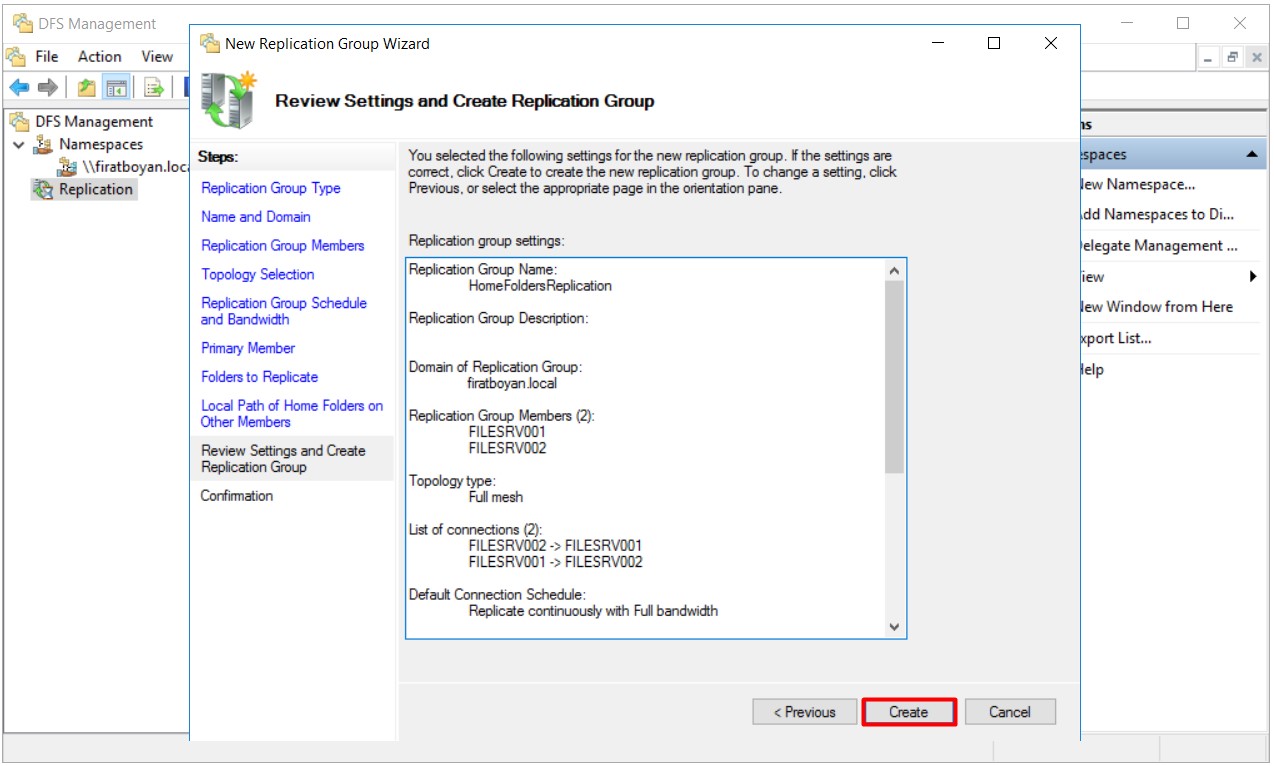
26- There is a summary of replication group settings in the Review Settings and Create Replication Group step. If the configuration settings are correct, I can start the process of creating the DFS Replication Group by clicking on the Create button.
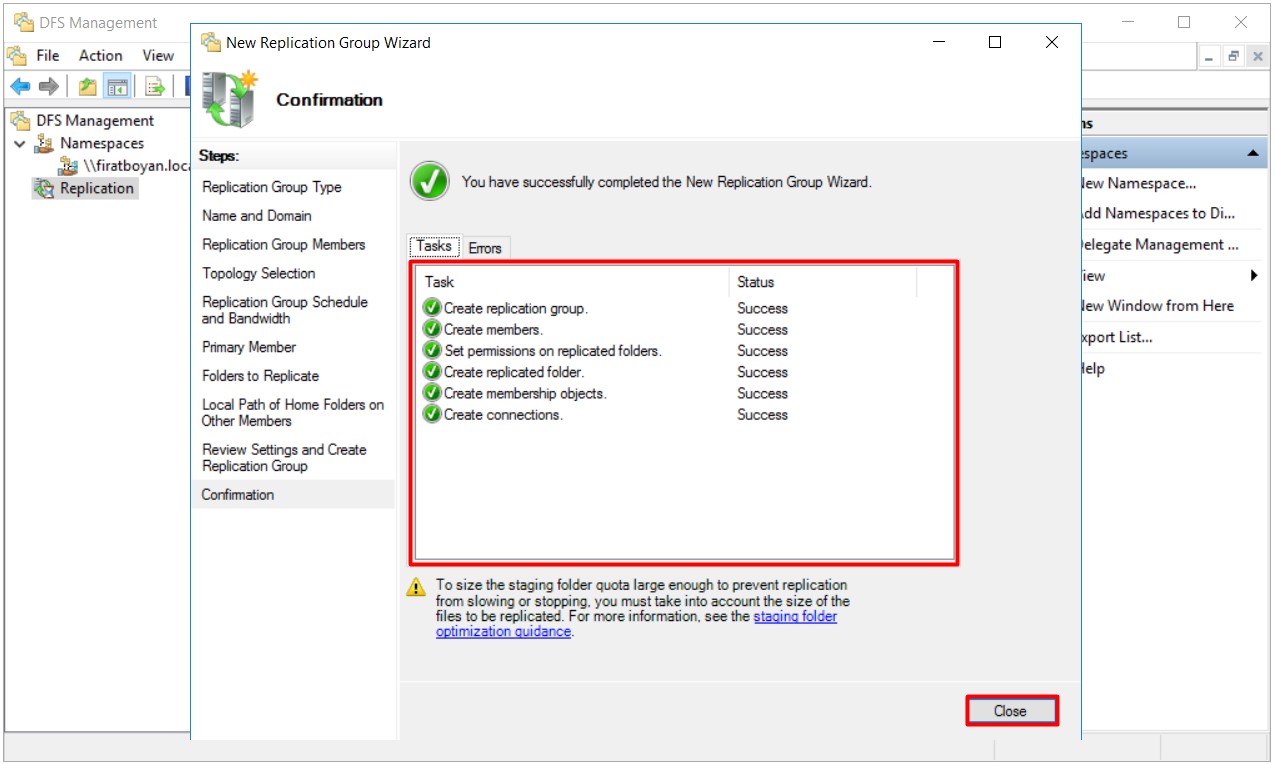
27- I see that my replication group has been successfully created in the Confirmation step. I am closing the related Wizard screen by clicking on the Close button.
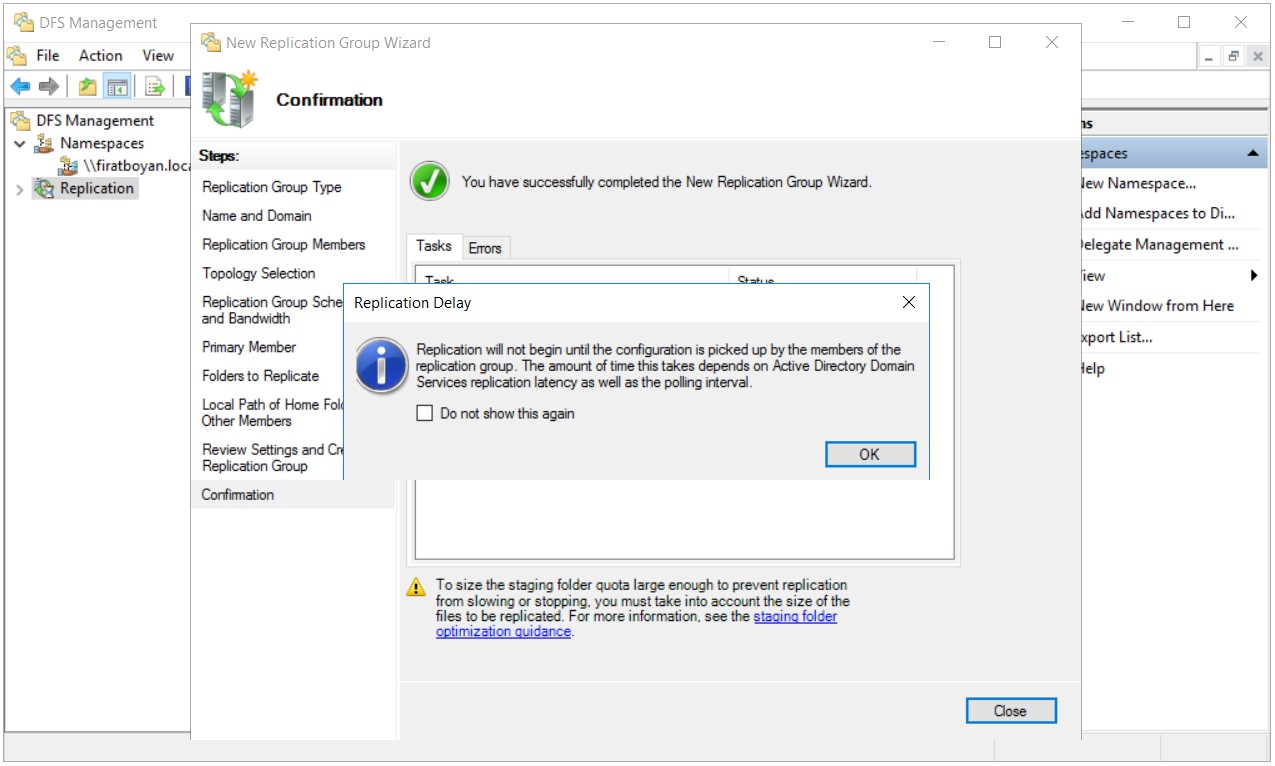
28- I get an information message stating that the replication will not start until the replication I created is received by the replication group member server(s) when I click on the Close button. In other words, the replication that I create must be created automatically on the replication group member server(s).
This process may take some time. It is good to wait :)
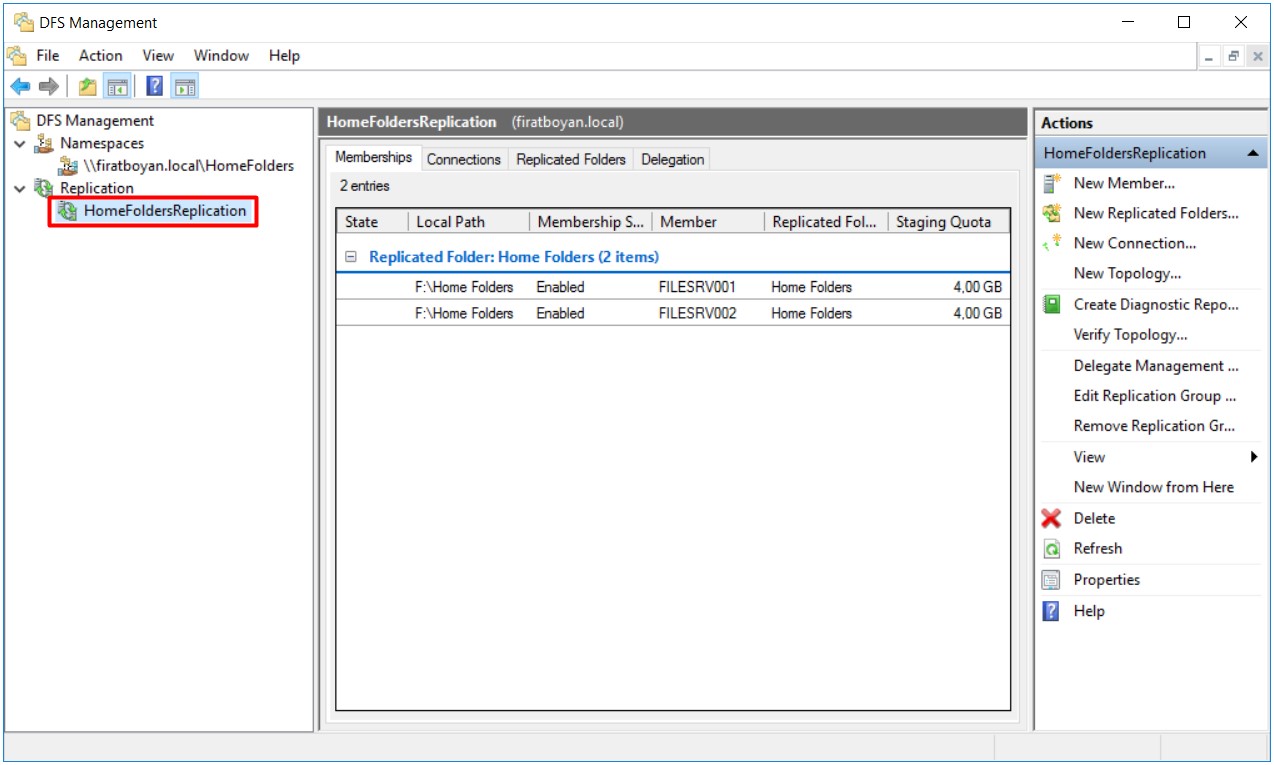
29- I can see that the replication I created has emerged under Replication.
File Staging Concept
DFS replication uses a folder called Staging Folders when replicating new or changed files from the sending member to the receiving member. The purpose of this folder is to prepare the files to be transferred at the block level and compress them and send them to the other party (only the changed blocks are sent and compression processes are performed if RDC is turned on). If the sending member receives a Request from the receiving member, it first starts the Staging process. In this process, the requested files are read from the Replicated folder and put into this folder. The file that turns into this state is called Staged File. At the end of this process, Staged File is sent to the requesting receiving member. If RDC is on, then only the changed part is transferred. The requesting member gets this file and similarly assigns it to the Staging folder. This file is opened (decompressed) and added to the Replicated folder.
Info!: Each Replicated Folder has its own Staging Folder. This Folder is located under the folder of DfsrPrivate in the local path of the replicated folder by default.
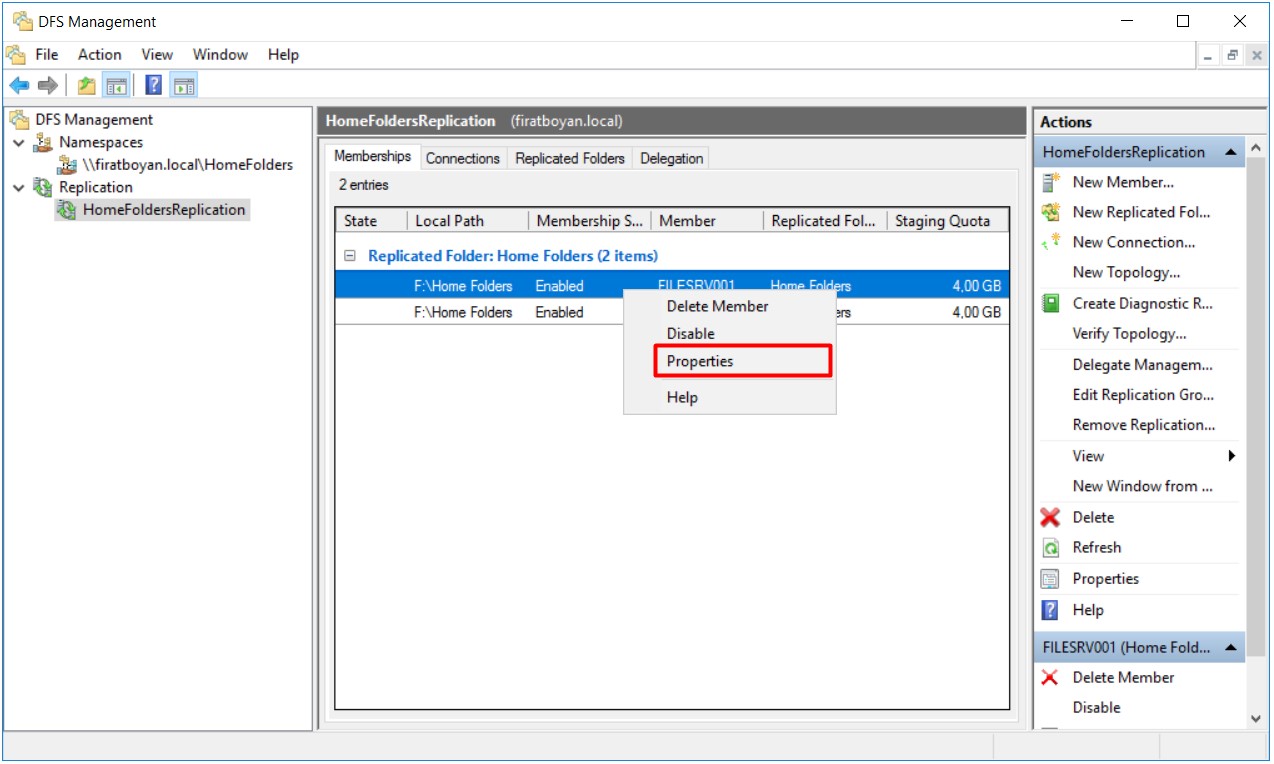
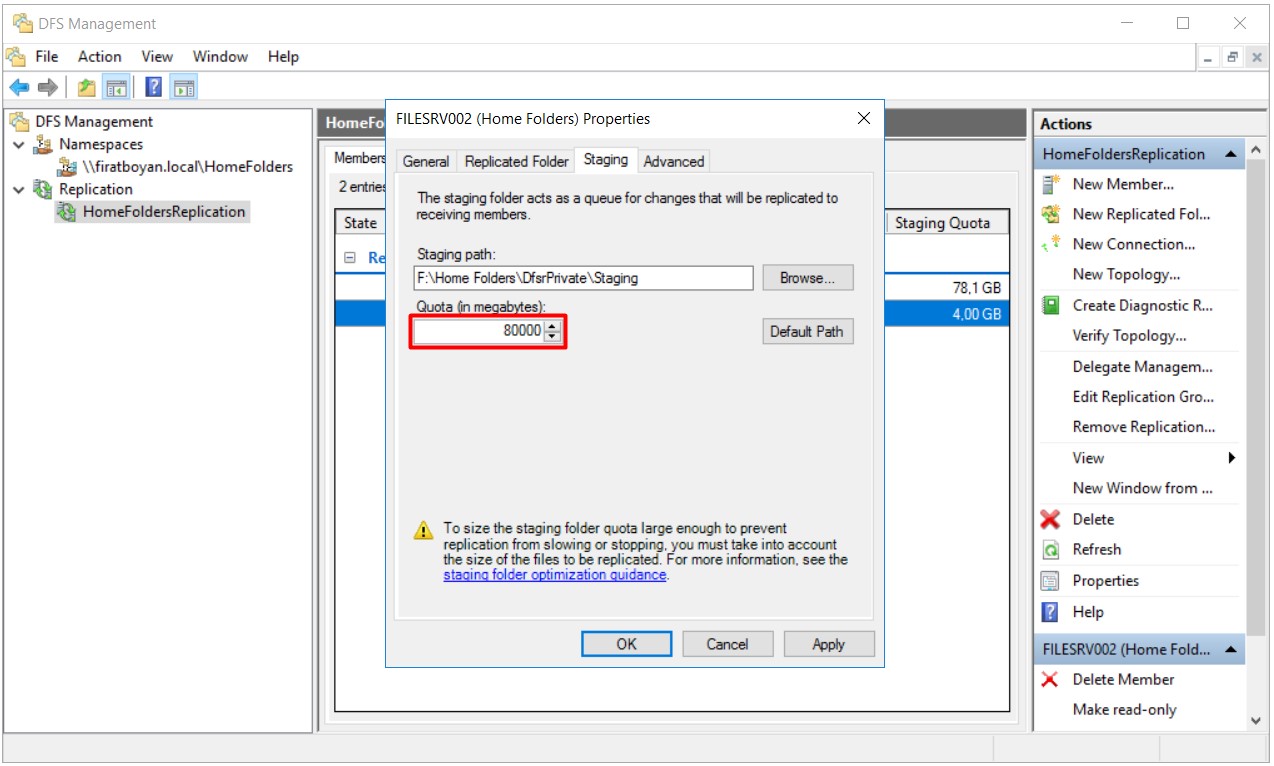
30- Our next process after creating the Replication Group will be to determine the Staging quota for each shared folder. I am right clicking on the relevant Replicated Folder in the Membership tab under the Replication Group I created and selecting Properties.
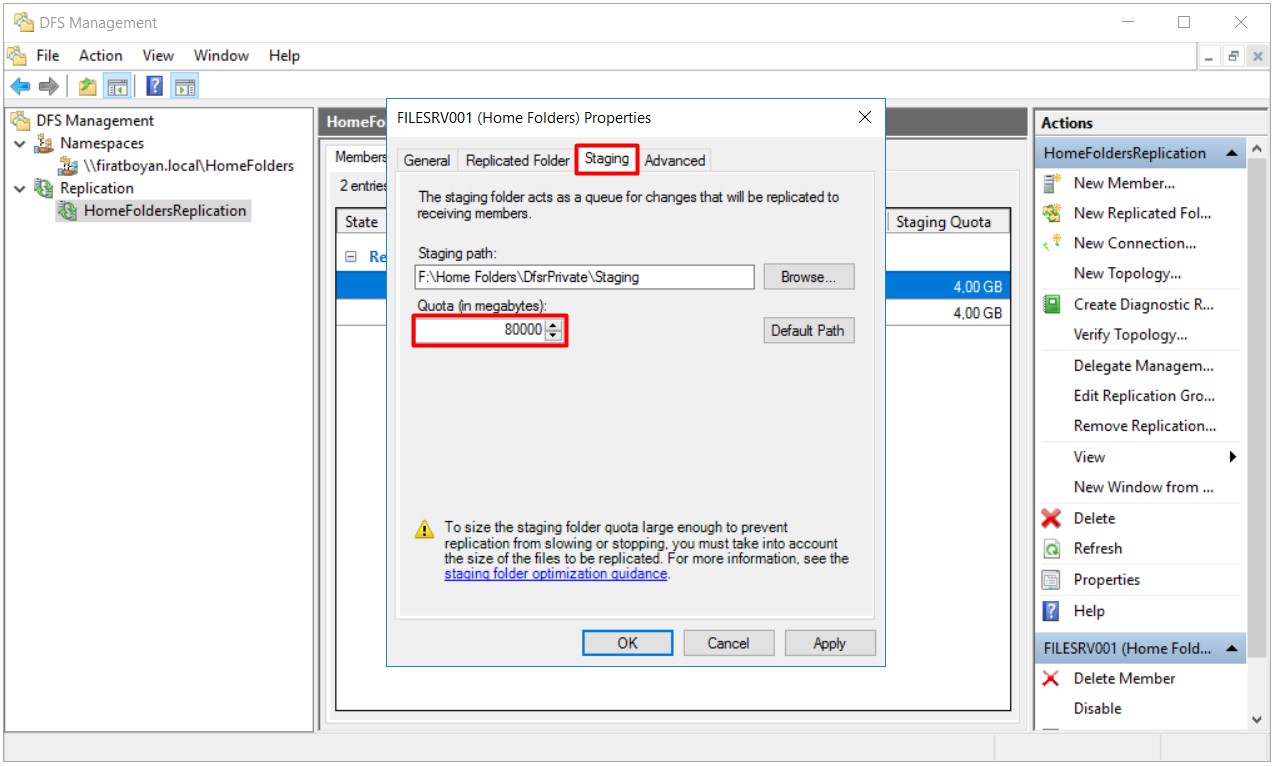
30.1- I will configure the Staging quota in the window that opens, under the Staging tab. By default, this folder is 4096 MB in size. This is a changeable limit. If the staging folder becomes 90% full, it will be deleted until 60% free space remains. This process works a little differently for large files. When a file larger than the quota is taken into the Stagin folder, the Cleanup process starts, but these files, which are considered to be old but still processed, cannot be deleted and this Cleanup process gets an error. The reason for this is that the staging file is large and is prepared to be sent to the other party. Since this cleanup process will be repeated after a while, this folder can be emptied after the transfer is finished or the Staging quota size can be increased. If you are constantly working with large files, increasing the Staging quota size is a recommended procedure. Of course, in this case, you need to increase the staging quota size one by one on all member servers in the replication group. If you are constantly working with large files, keeping the Staging quota size low will cause unnecessary resource consumption.
You can edit the staging quota size considering to your needs.
31- I mentioned that you need to increase the staging quota size one by one on all member servers in the replication group above. Now, I am selecting the Properties option on the relevant Replicated Folder on the other member server and I am performing the Staging quota configuration in the same way under the Staging tab in the window that opens.
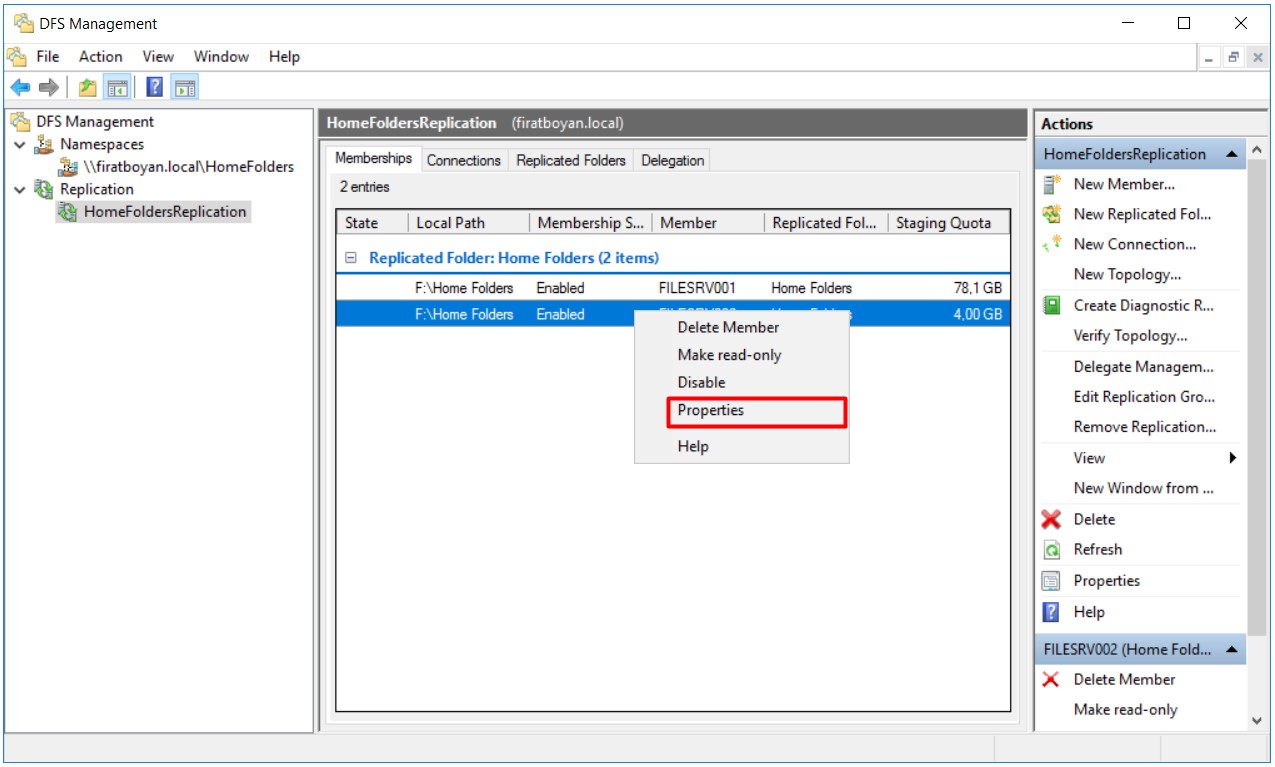
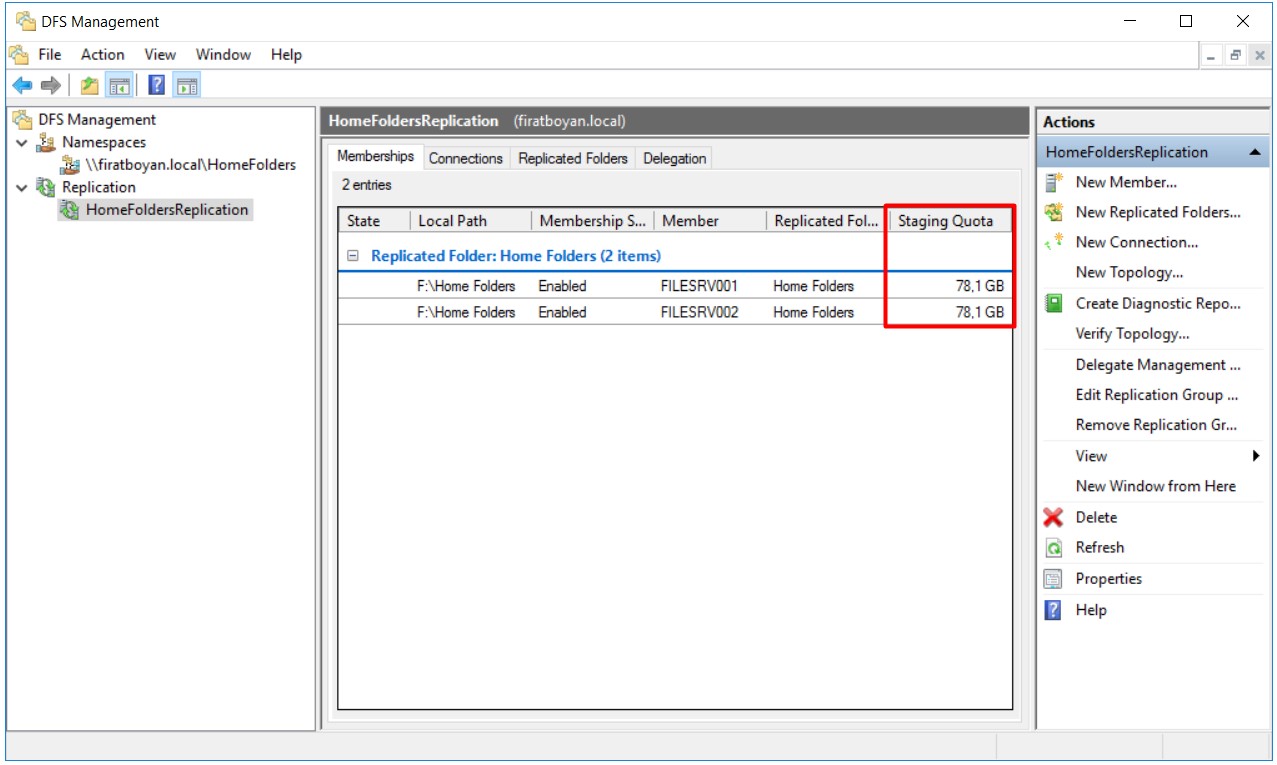
31.1- I have completed the Staging quota size configuration process on the member servers in both replication groups.
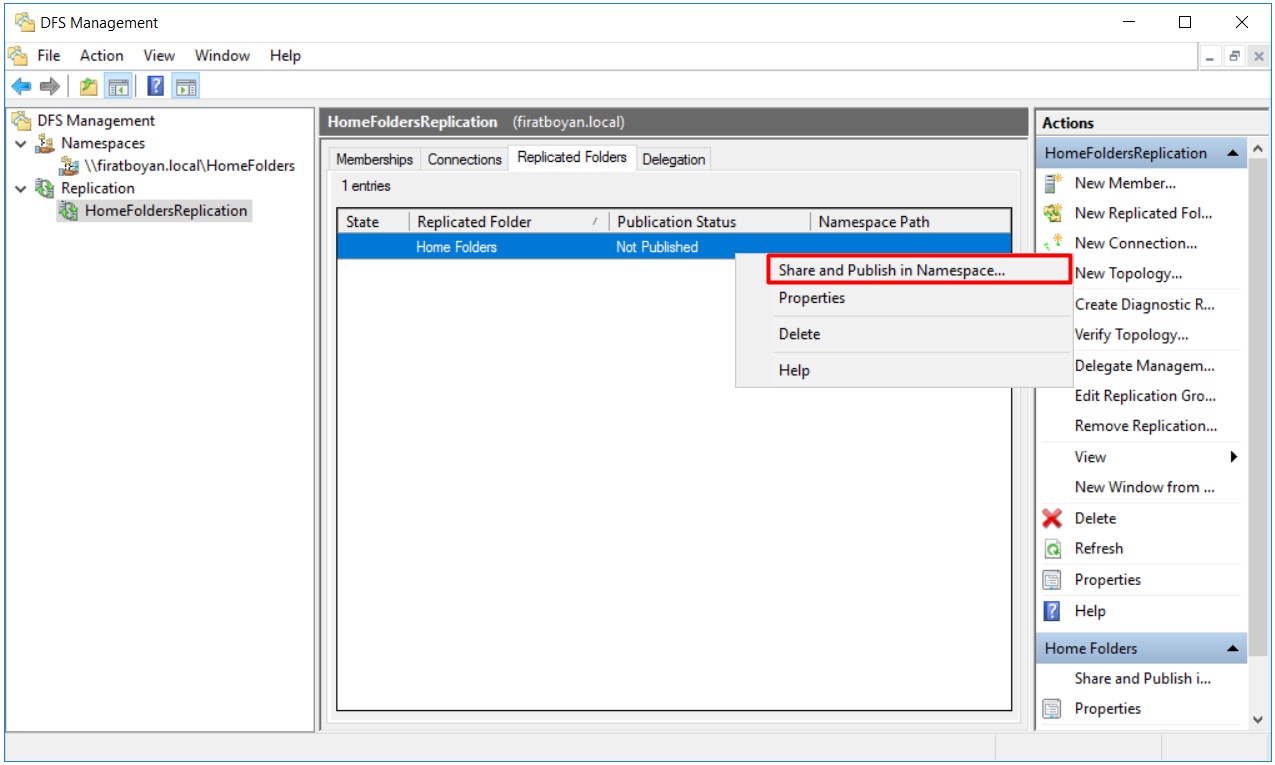
32- What I will perform in the next step is publishing my sharing folder, which I will replicate in the Replicated Folders tab under the Replication Group I created, under the Namespace I created. I am right clicking on the space of my sharing folder that I will replicate and selecting the Share and Publish in Namespace... option to perform this action.
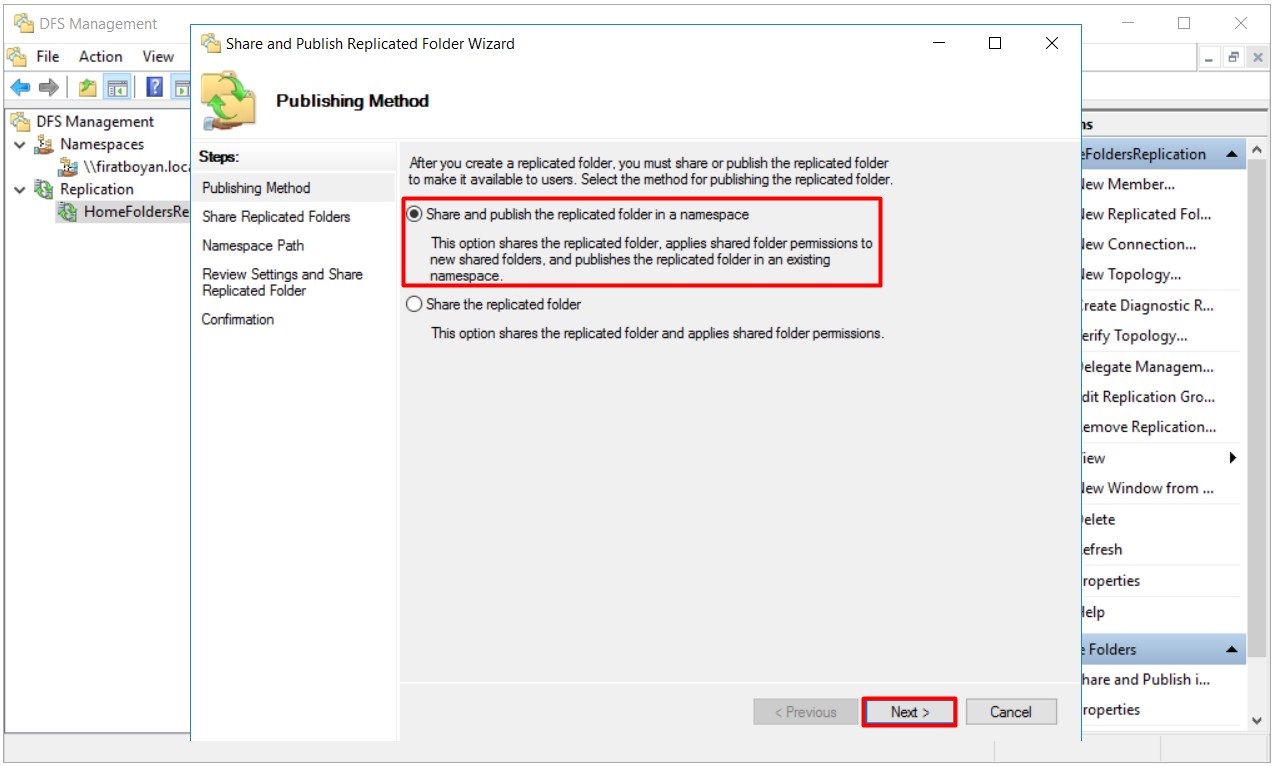
33- I am selecting the Share and Publish the replicated folder in namespace option under the Publishing Method section on the Share and Publish Replicated Folder Wizard window that opens and proceeding by pressing on the Next button.
34- I am selecting which DFS Server and under which Namespace my share folder will be published in the Share Replicated Folders step. I am proceeding by pressing on the Next button.
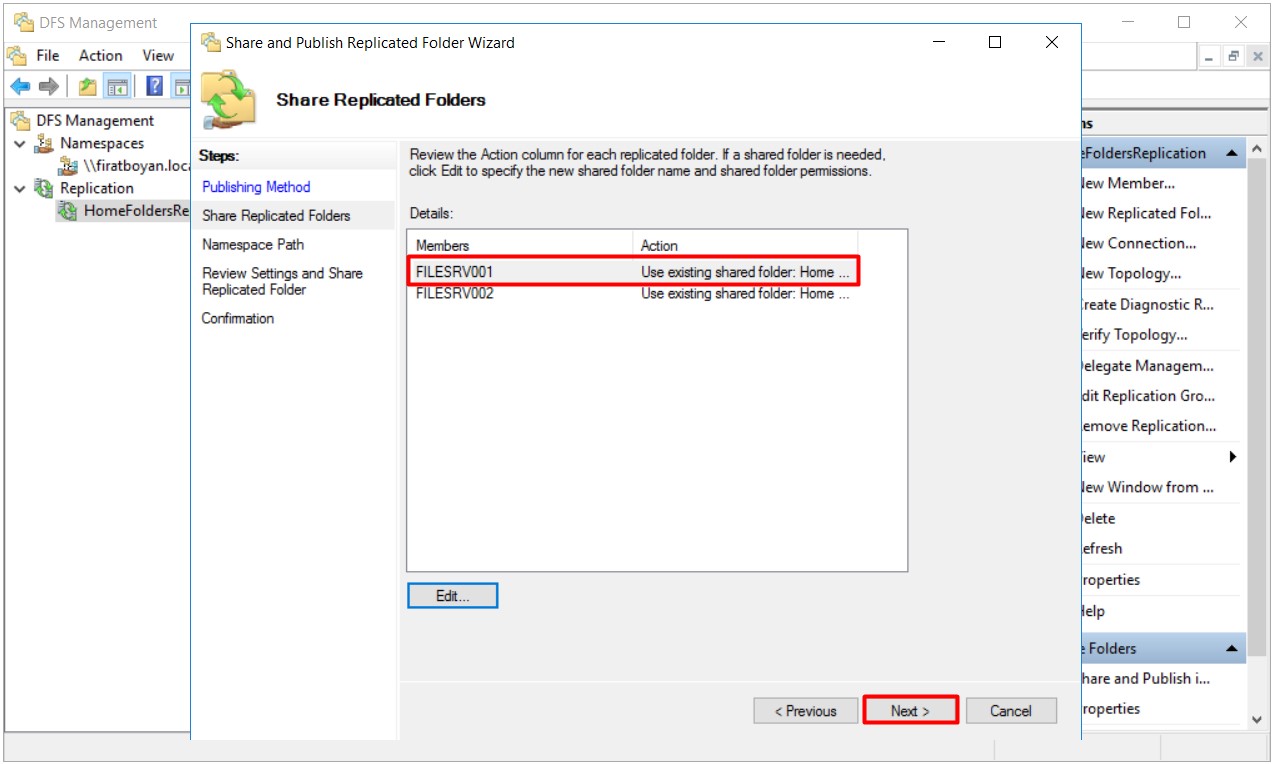
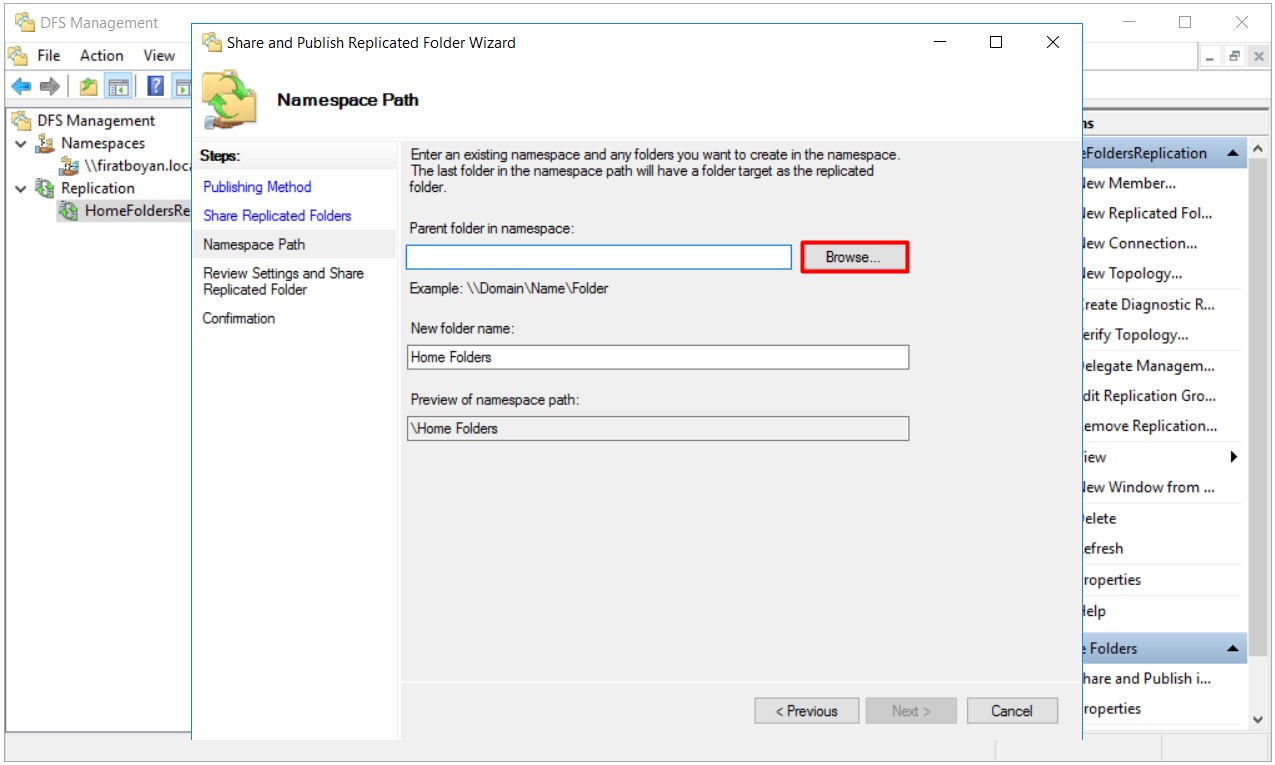
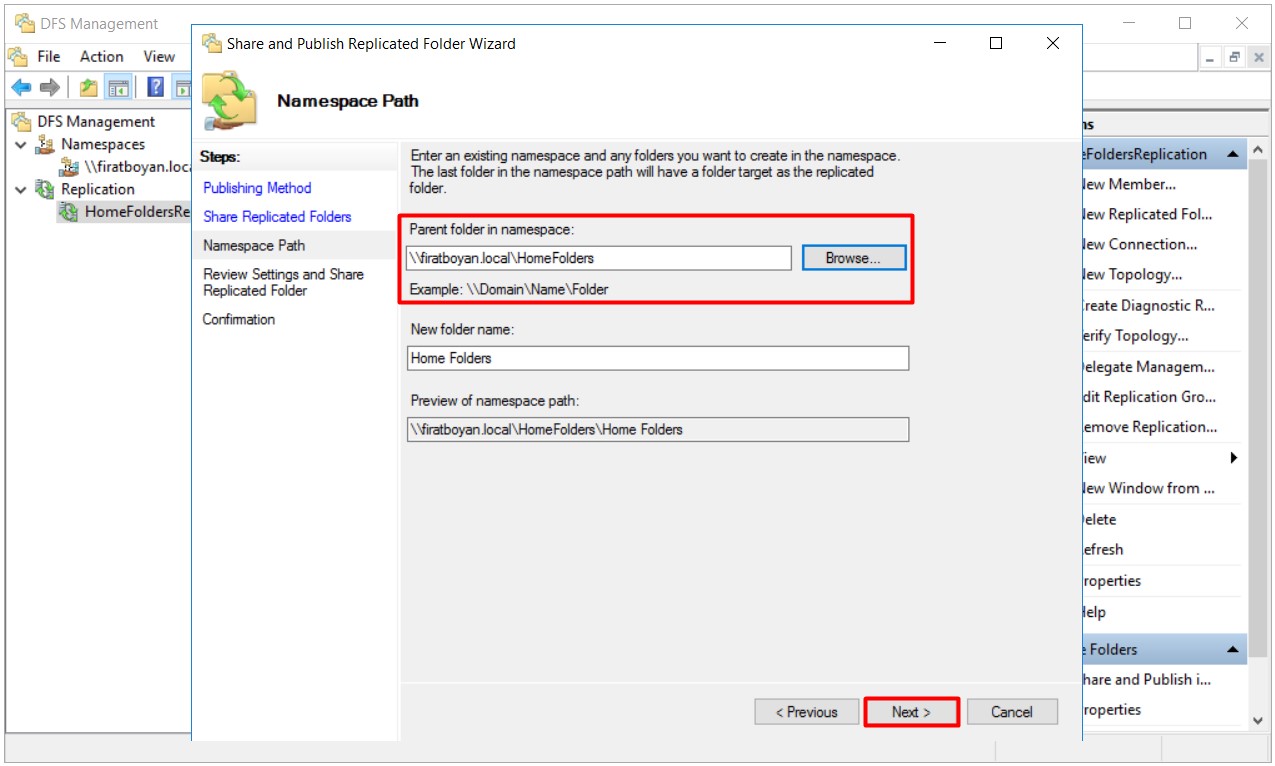
35- I am pressing on the Browse... button to select my Namespace to publish in the Parent folder in the namespace section in the Namespace Path step.
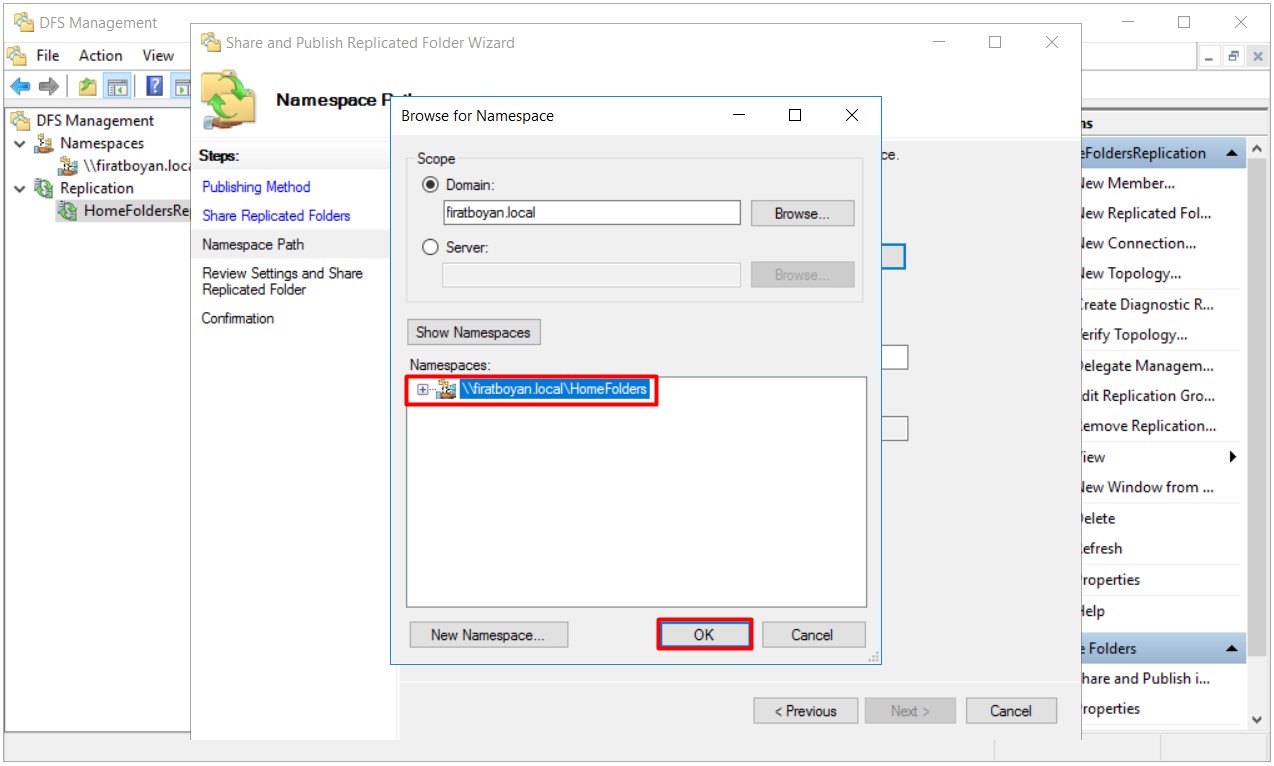
35.1- I am selecting the Namespace I created before in the window that opens and closing the window by pressing on the OK button.
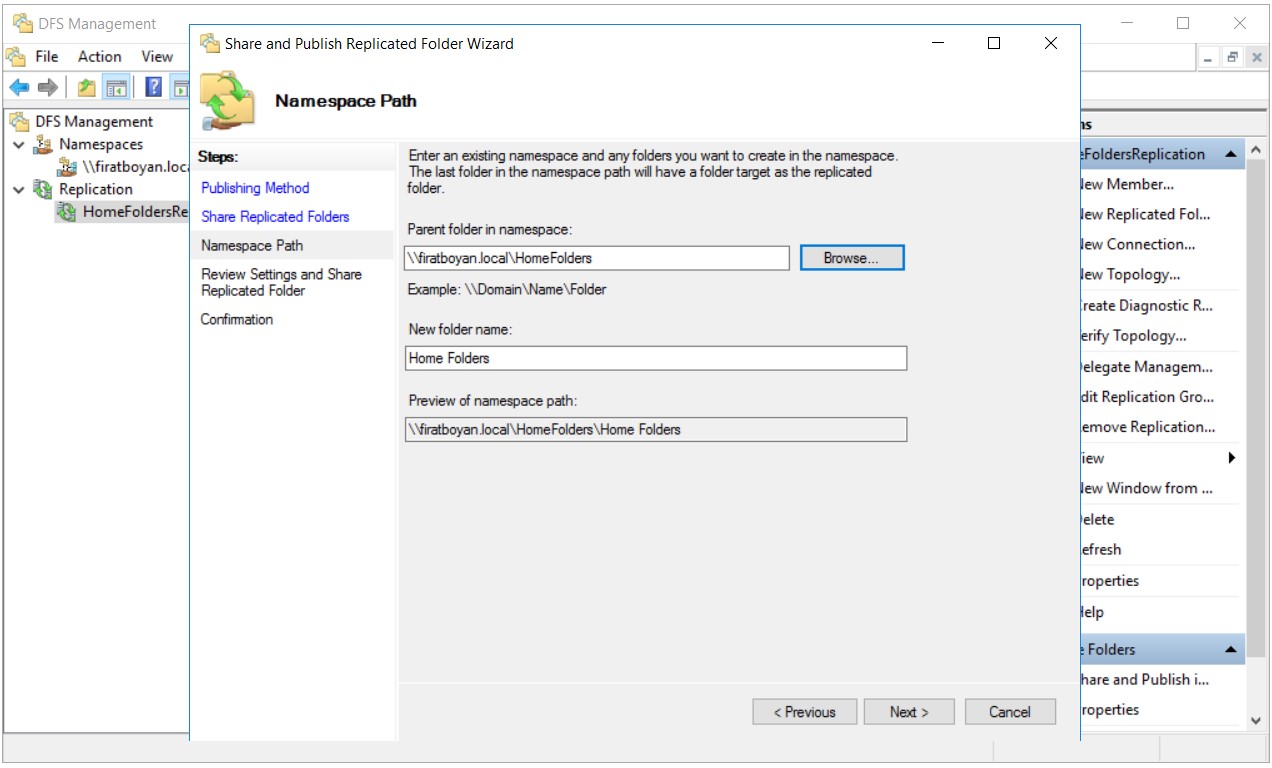
35.2- I am proceeding by clicking on the Next button after finishing selecting the relevant Namespace
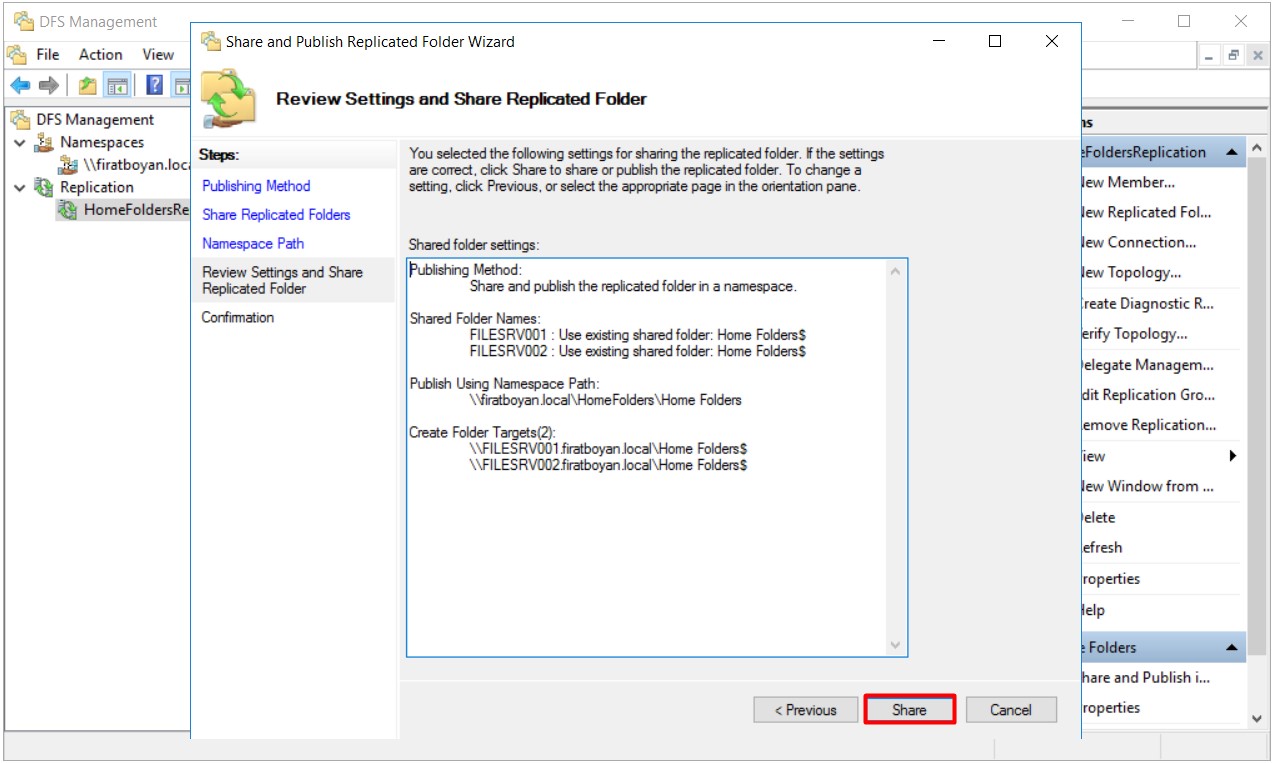
36- A summary of the configuration settings in the Review Settings and Share Replicated Folder step is seen. If the configuration settings are correct, it is possible for us to complete the publishing process under Namespace by clicking on the Share button.
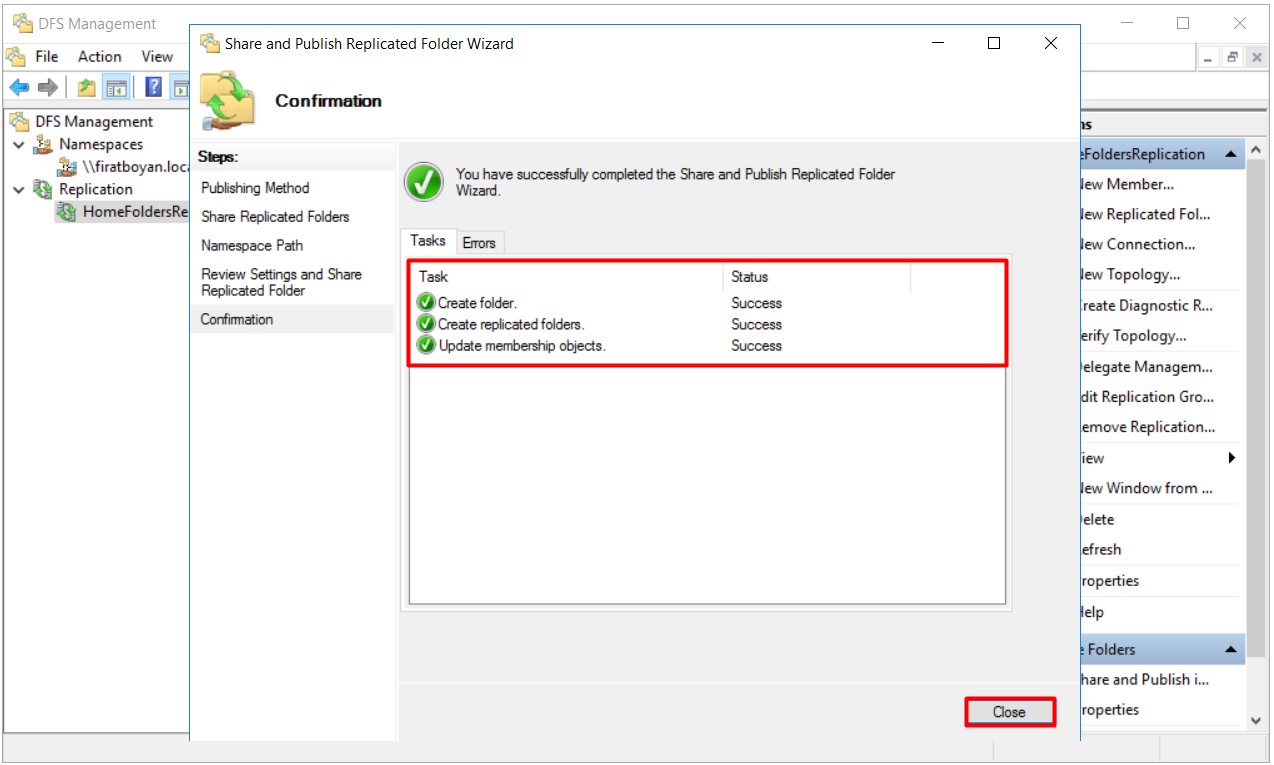
37- Our Publishing process under relevant Namespace is completed. I am closing the window by pressing on the Close button.
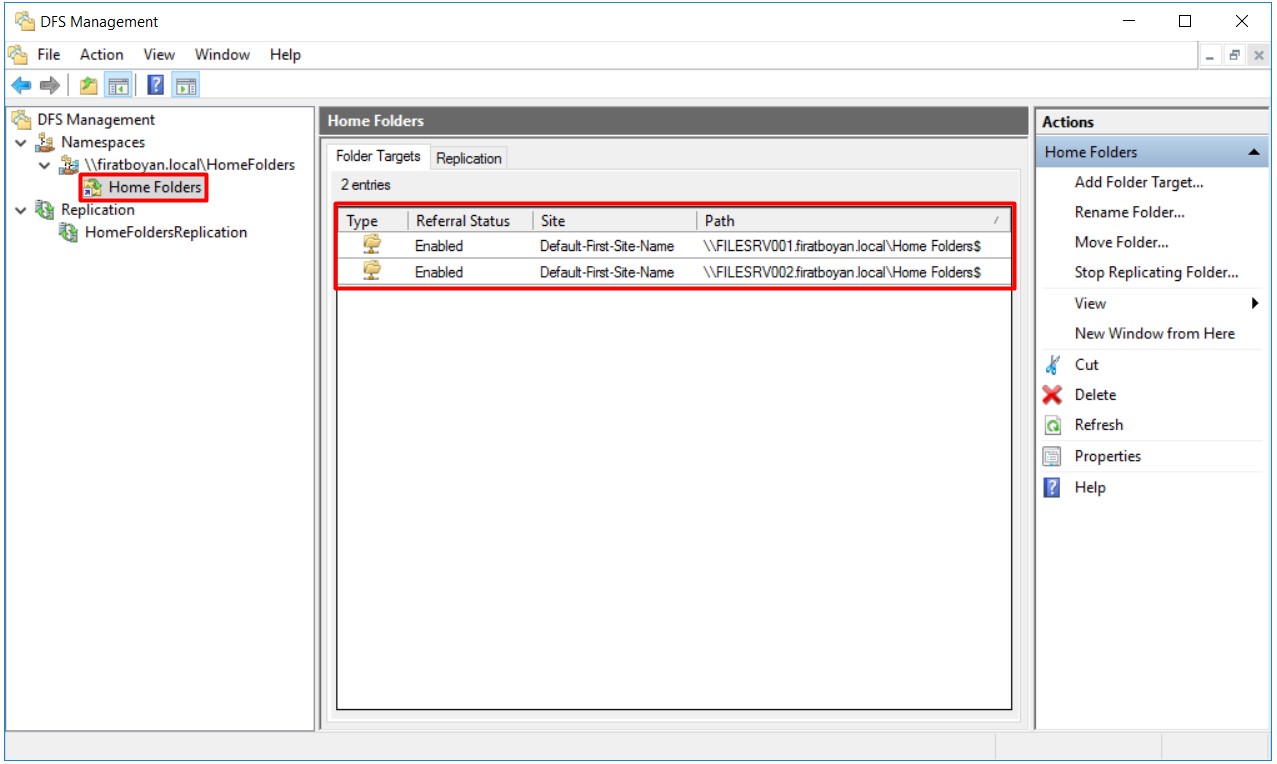
38- I can see that the shared folder is published under the Namespace I created.
39- I am opening the DFS Management on the DFS Server member in the replication group and see that the replication I created is also on this DFS Server upon completing all our actions.
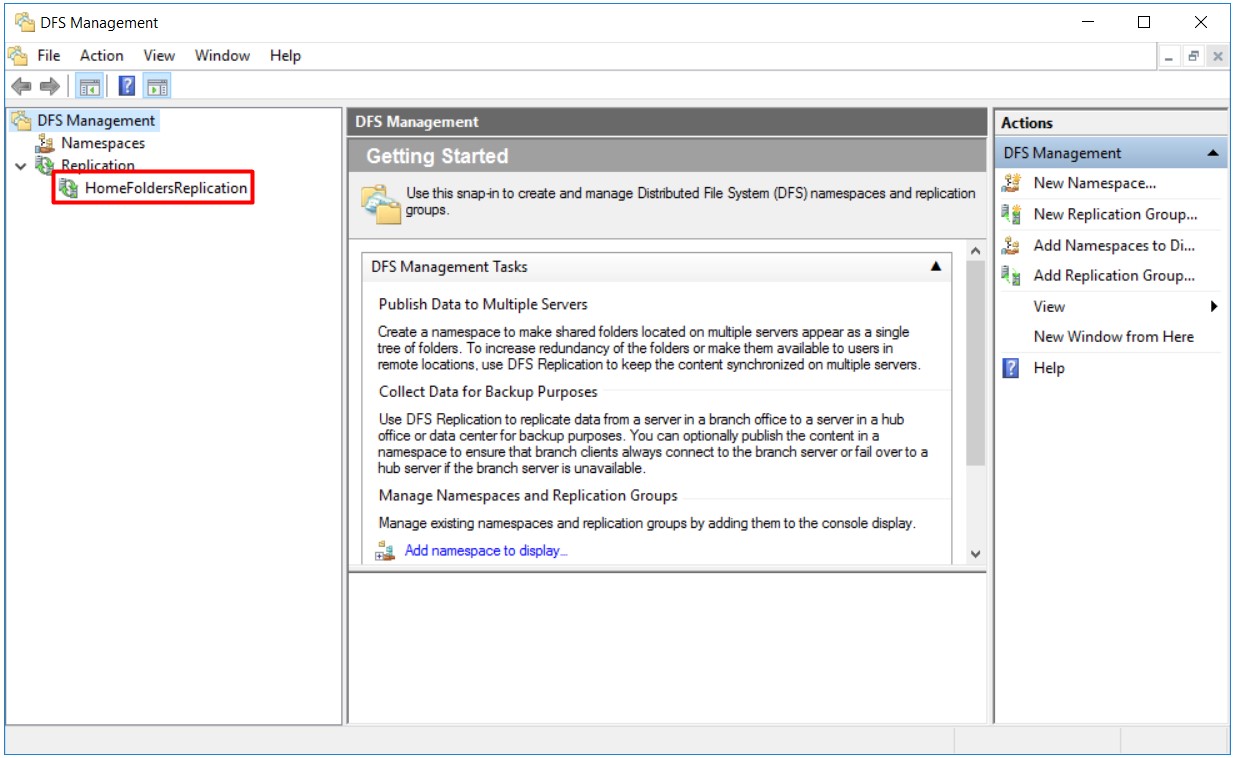
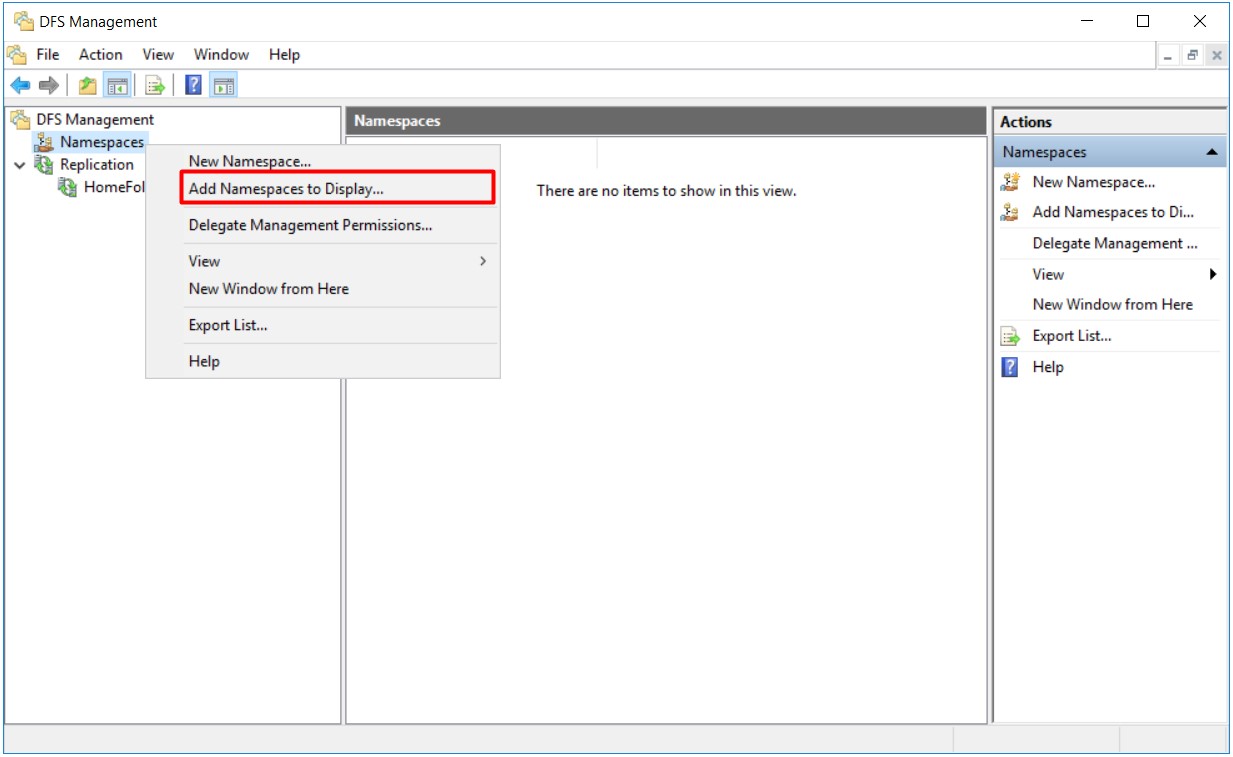
40- You can optionally request the corresponding Namespace to appear in the Namespaces section under DFS Management on the member DFS Server in the replication group. I am right clicking on Namespaces under DFS Management and select Add Namespaces to Display... option to perform this action.
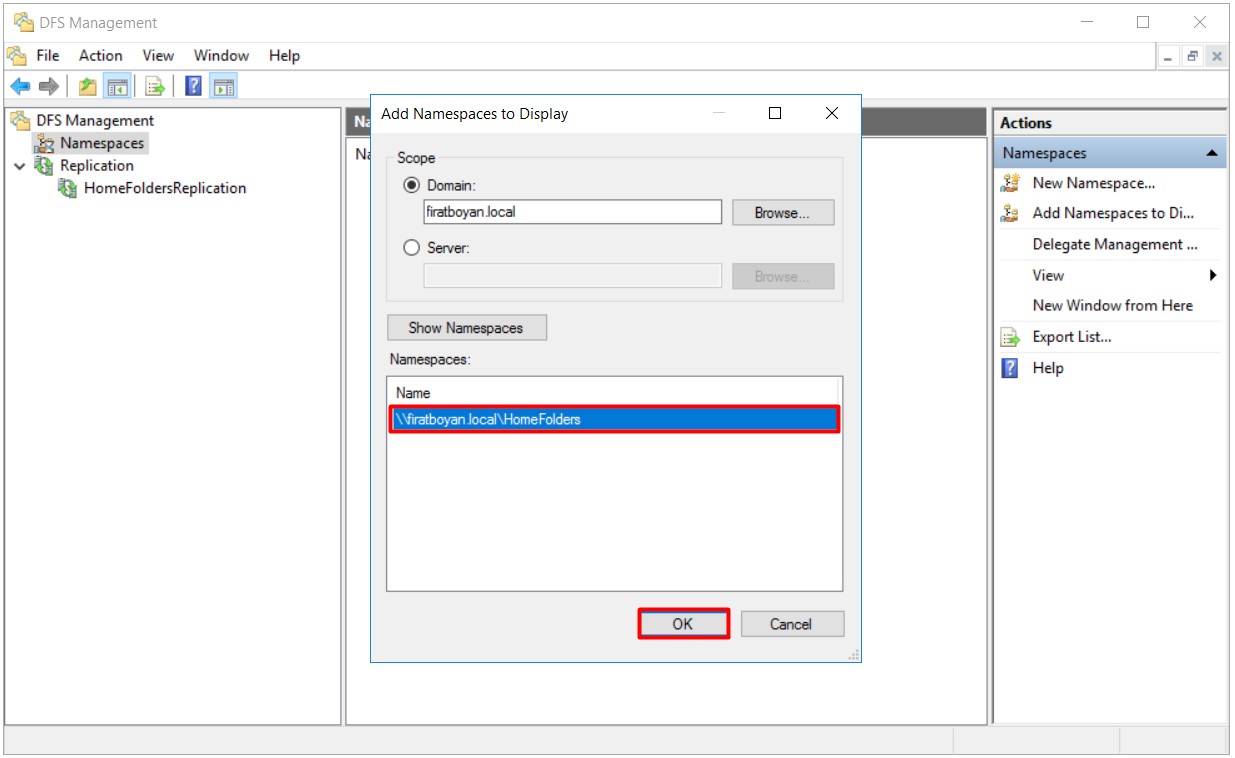
40.1- In the window that opens, I am selecting the relevant Namespace under Namespaces and click on the OK button to add.
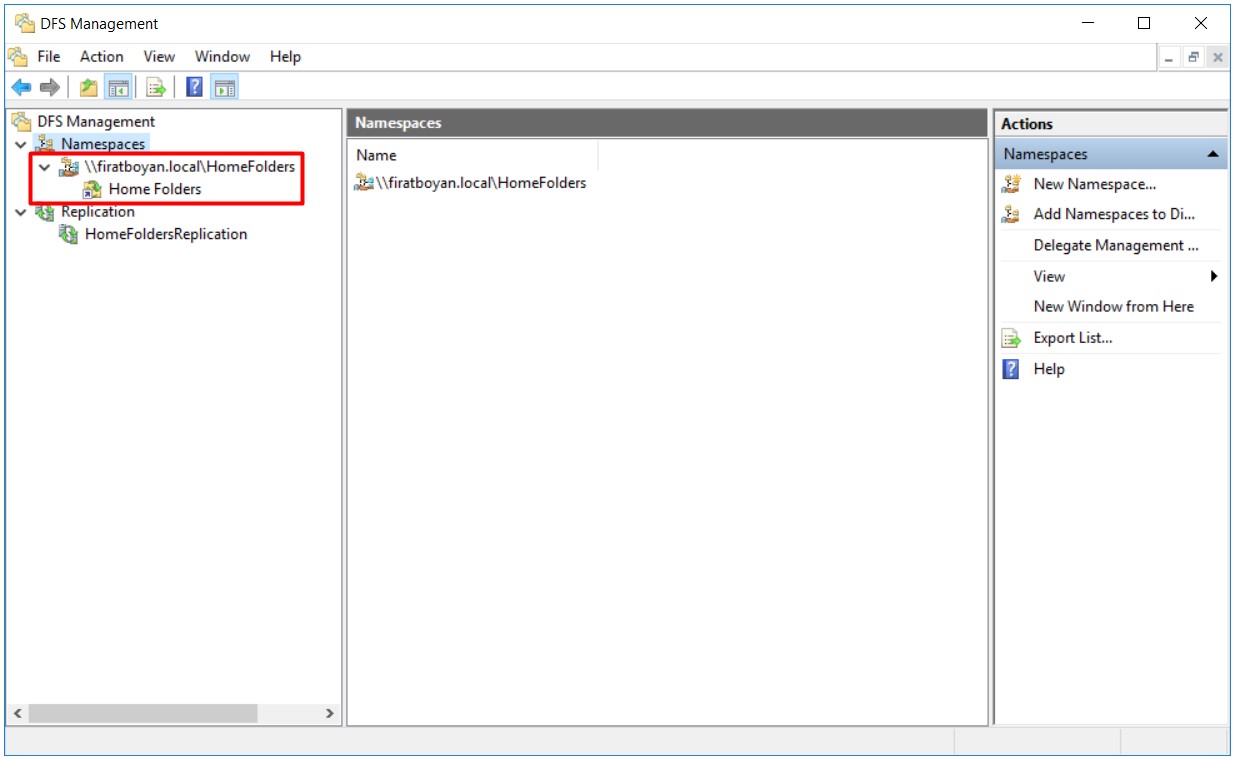
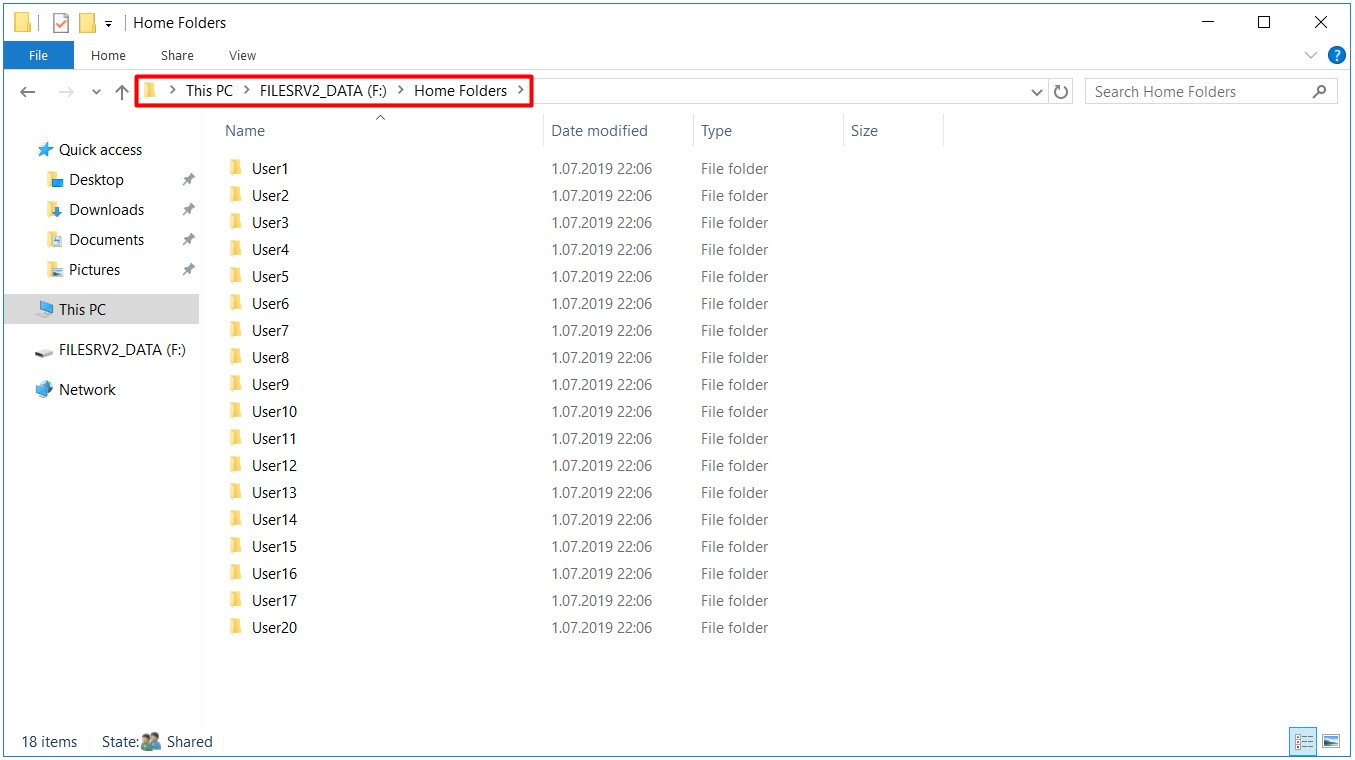
41- I can see that all folders and files in my share folder that I created in NTFS Volume on Primary DFS Server have successfully replicated into my share folder that I created on the NTFS Volume on the Replicated DFS Server.
Creating DFS-Distributed File System High Availability (HA)
I have completed all the necessary procedures for the formation of the DFS structure on DFS Servers so far. It is time to complete the most important part which is DFS-Distributed File System High Availability (HA). High Availability is the process of ensuring that access to the share folder continues uninterruptedly through the Namespace in case one of the DFS member servers is DOWN. If this configuration is not done, if one of the DFS member servers is DOWN, the share folder will not be accessed through the associated Namespace. In this case, it will not be possible to mention about a cluster structure.
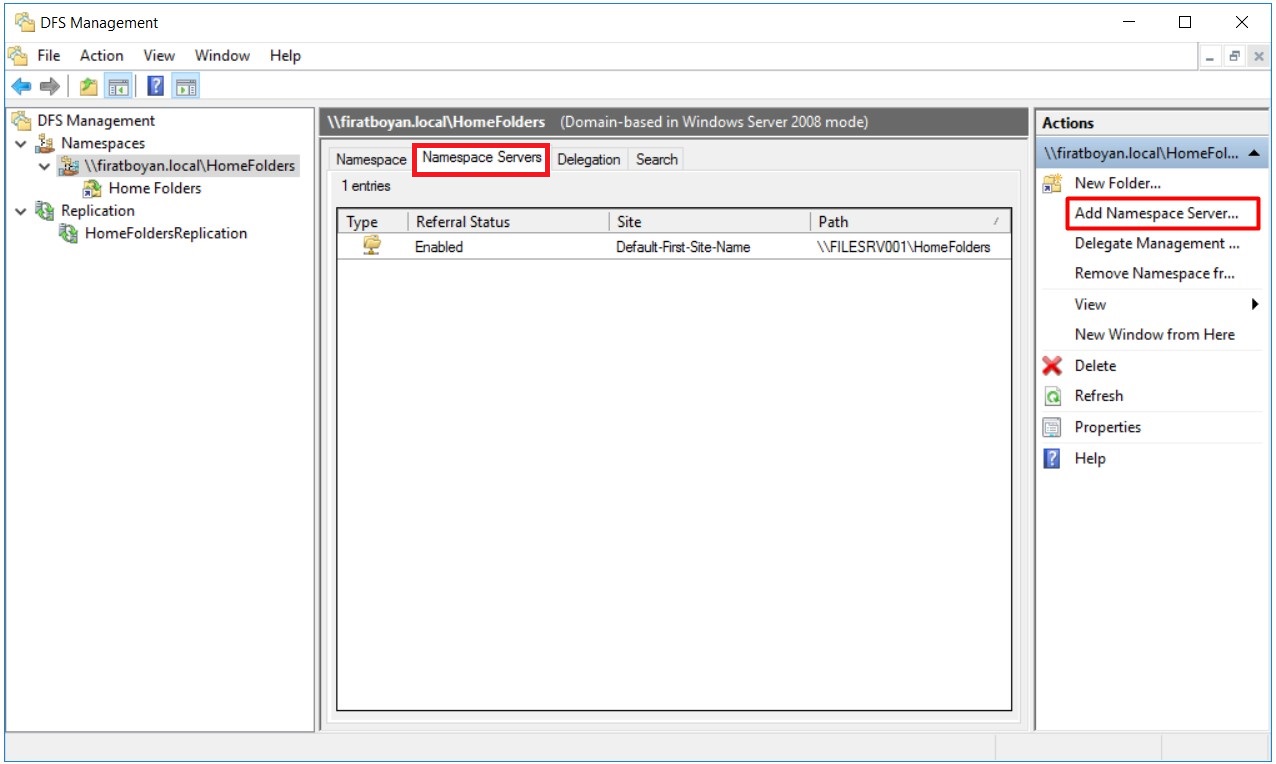
42- I am clicking on Namespaces under DFS Management. The namespace \\FILESRV001\ HomeFolders, which is my Primary DFS Server by default under the Namespace Servers tab is seen. What I need to do here is to add my DFS Server with the Host Name of FILESRV002, which is the member Replicated DFS Server in the replication group for High Availability (HA), through Add Namespace Server... on the right.
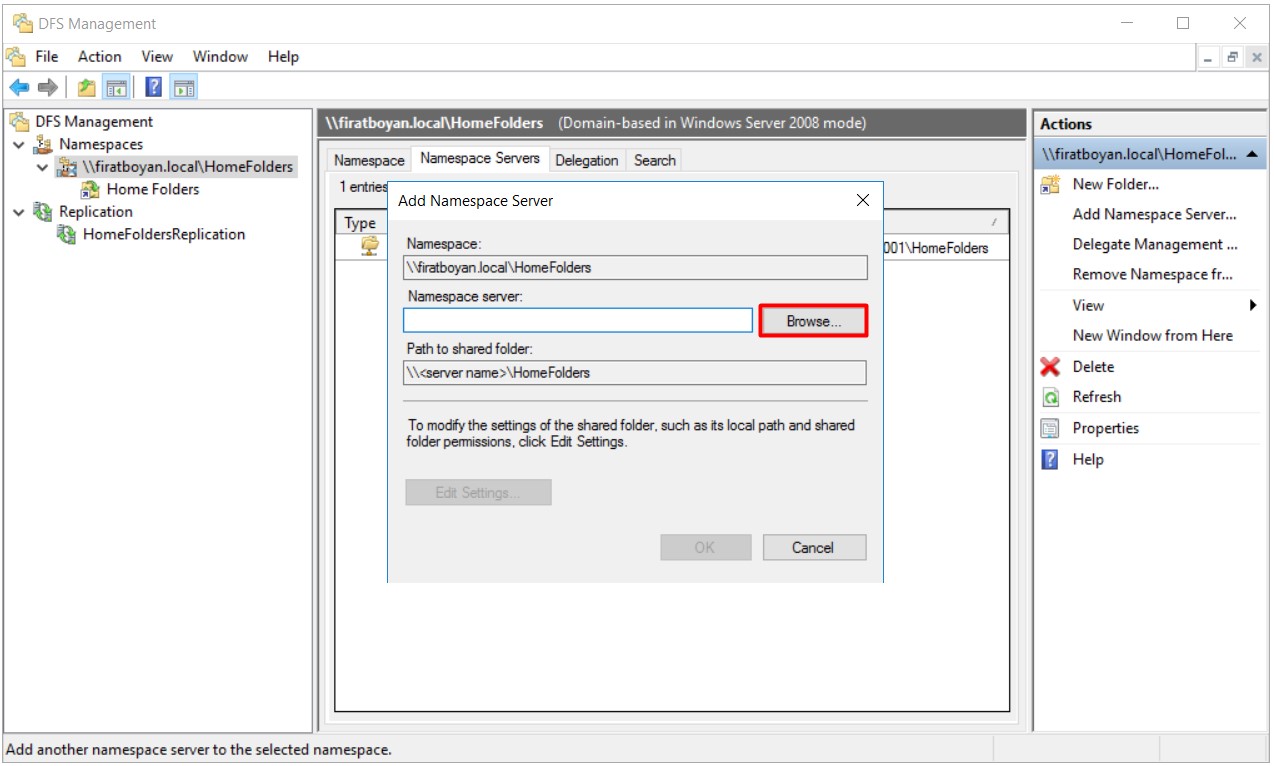
42.1- I will select my DFS Server with FILESRV002 Host Name by clicking on the Browse... button in the window that opens.
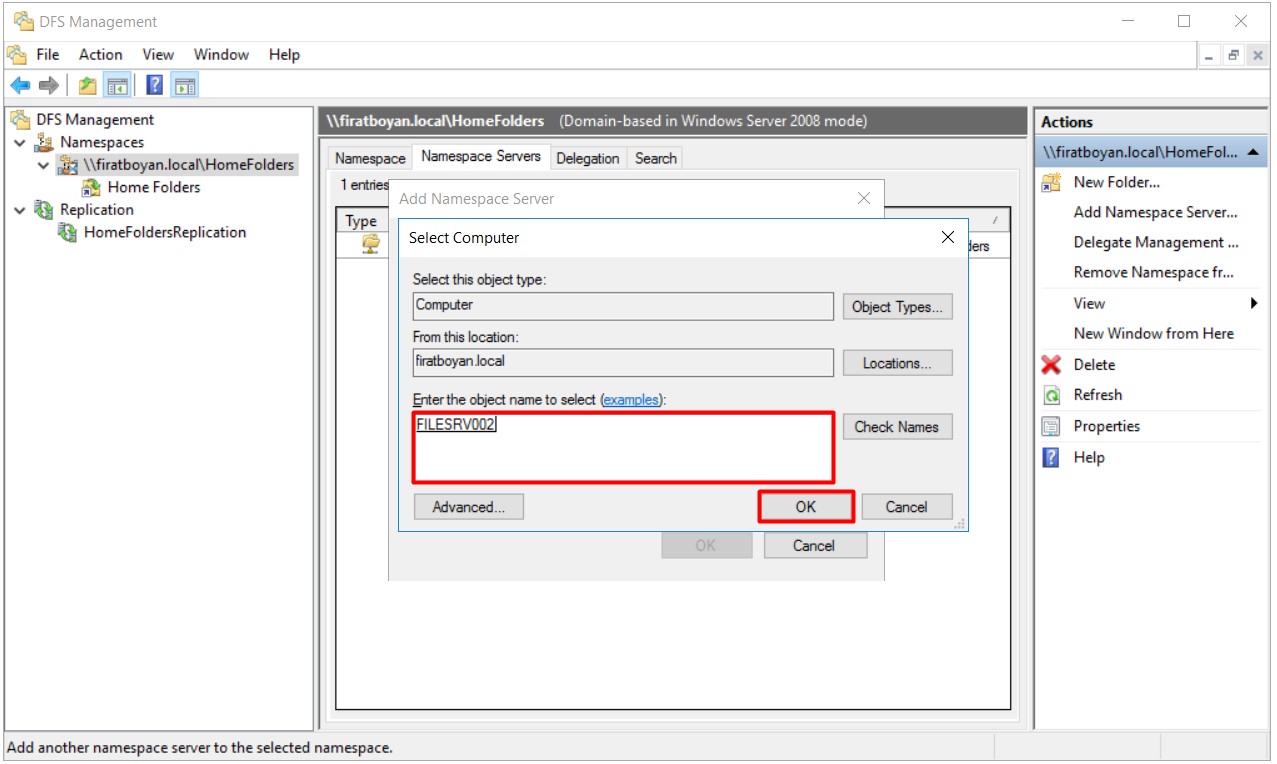
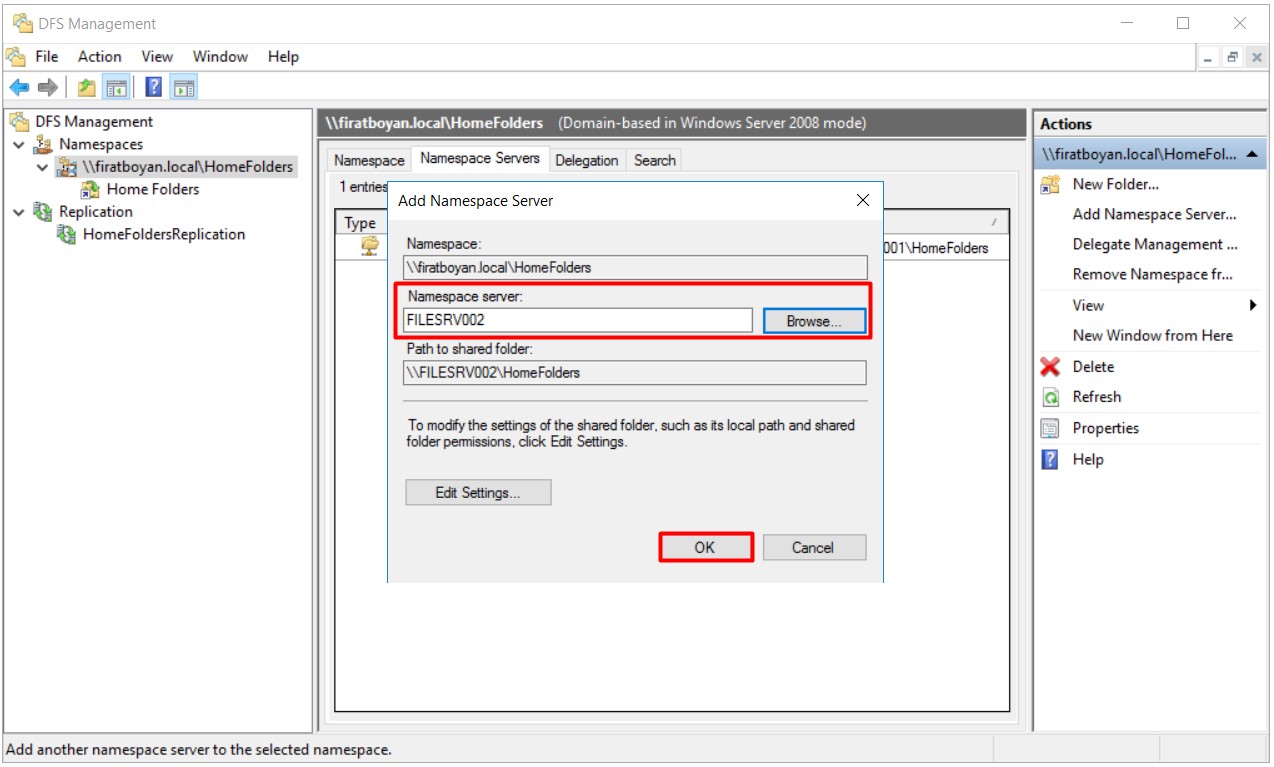
42.2- I have taken the necessary action for High Availability (HA) by adding the DFS Server with the host name of FILESRV002 under Namespace Servers.
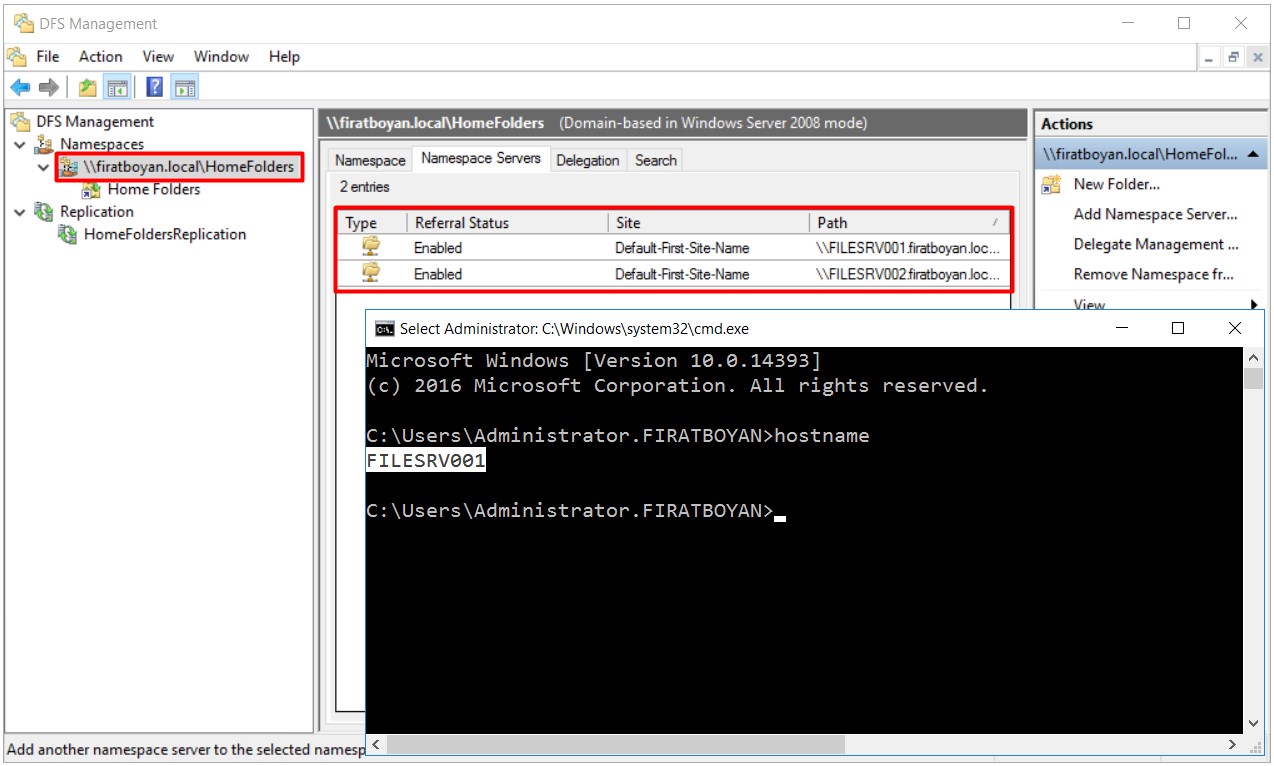
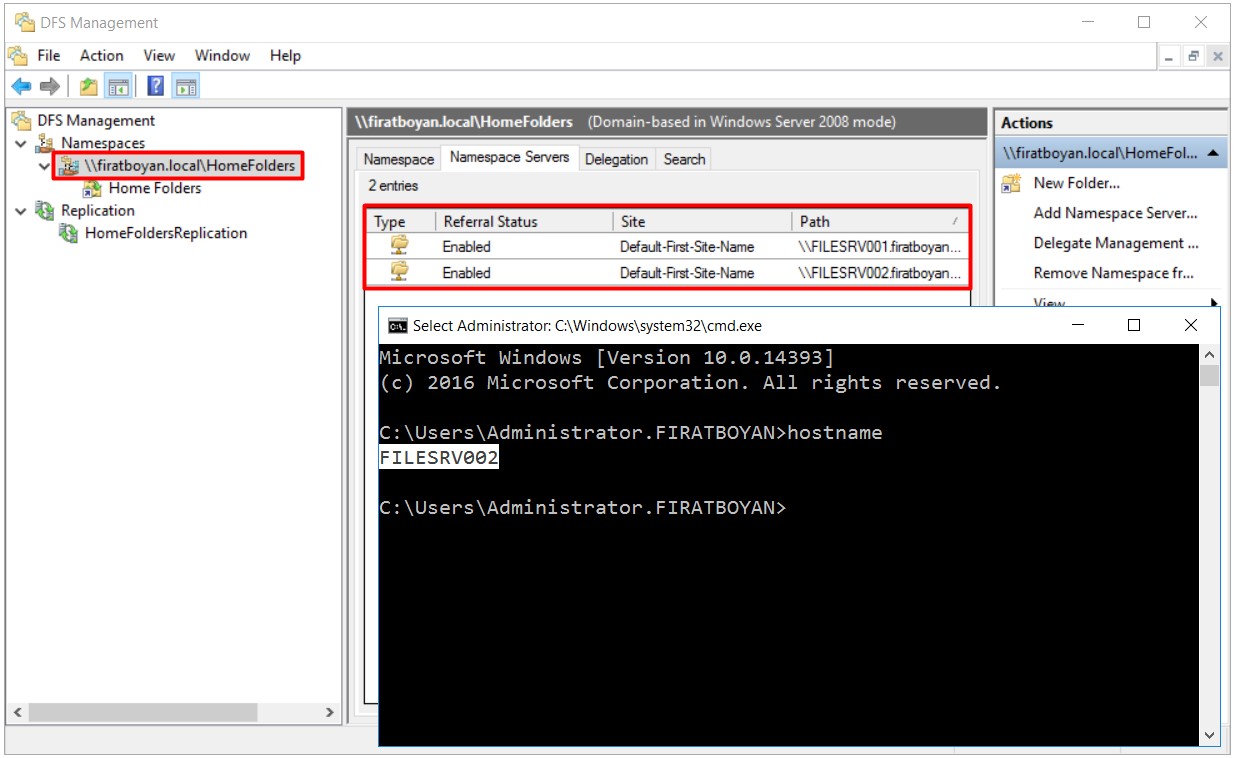
42.3- I can see that the Namespace Server is added on the DFS Management in my DFS Server with the host name of FILESRV002.
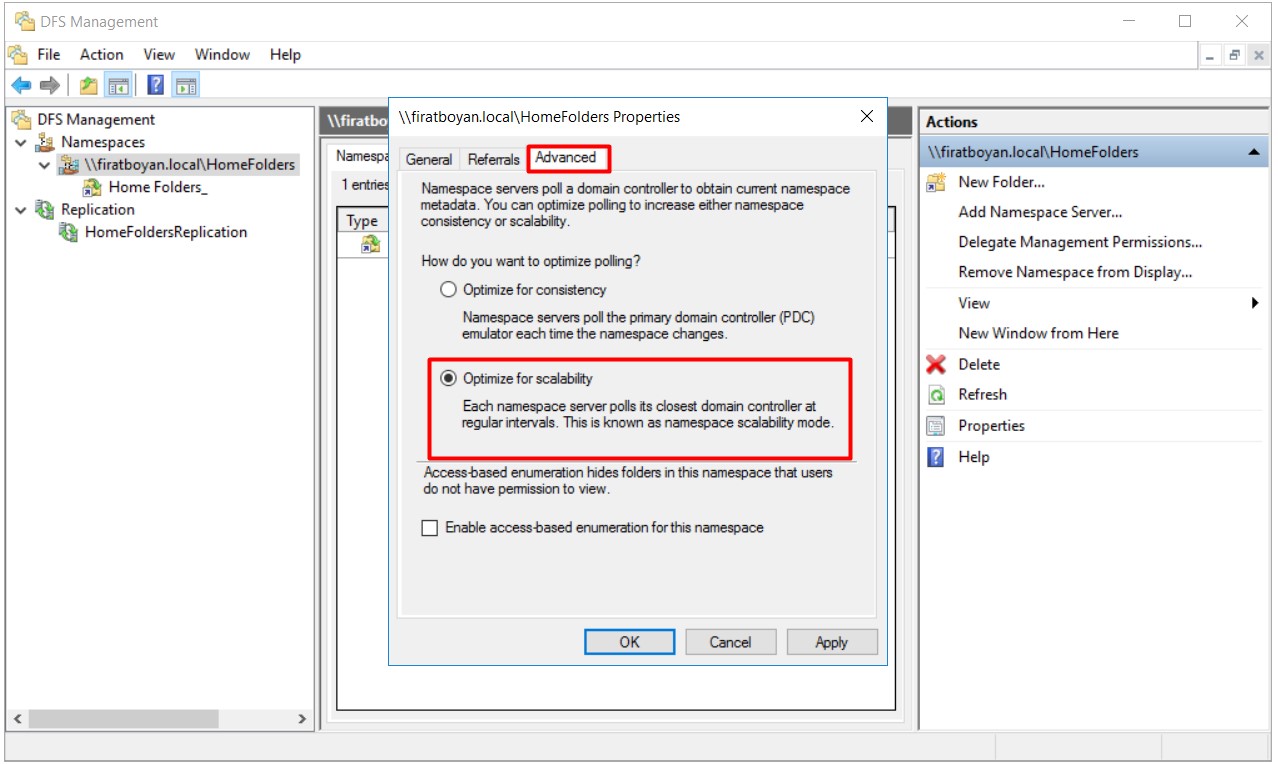
43- Another process that I strongly recommend is to ensure that all member DFS servers in the replication group can be accessed from the Active Directory SITE where they are located. I am right clicking on Namespaces under DFS Management and select Properties to perform this action.
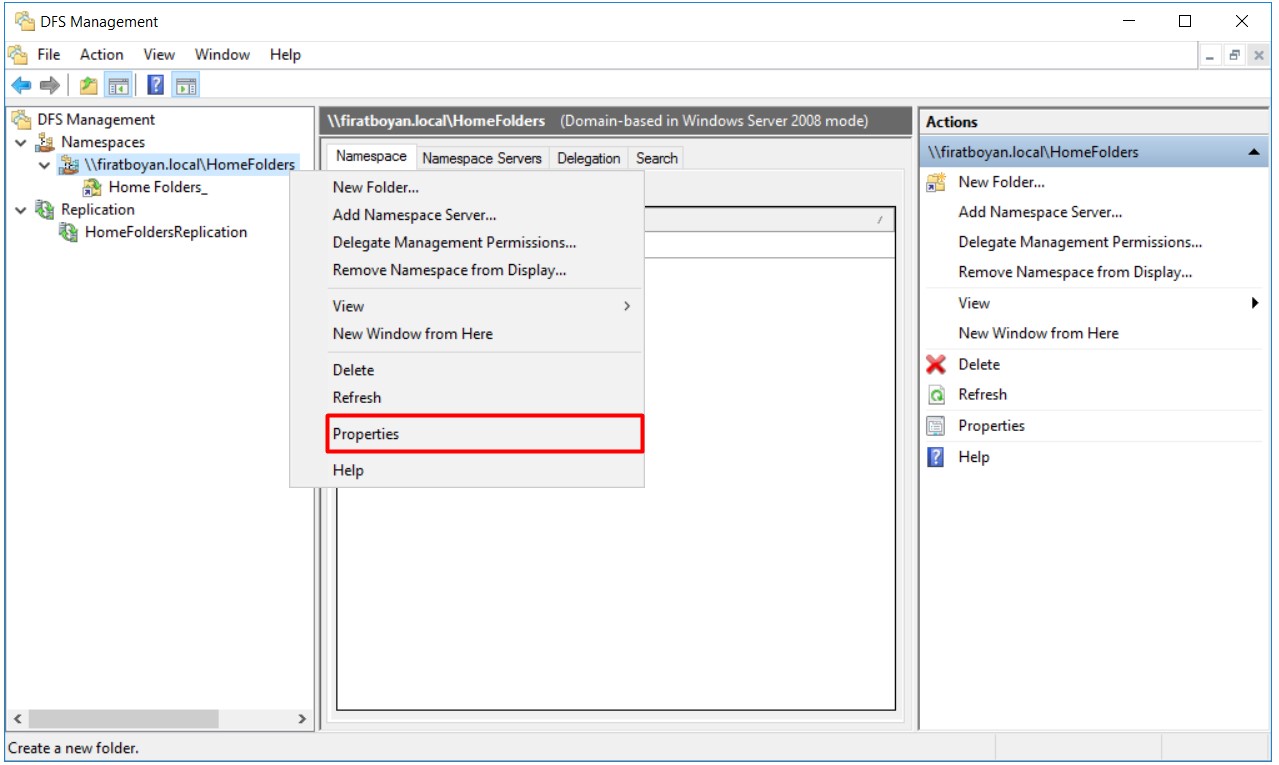
43.1- I am selecting the option of Optimize for scalability option under the Advanced tab in the window that opens.
DFS- Distributed File System High Availability TEST Phase
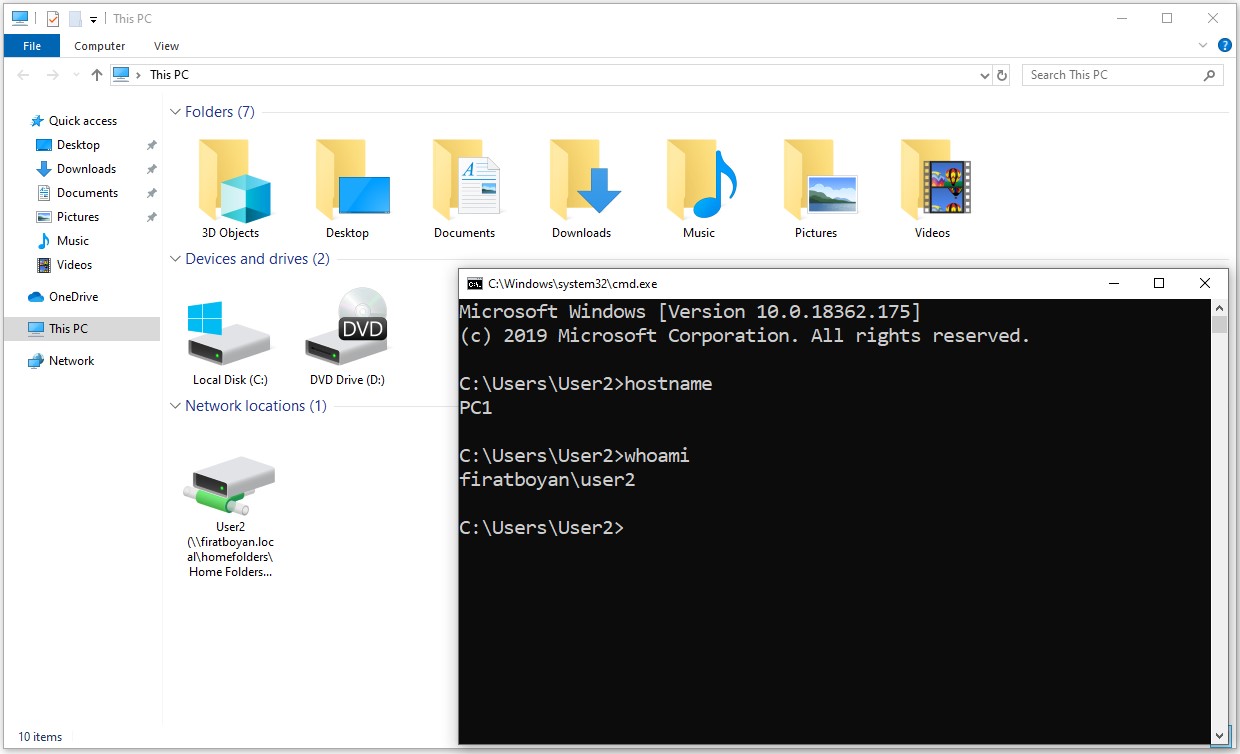
44- I am logging on to a Windows 10 computer with an Active Directory user. I can see the Home Folder that I mapped before under my DFS Namespace .
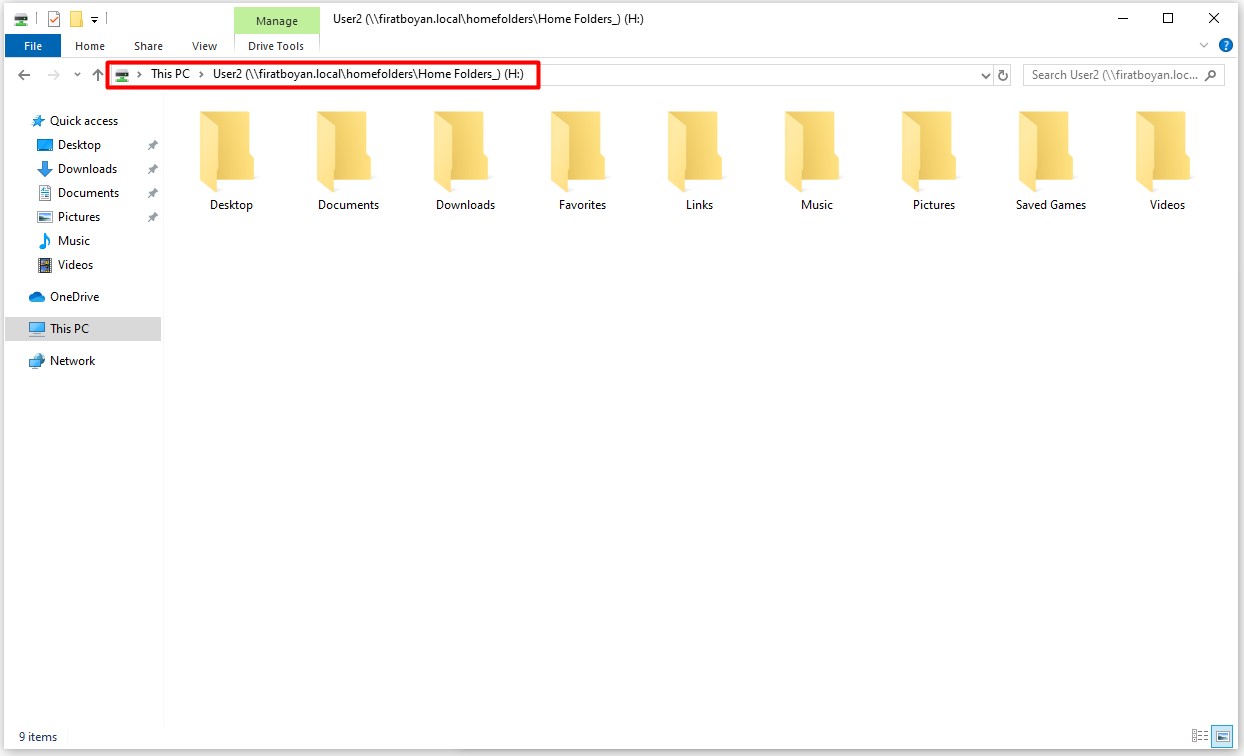
44.1- I see the Active Directory user's Profile folders when I enter the Home Folder I mapped.
44.2- I am creating a few folders by entering the desktop folder. By the way, please keep in mind that you can see the active DFS Server under the DFS tab by right clicking on the folder and selecting the folder properties.
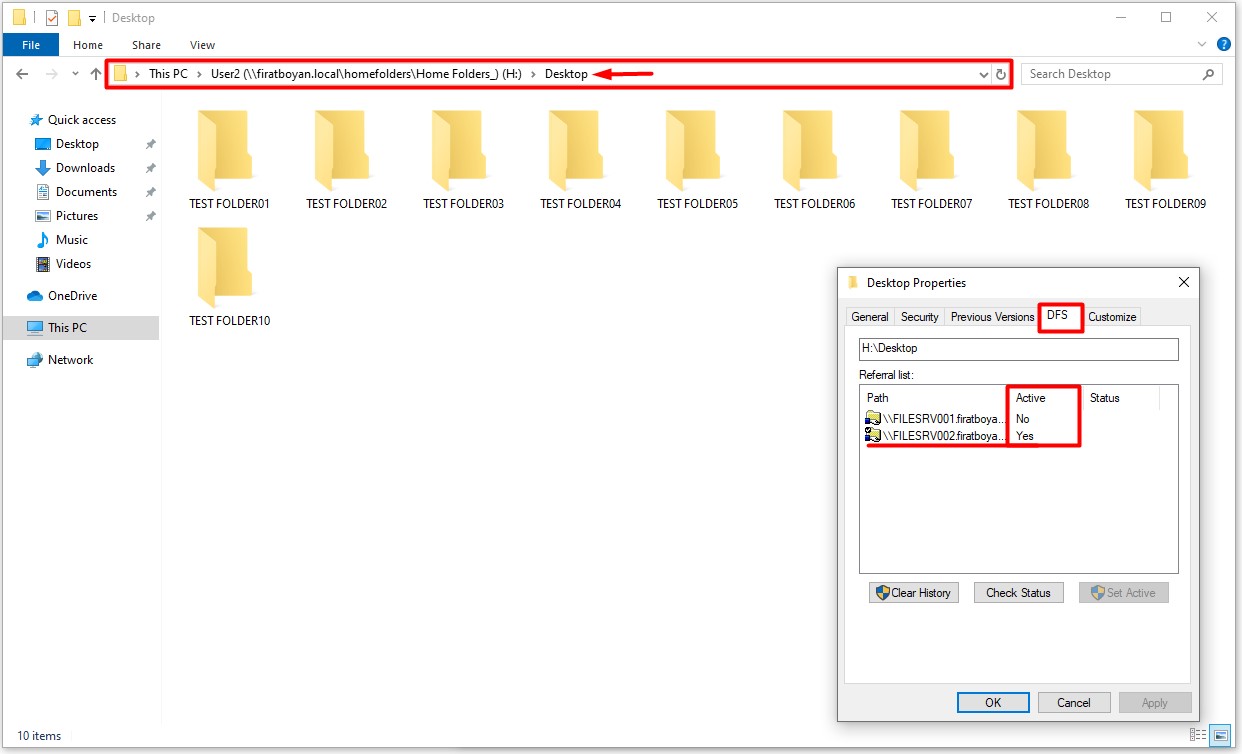
44.3- I can see that the folders I created in the Desktop folder on the Active Directory user's Map are replicated to the shared folder of Home Folders on the NTFS Volumes of all member DFS servers in the replication group.
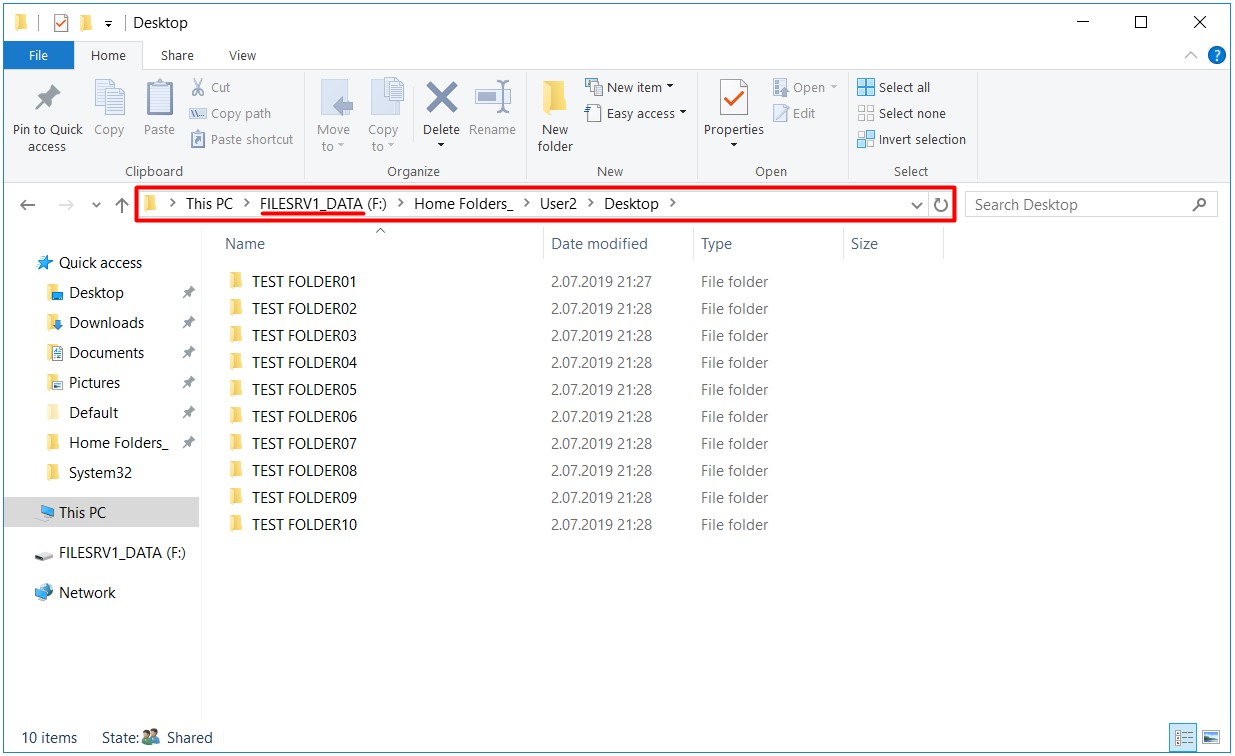
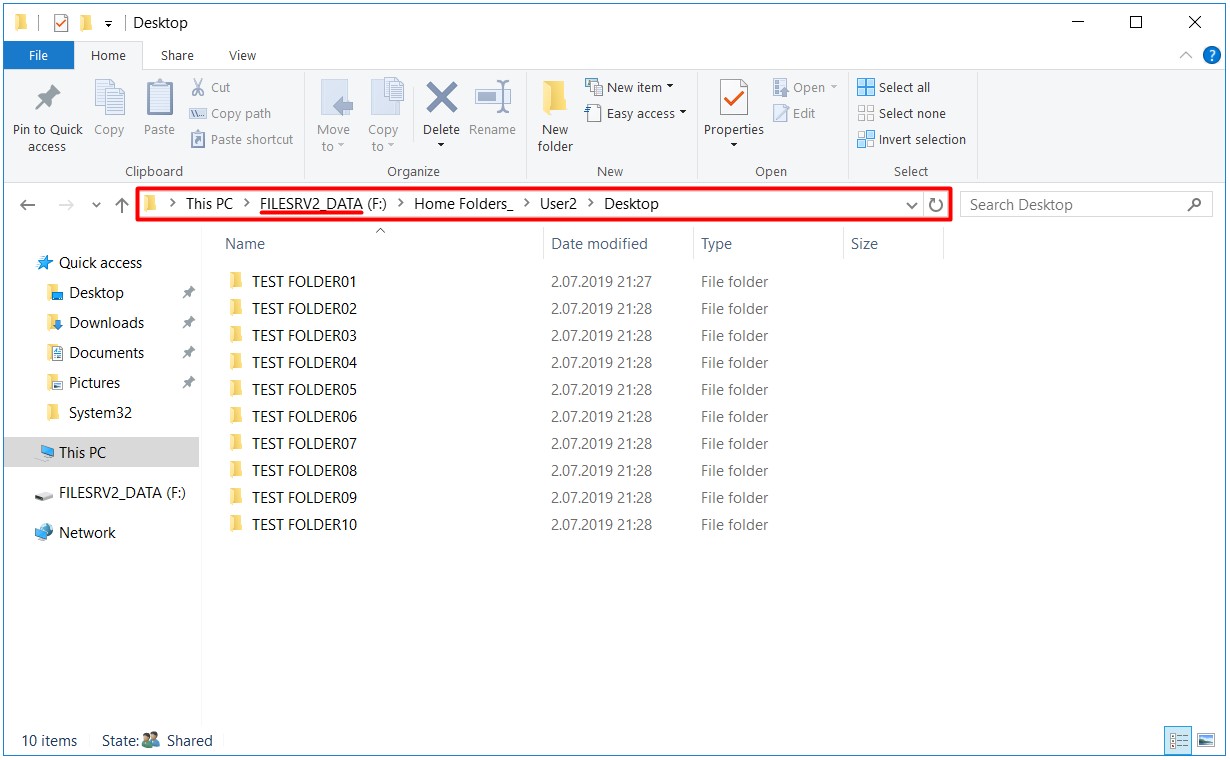
45- I am switching my active DFS Server with the host name of FILESRV002 to DOWN state.
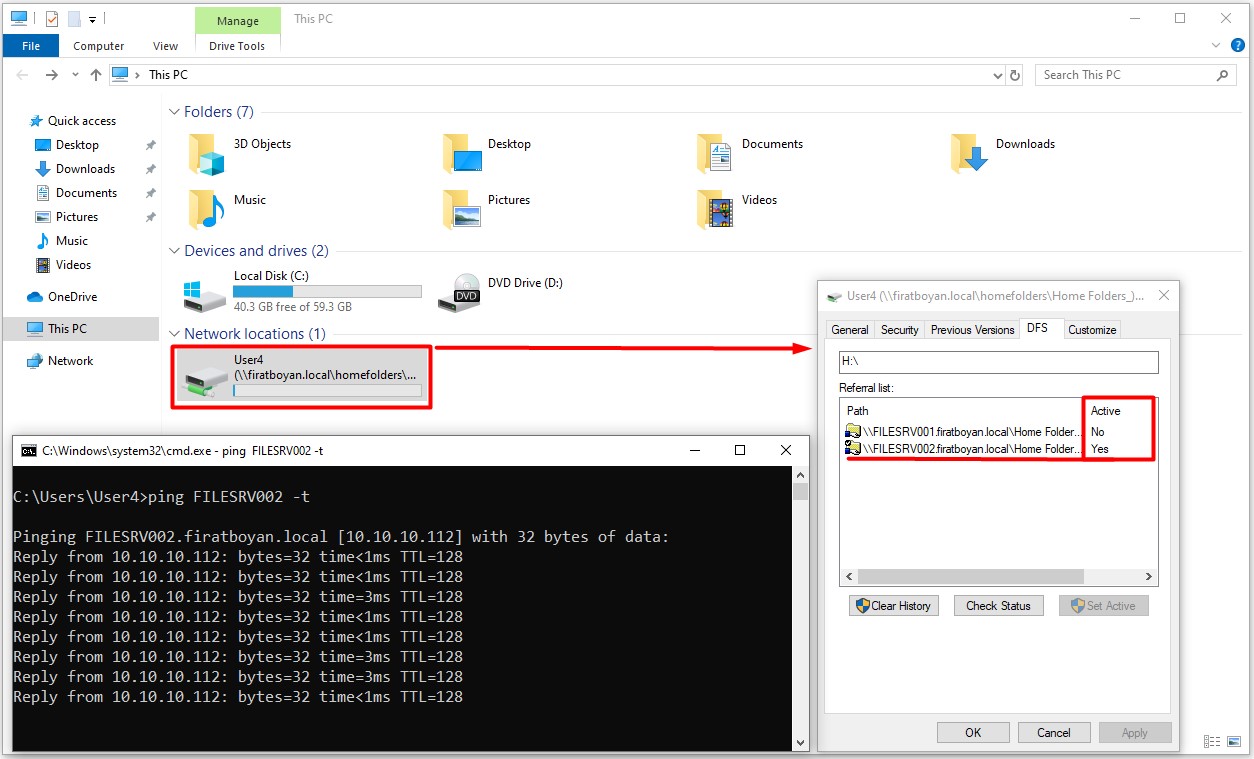
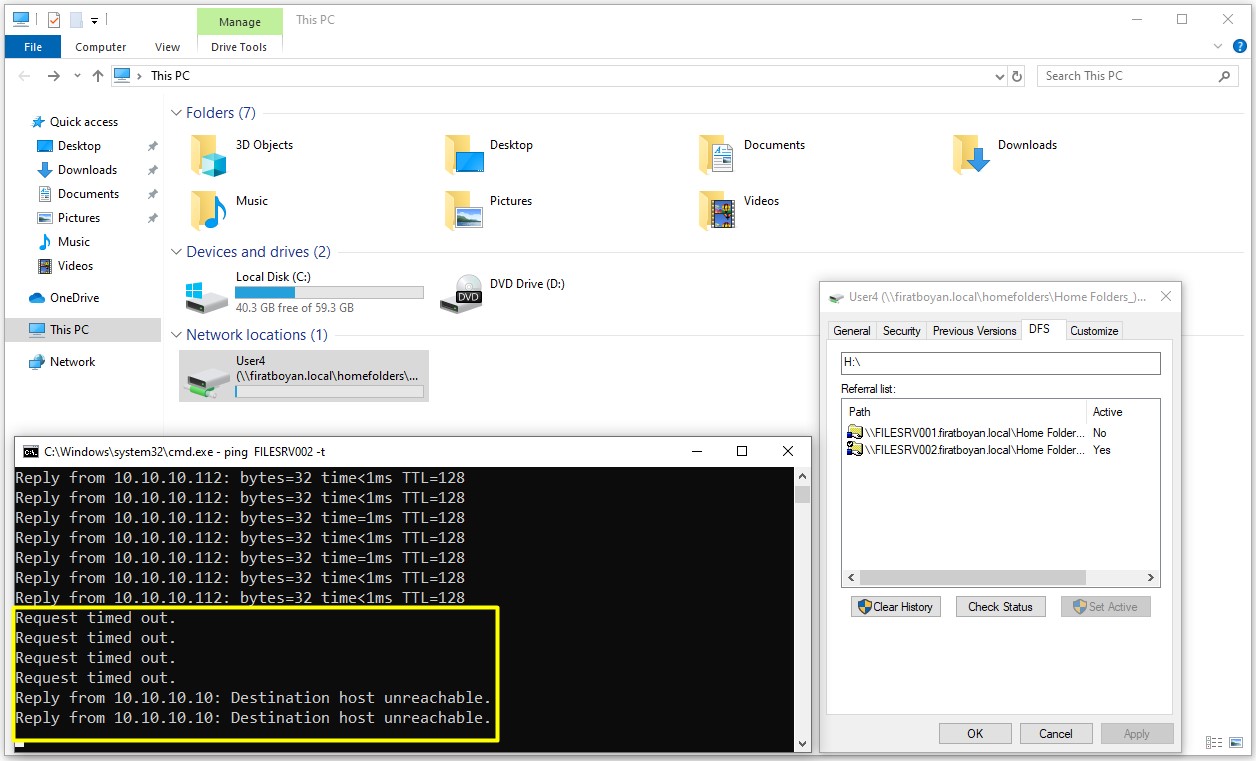
46- After turning my active DFS Server with the Host Name of FILESRV002 into DOWN state, when I want to access the Shared folder with Map again, I see that even though the server is in DOWN state, it can be accessed. Again, when I check the DFS tab, I can see that the Active DFS Server is the DFS Server with Host Name of FILESRV001.
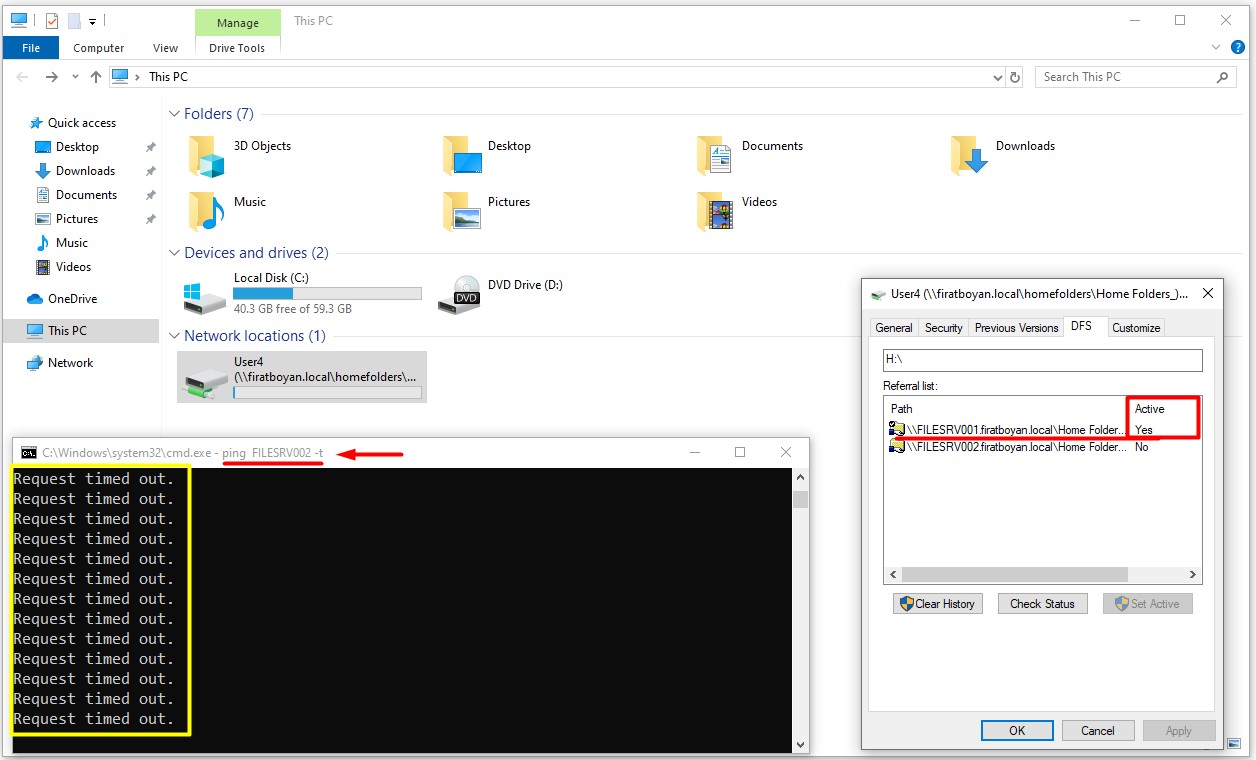
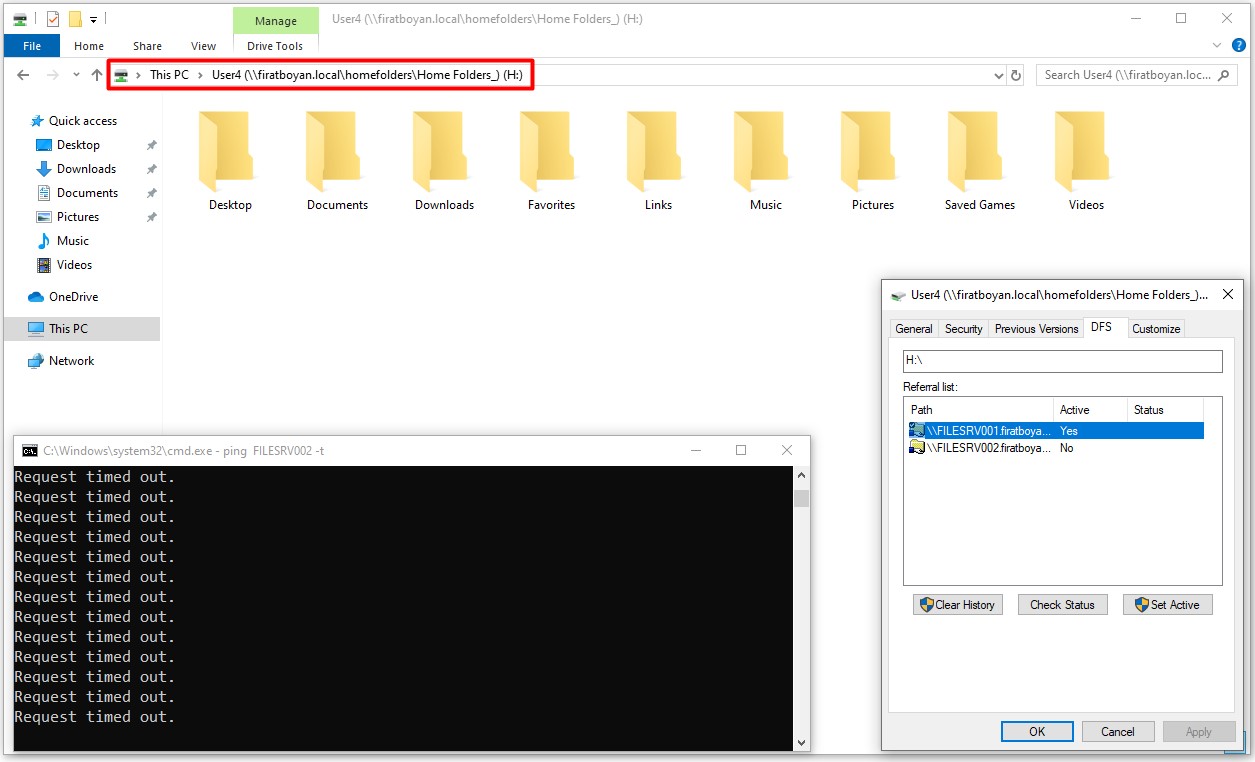
I have managed providing uninterrupted access to resources in this way.
I hope it benefits...
Tags: Dfs Server, DFS Server Setup on Windows Server 2016, DFS namespace creation, DFS failover cluster configuration, DFS cluster setup, DFS HA Setup, DFS failover setup, Dfs high availability setup, dfs replication settings, dfs replication configuration.
You may submit your any kind of opinion and suggestion and ask anything you wonder by using the below comment form.